
Packing List
Name | Details | PNP Version | RTF Version |
Fuselage | LD-B20 Drone | 1 | 1 |
Transmitter | RadioLink T12D | 1 | |
Receiver | RadioLink R16SM | 1 | |
FC/ESC | RadioLink All-In-One Flight Controller ArduBeta-PIX | 1 | 1 |
Motor | SZ-SPEED Brushless Motor | 4 | 4 |
Propeller | HQ T3*3*3 | 4 | 4 |
Battery | Gensace 4S 850mah 40C Battery | 1 | 1 |
HY 2S 1700mAh Battery | 1 | ||
Charger | Gensace B6 Charger | 1 | 1 |
RadioLink CM210 Charger (with a cable) | 1 | ||
Cables | Type-C cable | 1 | 1 |
ELRS Receiver Connect Cable | 1 | ||
Hex Wrench | 1.5mm& 2.0mm Hex Wrench | 2 | 2 |
Bag | Portable Bag | 1 | 1 |
Parameters
Takeoff Weight | 290g |
Dimension | 218mm |
Material | Carbon Fiber (Frame), Plastic (Ball Shells, Battery Case) |
Signal input supported | CRSF、ELRS、SBUS |
Flight Modes | Alt-Hold mode (low speed), Alt-Hold mode (high speed), Stabilize mode, Turtle mode, Air mode |
Flight Time | 5 Minutes |
Flight Distance | 3000 Meters |
Low Battery Alarm | 14.7V by default. When the battery voltage is lower than 14.7V, the T12D will emit a beeping alarm. |
Theory of Flight
Transmitter
The two joysticks of T12D correspond to the four basic channels respectively.
Note: All of the following are based onT12D Mode 2 (Throttle on the left stick).
Left joystick
Make the LD-B20 rise or descend by toggling the left stick (THROTTLE) vertically upward or downward and turn clockwise or anticlockwise by toggling the left stick (YAW) to the left or right.
Right joystick
Make the LD-B20 fly forward or backward by toggling the right stick (PITCH) vertically upward or downward and to left or right by toggling the right stick (ROLL) to the left or right.
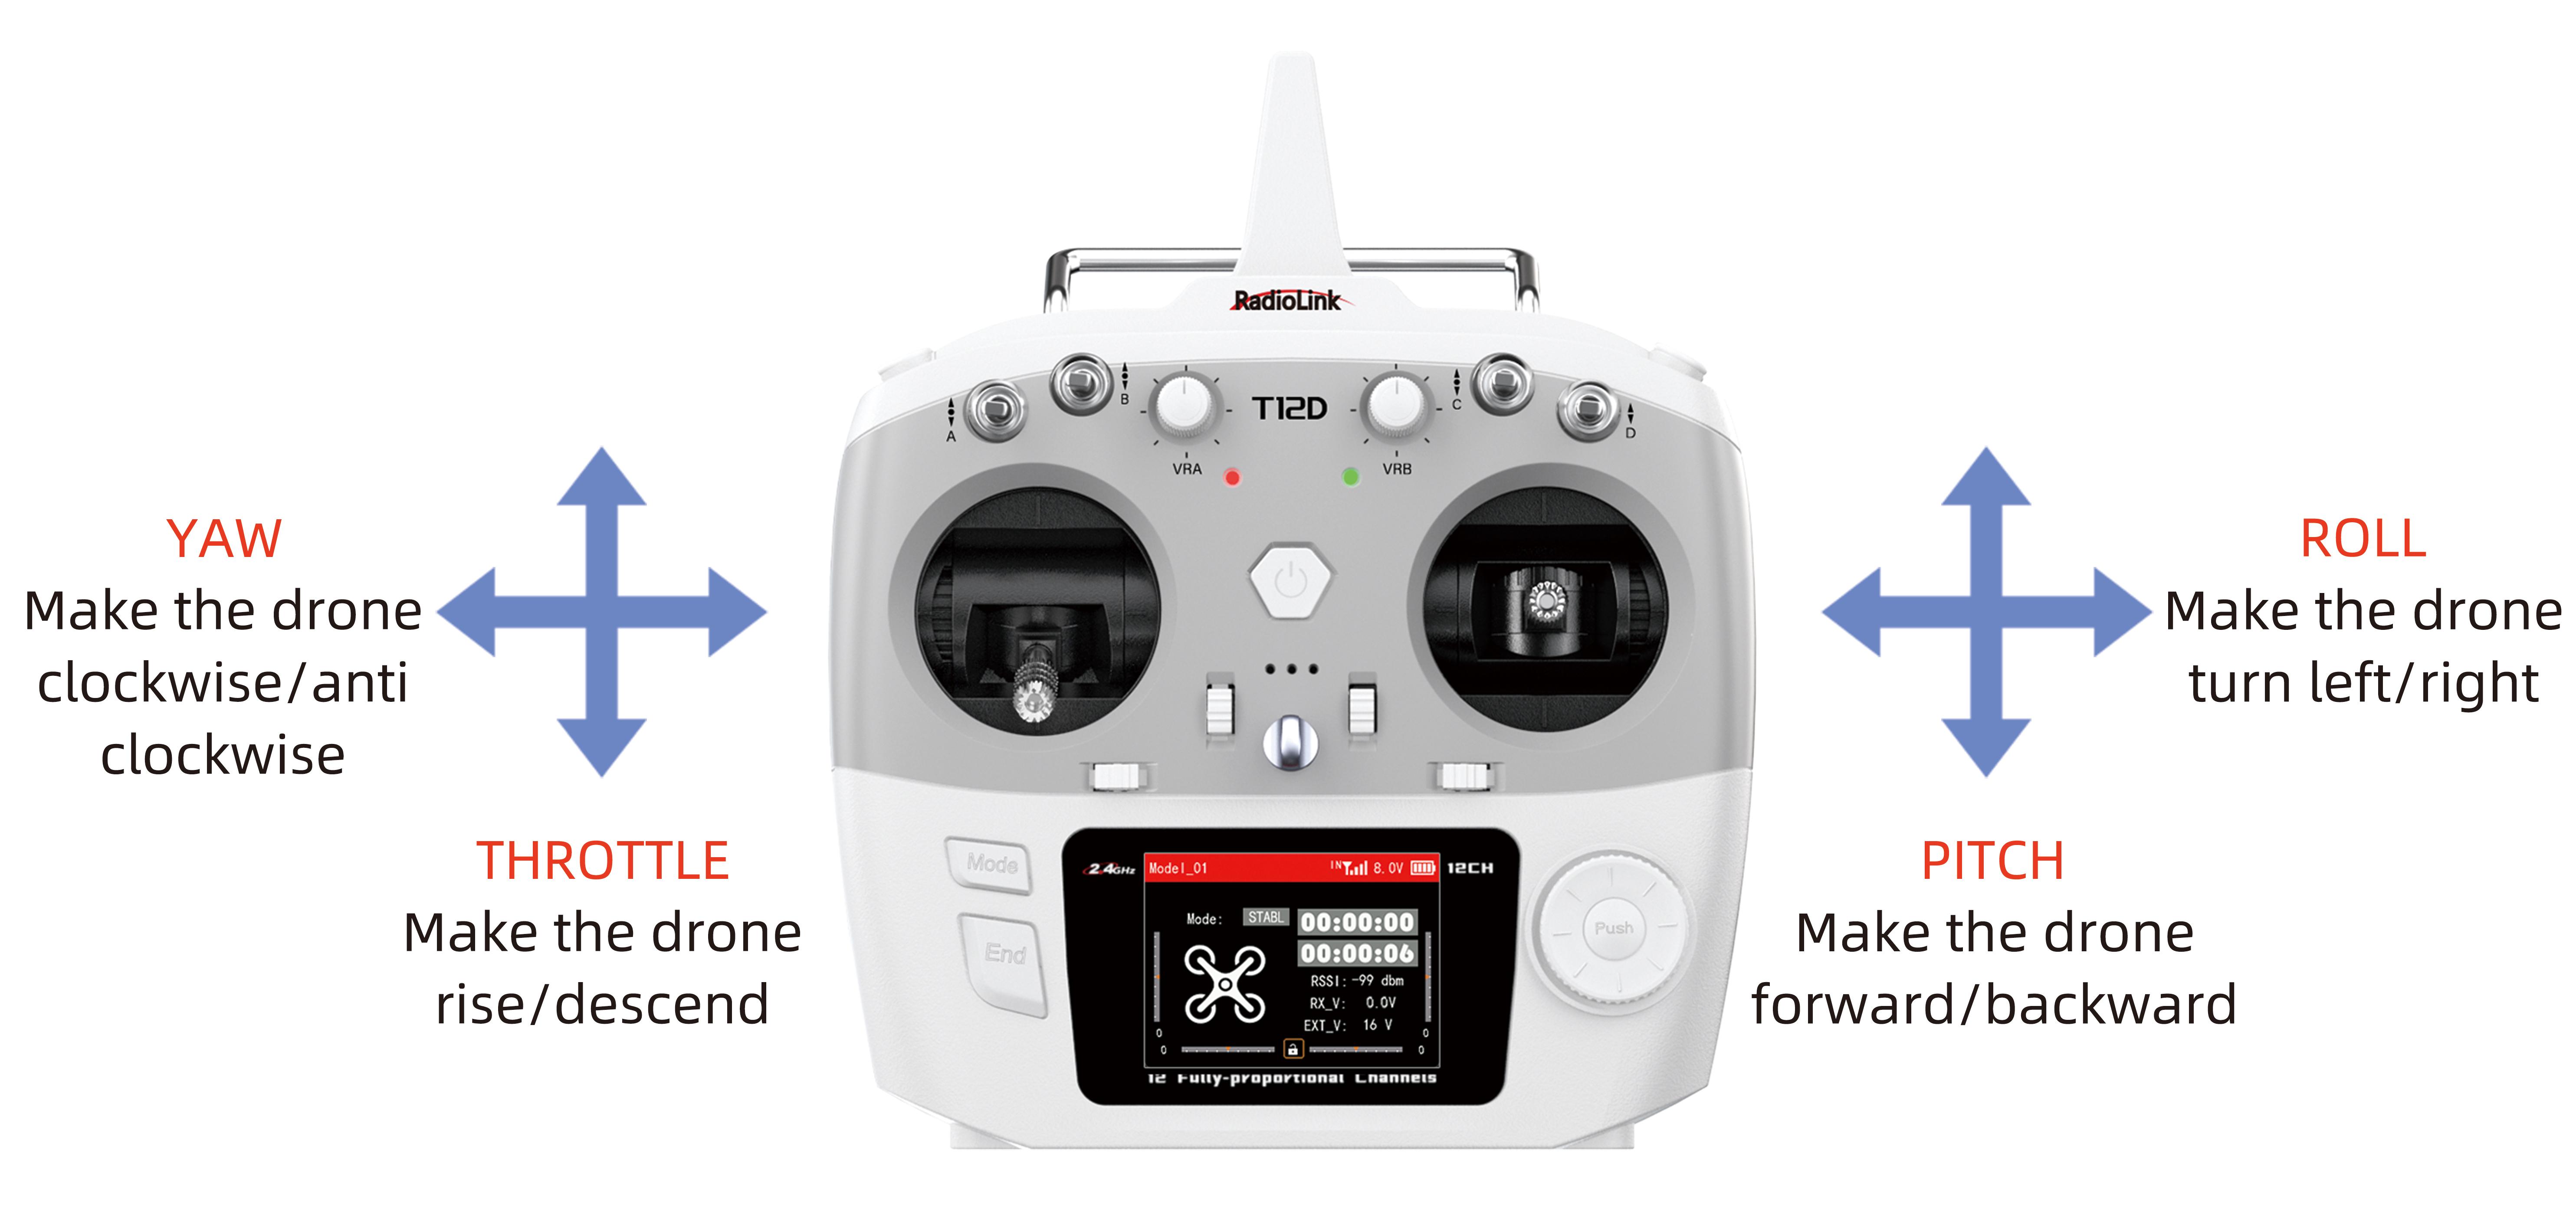
MODE 2
Joysticks & Flight Movements
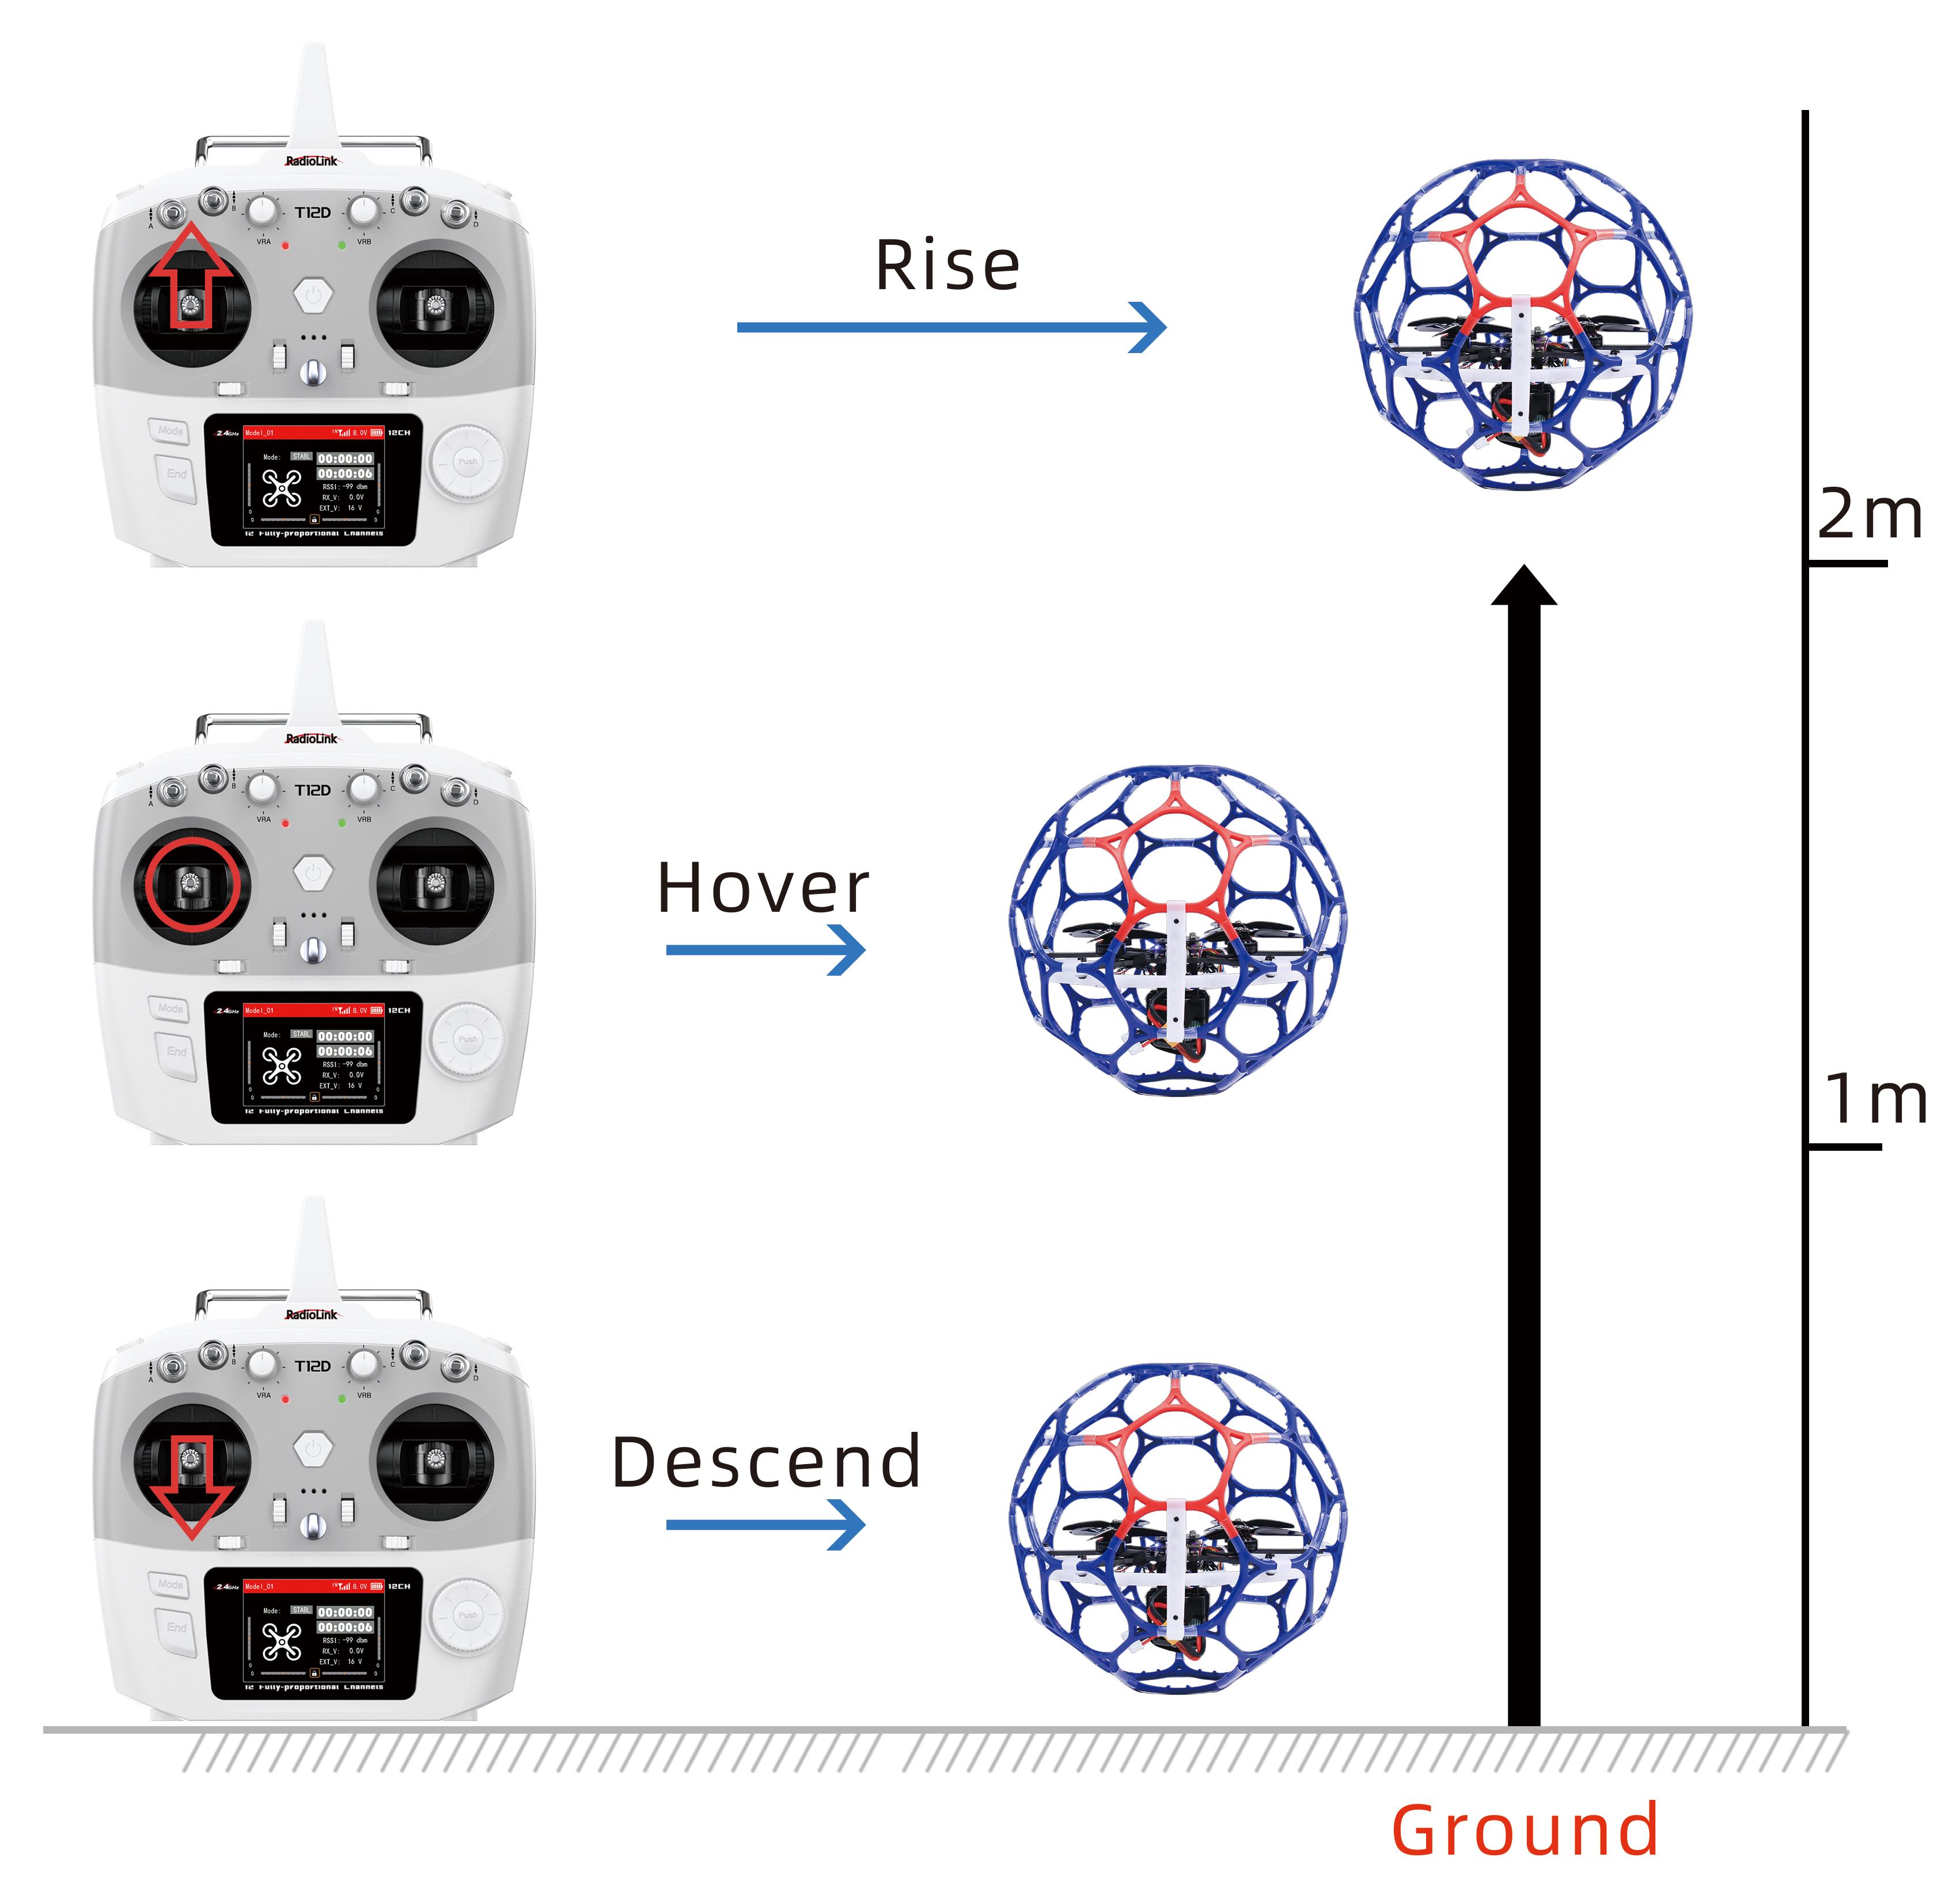
A. Throttle: Rise/ Descend/Hover(Note: Take T12D mode 2 as an example)
Toggle the throttle stick (on the left) vertically upward and LD-B20 will rise and toggle the throttle vertically downward, then LD-B20 descends.
B. Yaw: Clockwise/Anticlockwise
Toggle the yaw stick (on the left) to the left and LD-B20 will turn anticlockwise and toggle the yaw stick to the right, then LD-B20 turns clockwise.
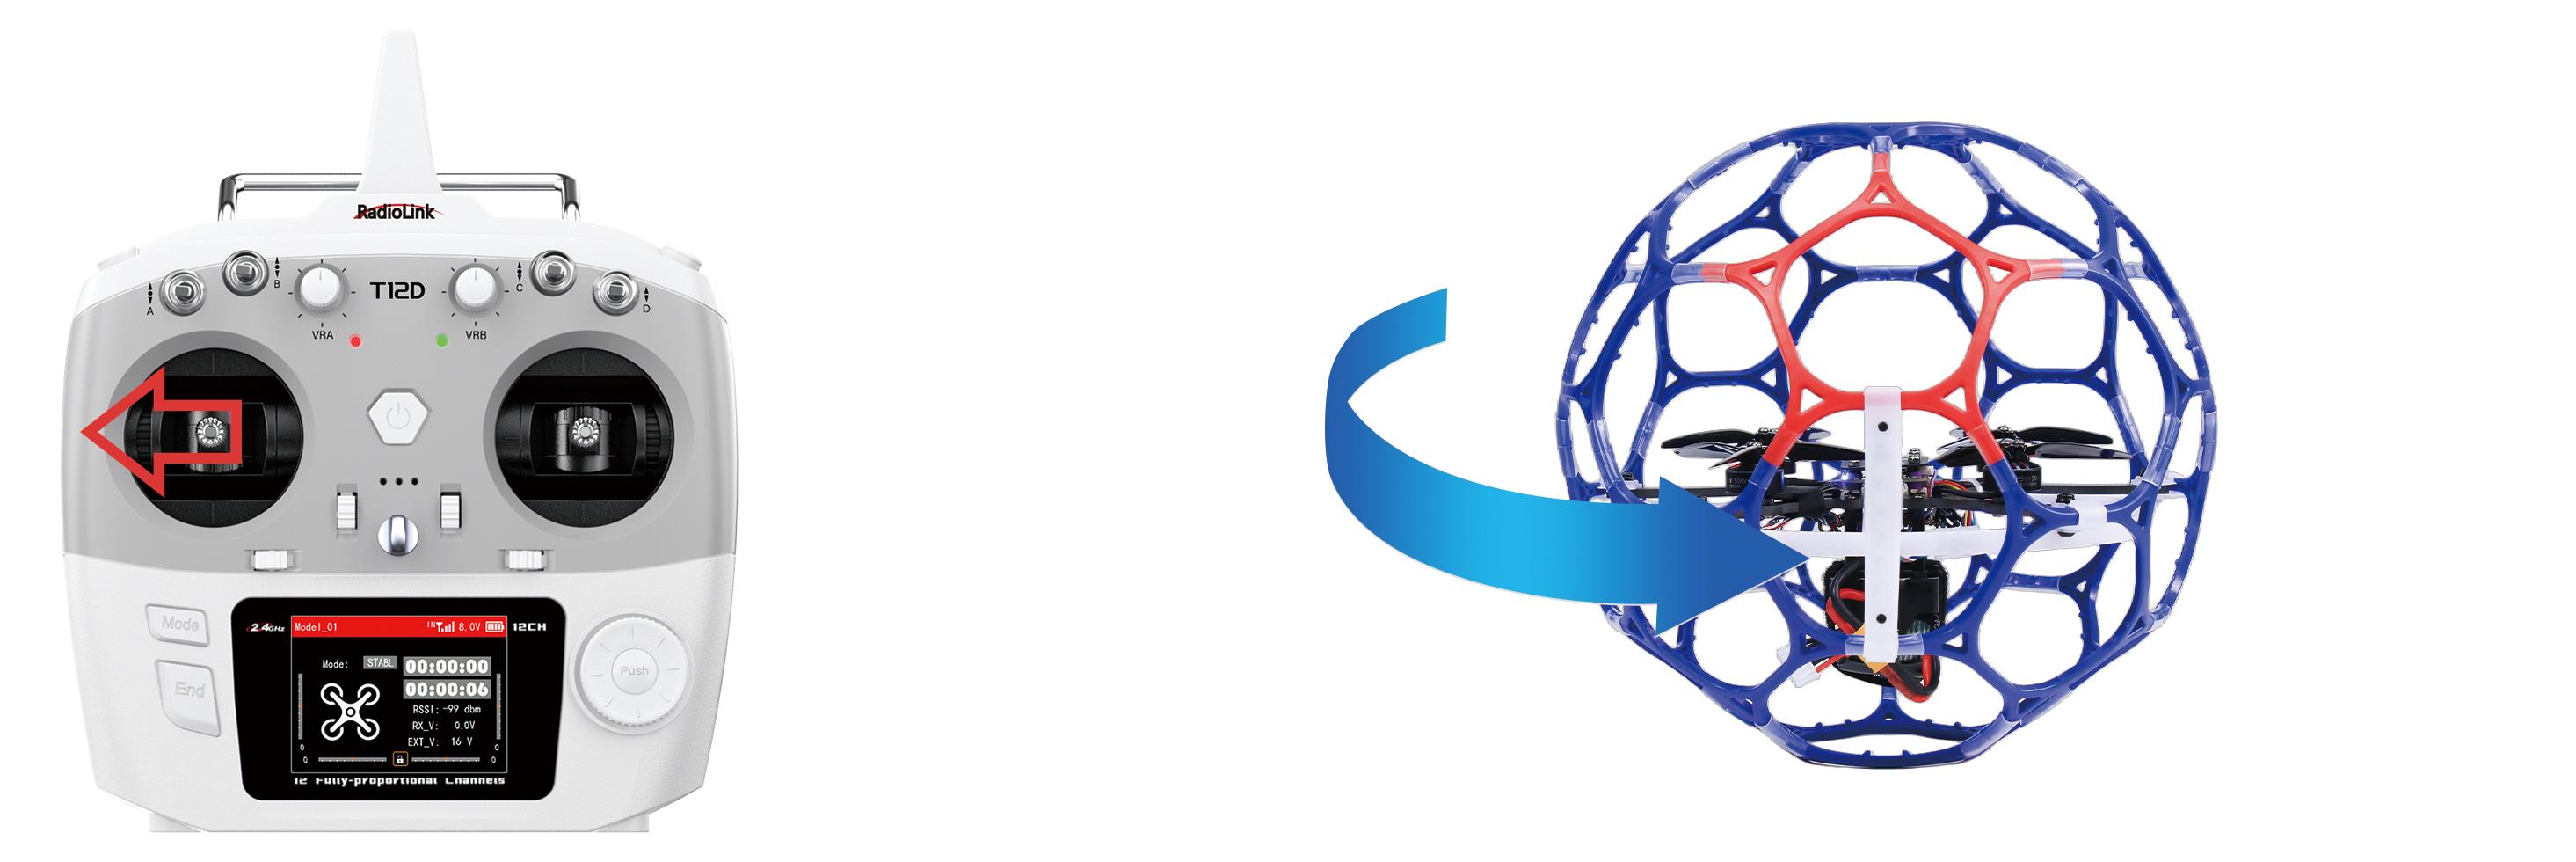
Yaw stick to the left, LD-B20 turns anticlockwise
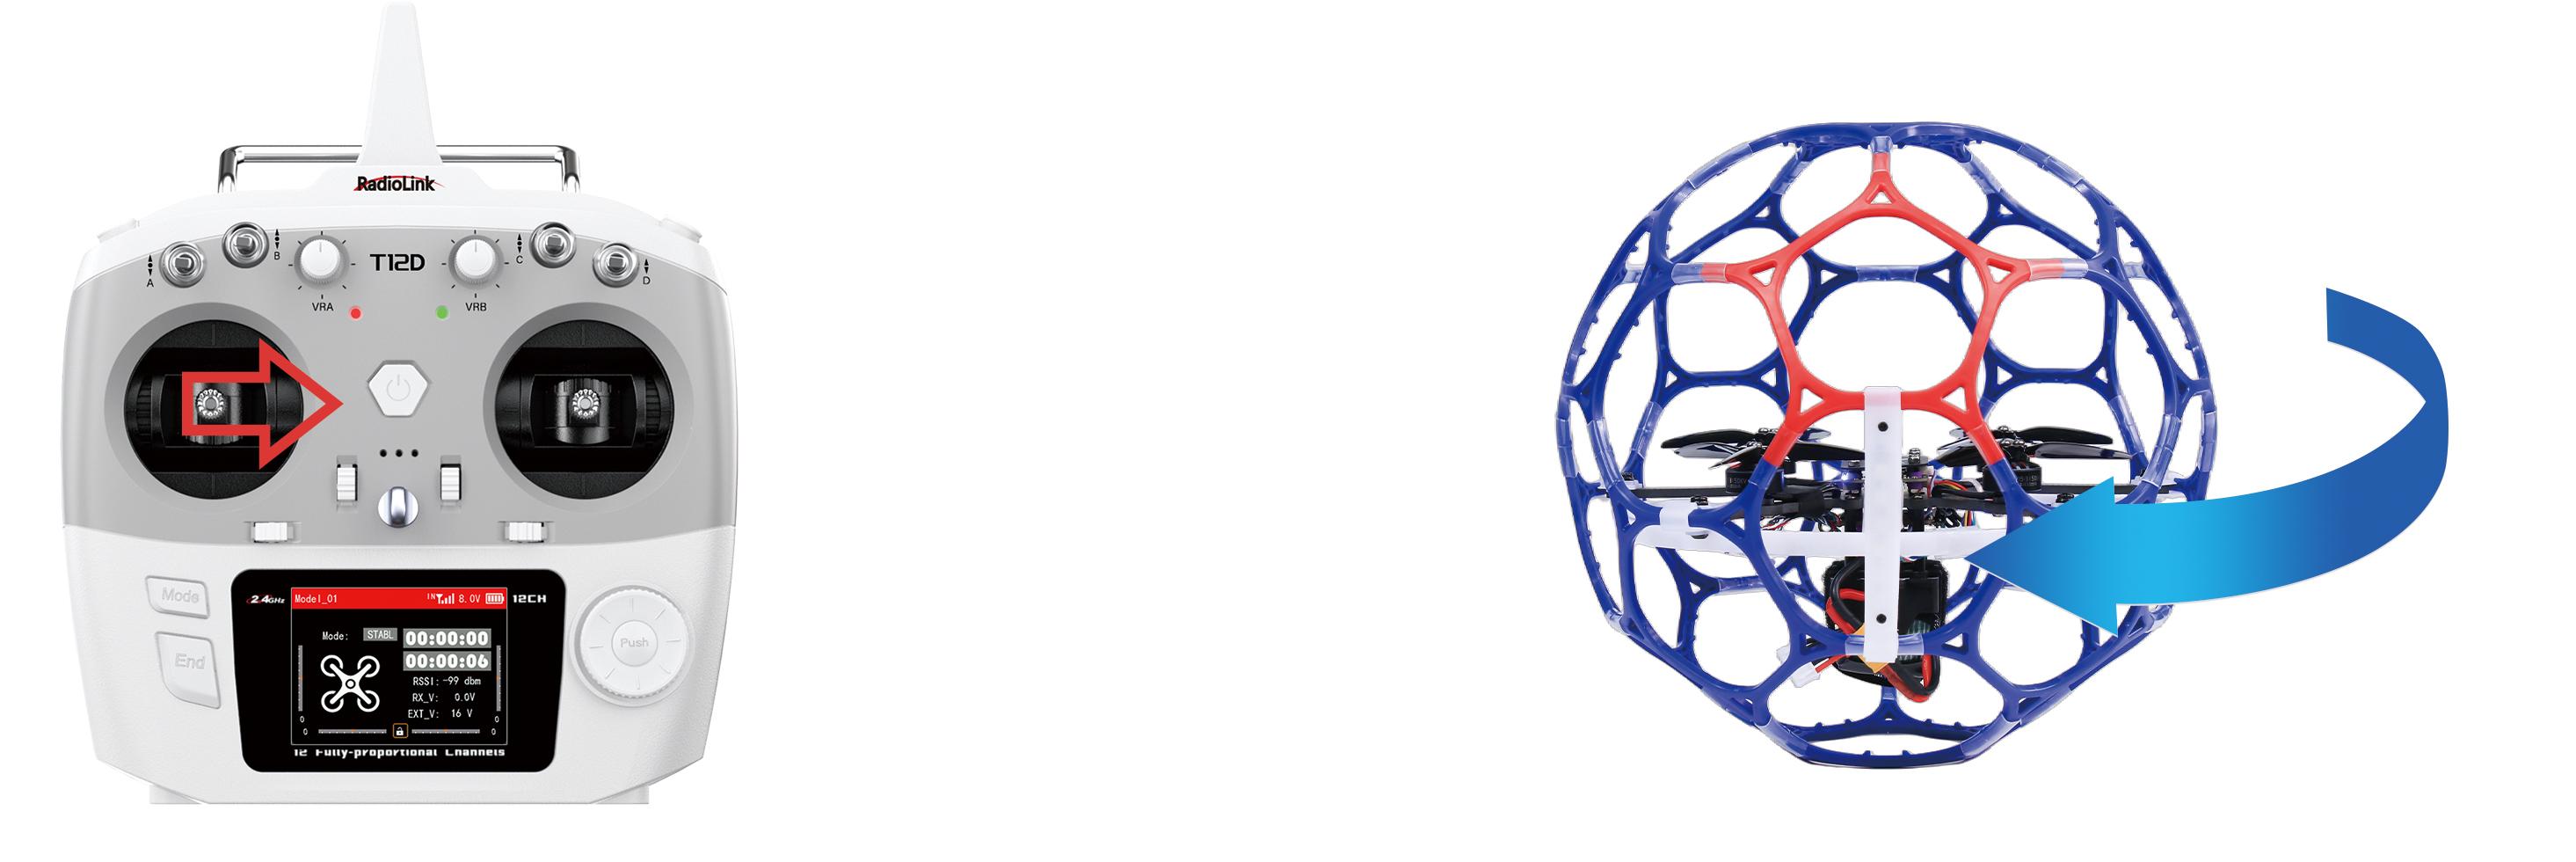
Yaw stick to the right, LD-B20 turns clockwise
C. Pitch: Forward/Backward
Toggle the pitch stick (on the right) vertically upward and LD-B20 will fly forward and toggle the pitch stick vertically downward, then LD-B20 flies backwards.
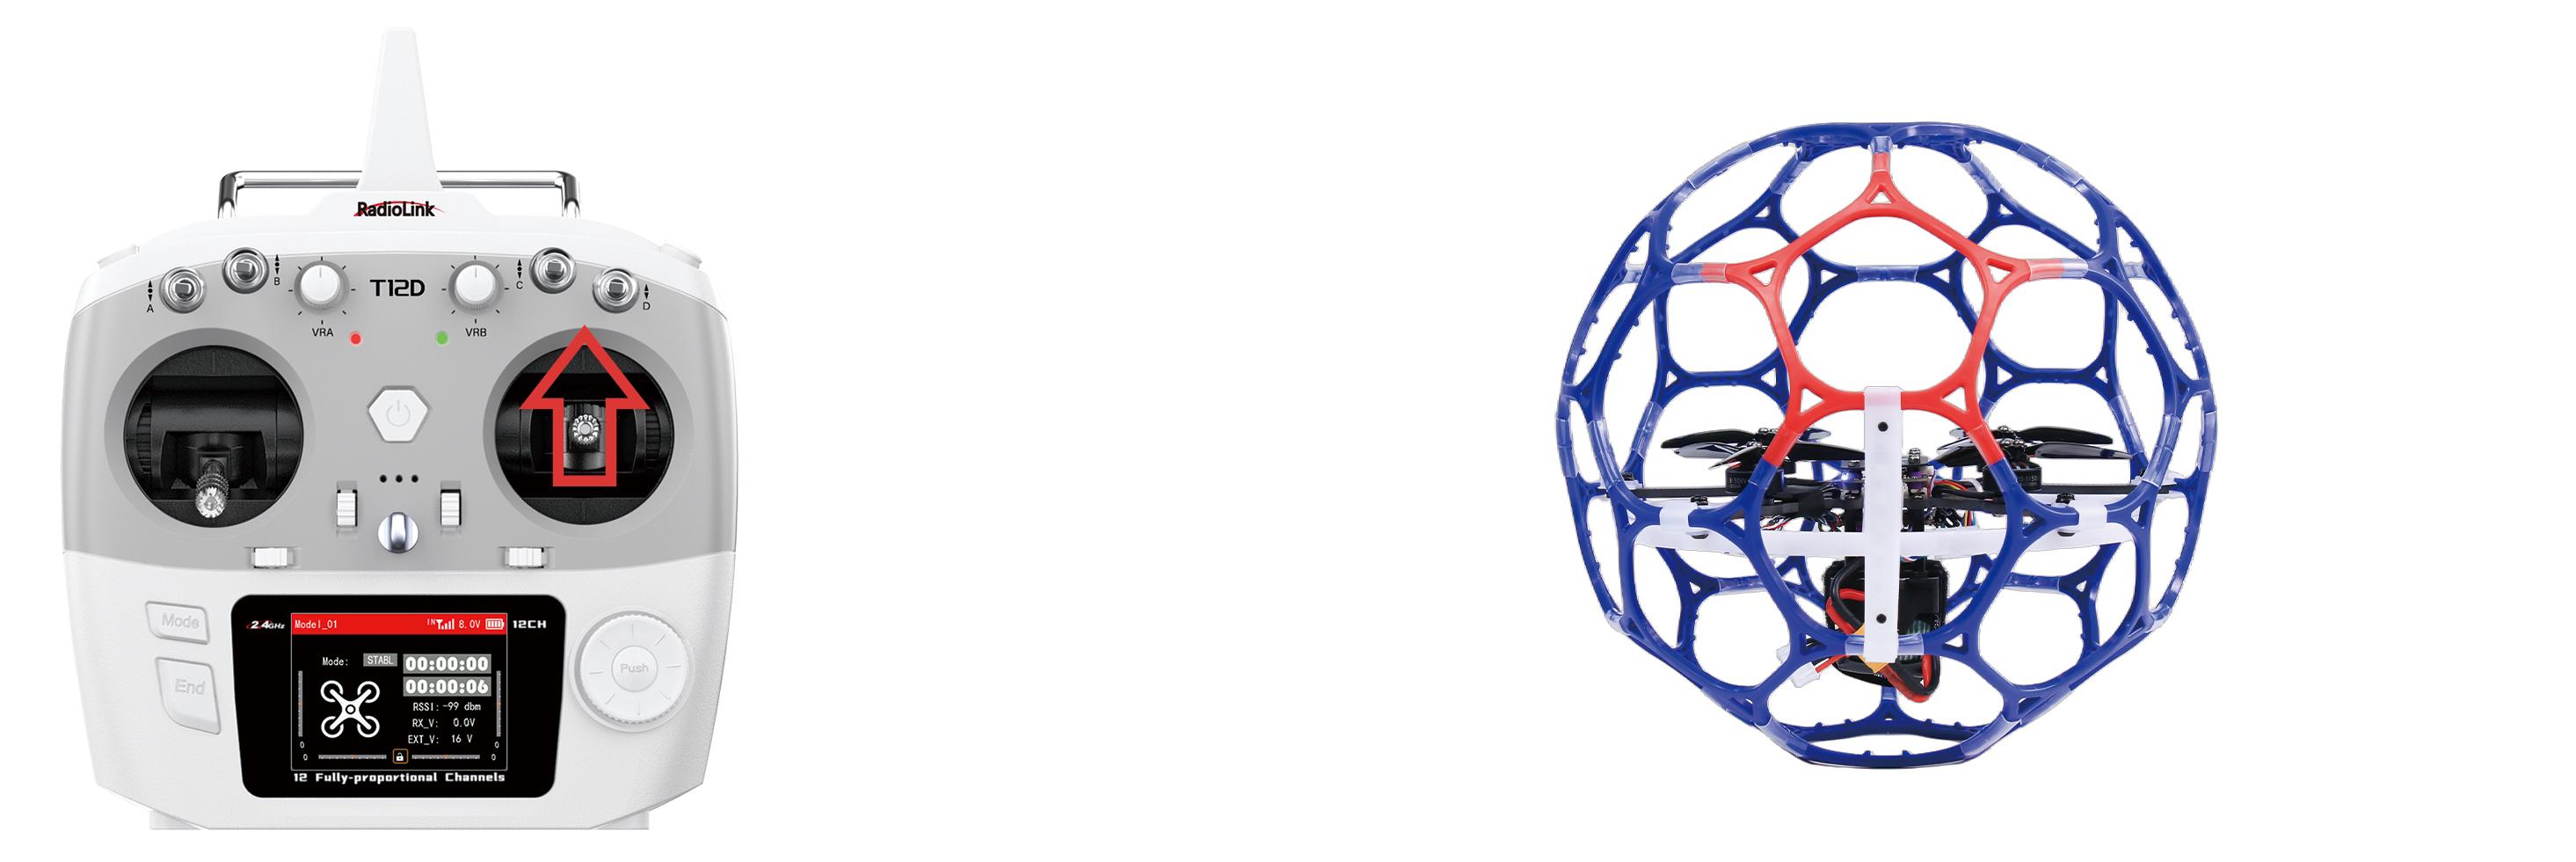
Pitch stick upward, LD-B20 moves forward
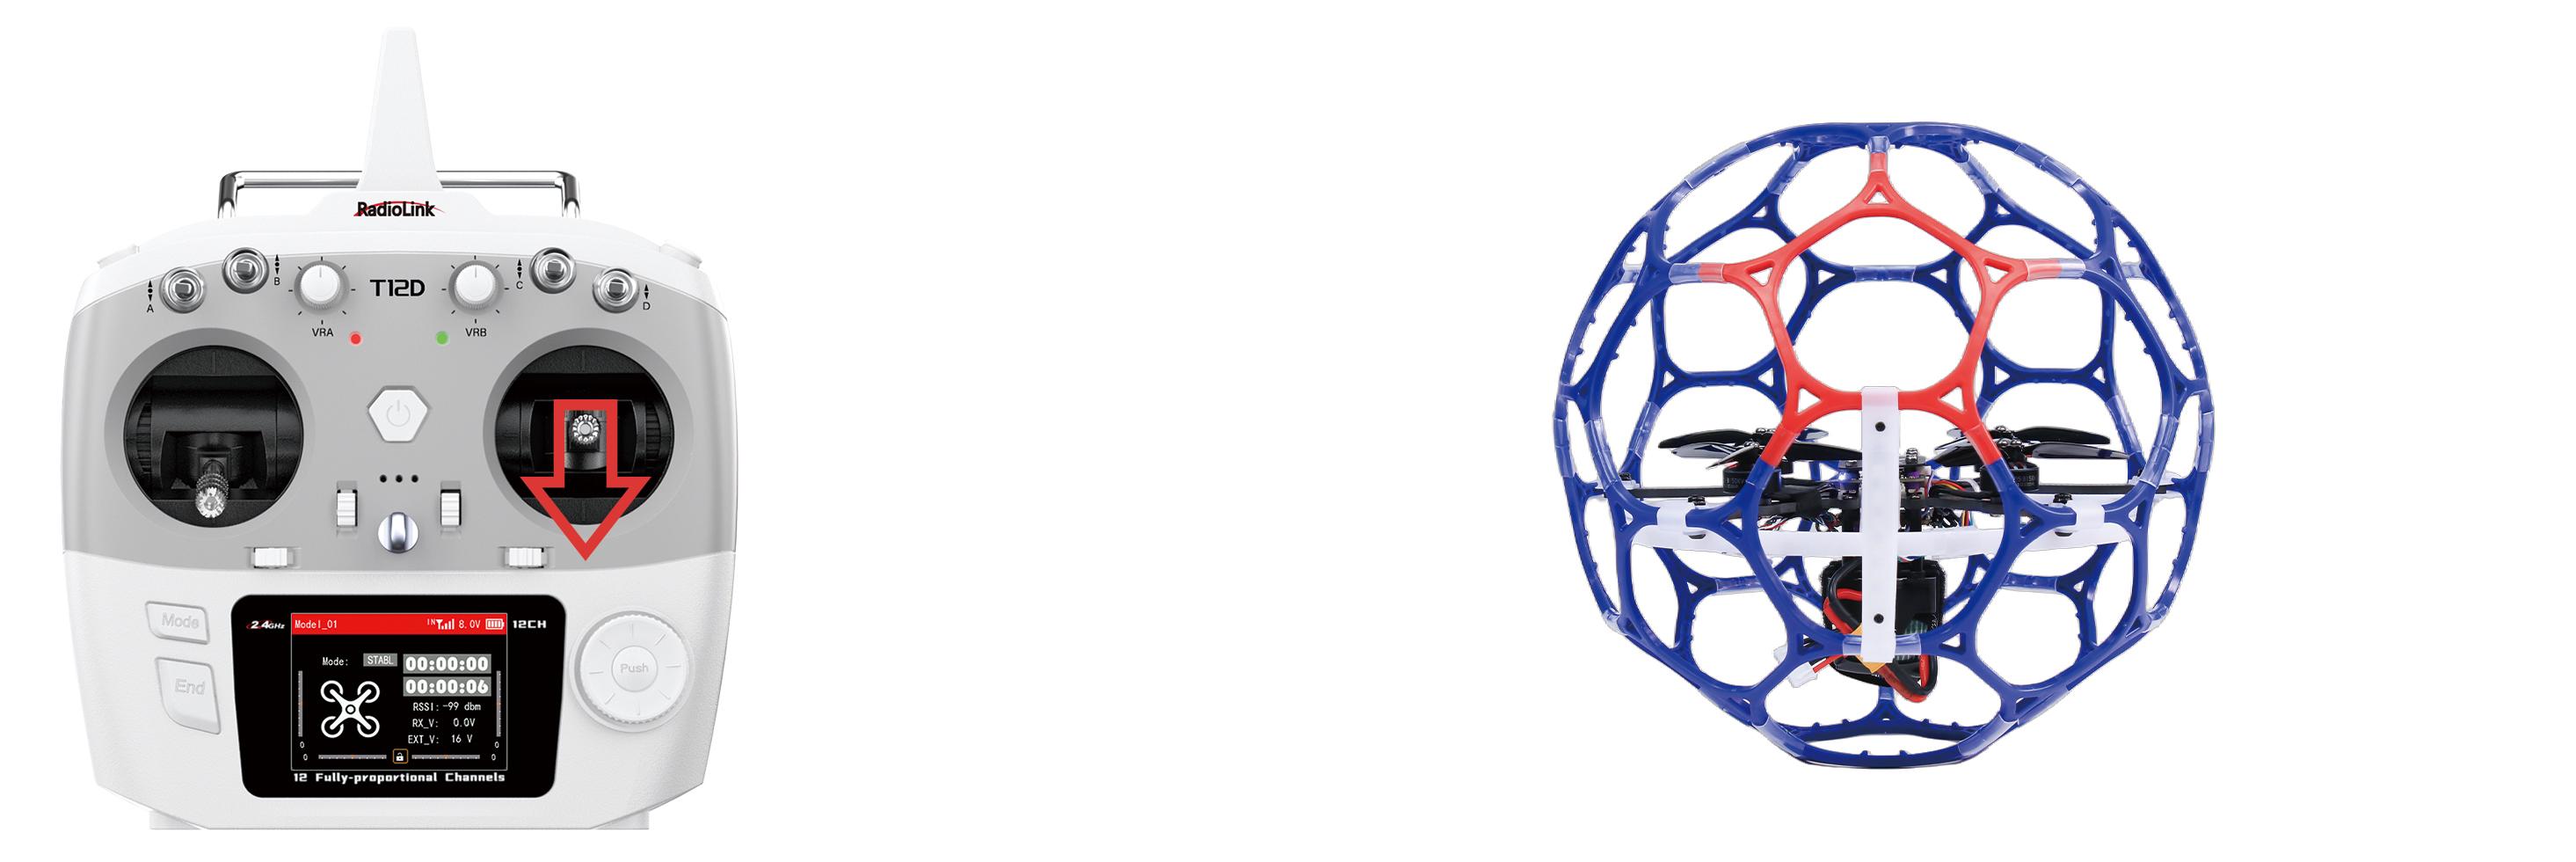
Pitch stick downward, LD-B20 moves backward
D. Roll: Right/Left
Toggle the roll stick (on the right) to the left and LD-B20 will fly to the left side and toggle the roll stick to the right, then LD-B20 will fly to the right side.
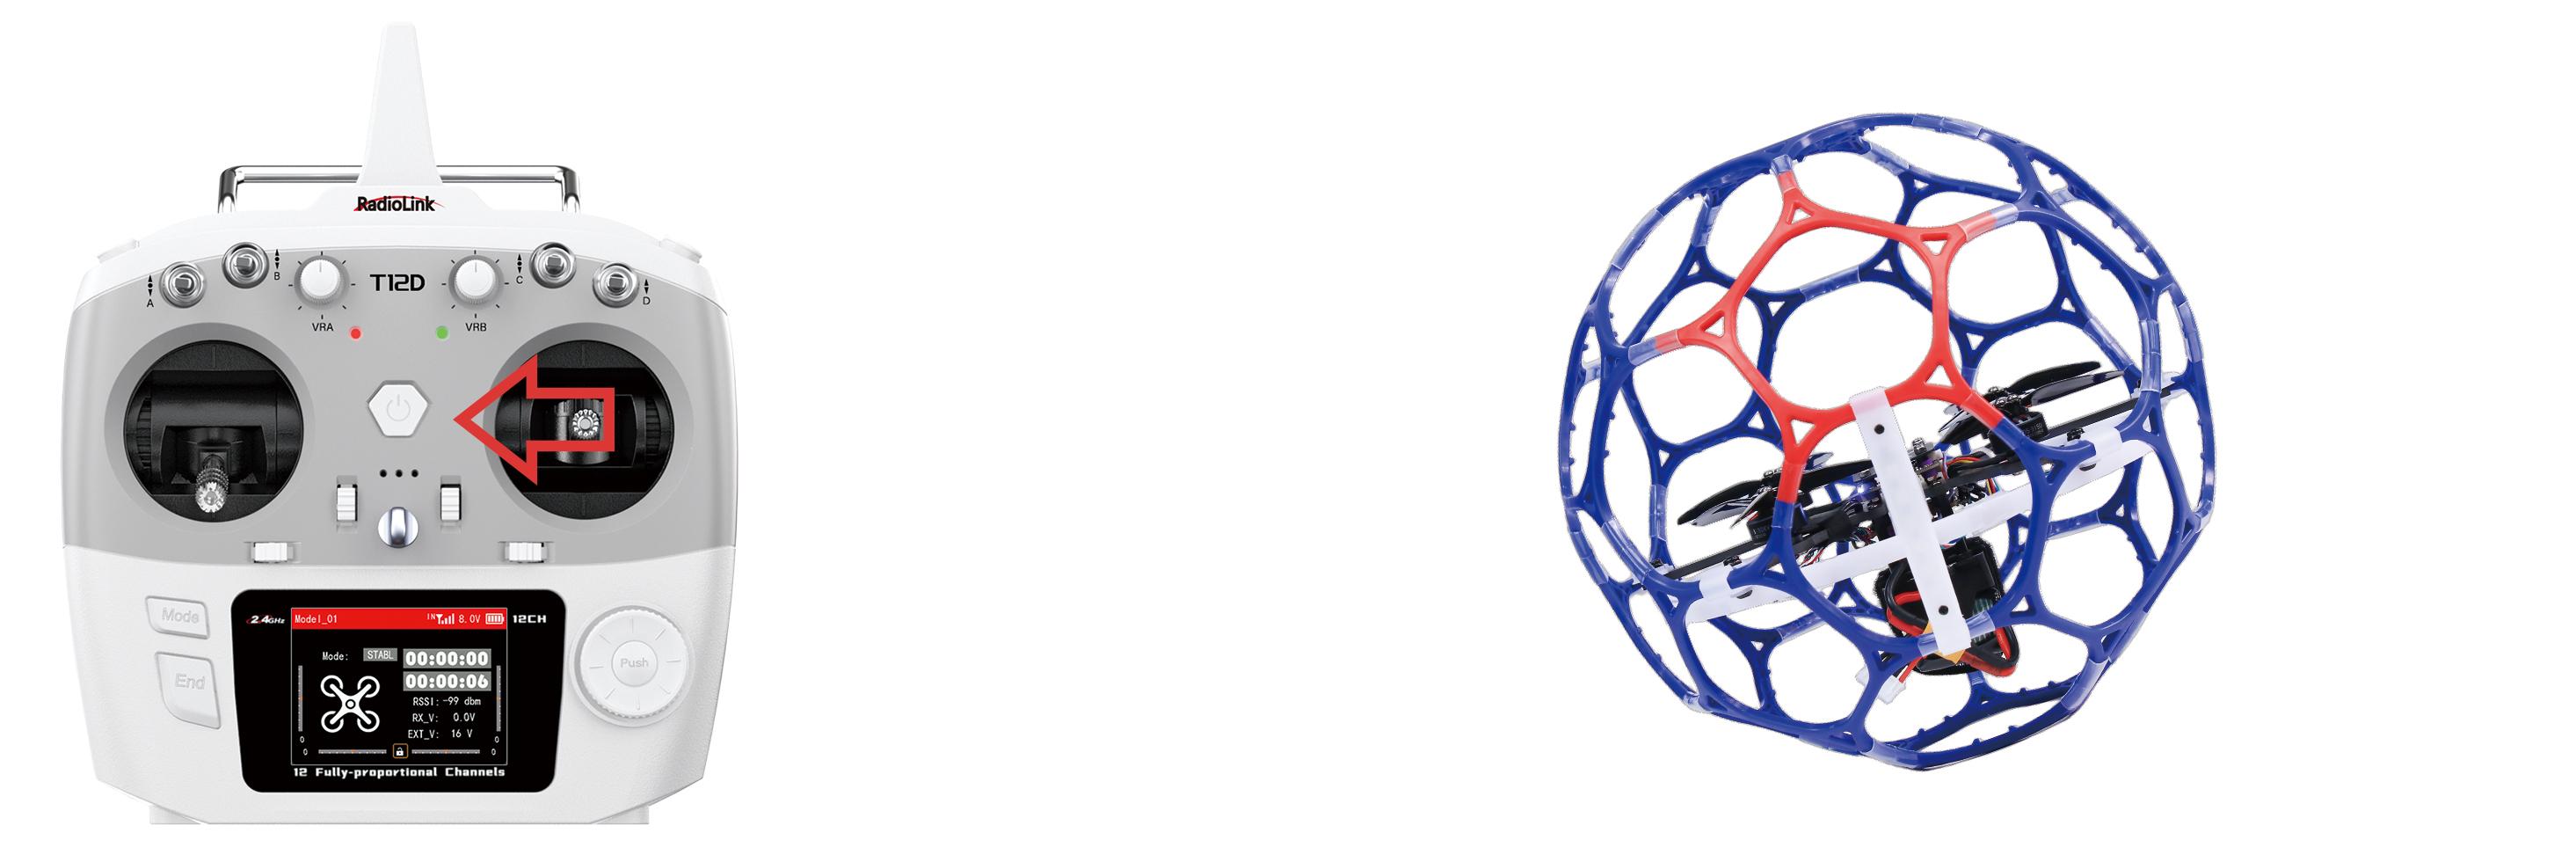
Roll stick to left, LD-B20 fly to the left side
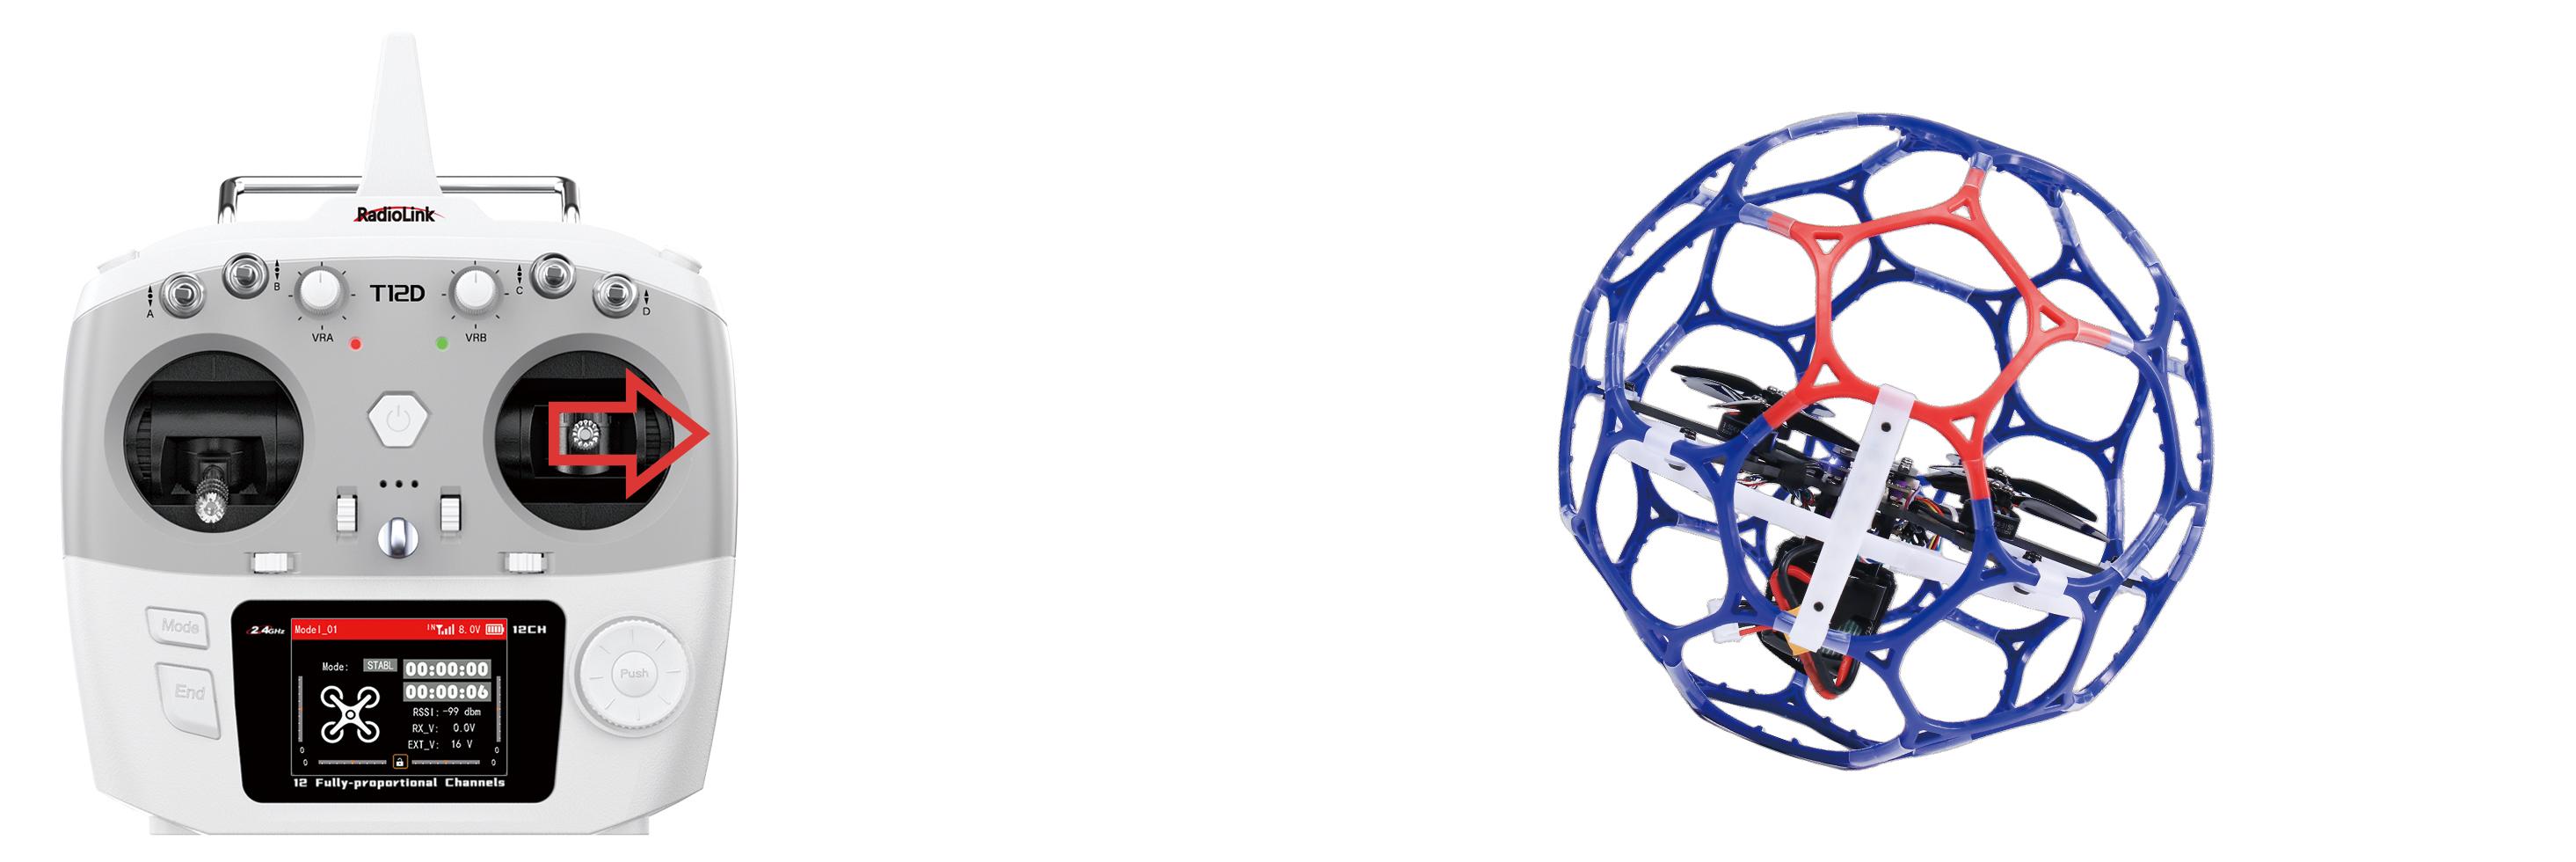
Roll stick to right, LD-B20 fly to the right side
Flight Controller Channel Introduction
Channel | Introduction |
CH1 | Roll |
CH2 | Pitch |
CH3 | Throttle |
CH4 | Yaw |
CH5 | Disarm/Arm |
CH6 | Air mode |
CH7 | Alt-Hold mode (low speed), Alt-Hold mode (high speed), Stabilize mode |
CH8 | Turtle mode |
Transmitter Switch Introduction
LD-B20 comes with RadioLink T12D transmitter. Here is the introduction of the switches of T12D:
SWA: Push it up to disarm the drone. Push it down to arm the drone. NULL in the middle. Corresponding to CH5 of the flight controller.
SWB: Push it up to turn off air mode. Push it down to turn on air mode. NULL in the middle. Corresponding to CH6 of the flight controller.
SWC: Push it up to select Alt-Hold mode (low speed), Alt-Hold mode (high speed) in the middle and stabilize mode at the bottom. Corresponding to CH7 of the flight controller.
SWD: Push it up to turn off turtle mode. Push it down to turn on turtle mode. Corresponding to CH8 of the flight controller.
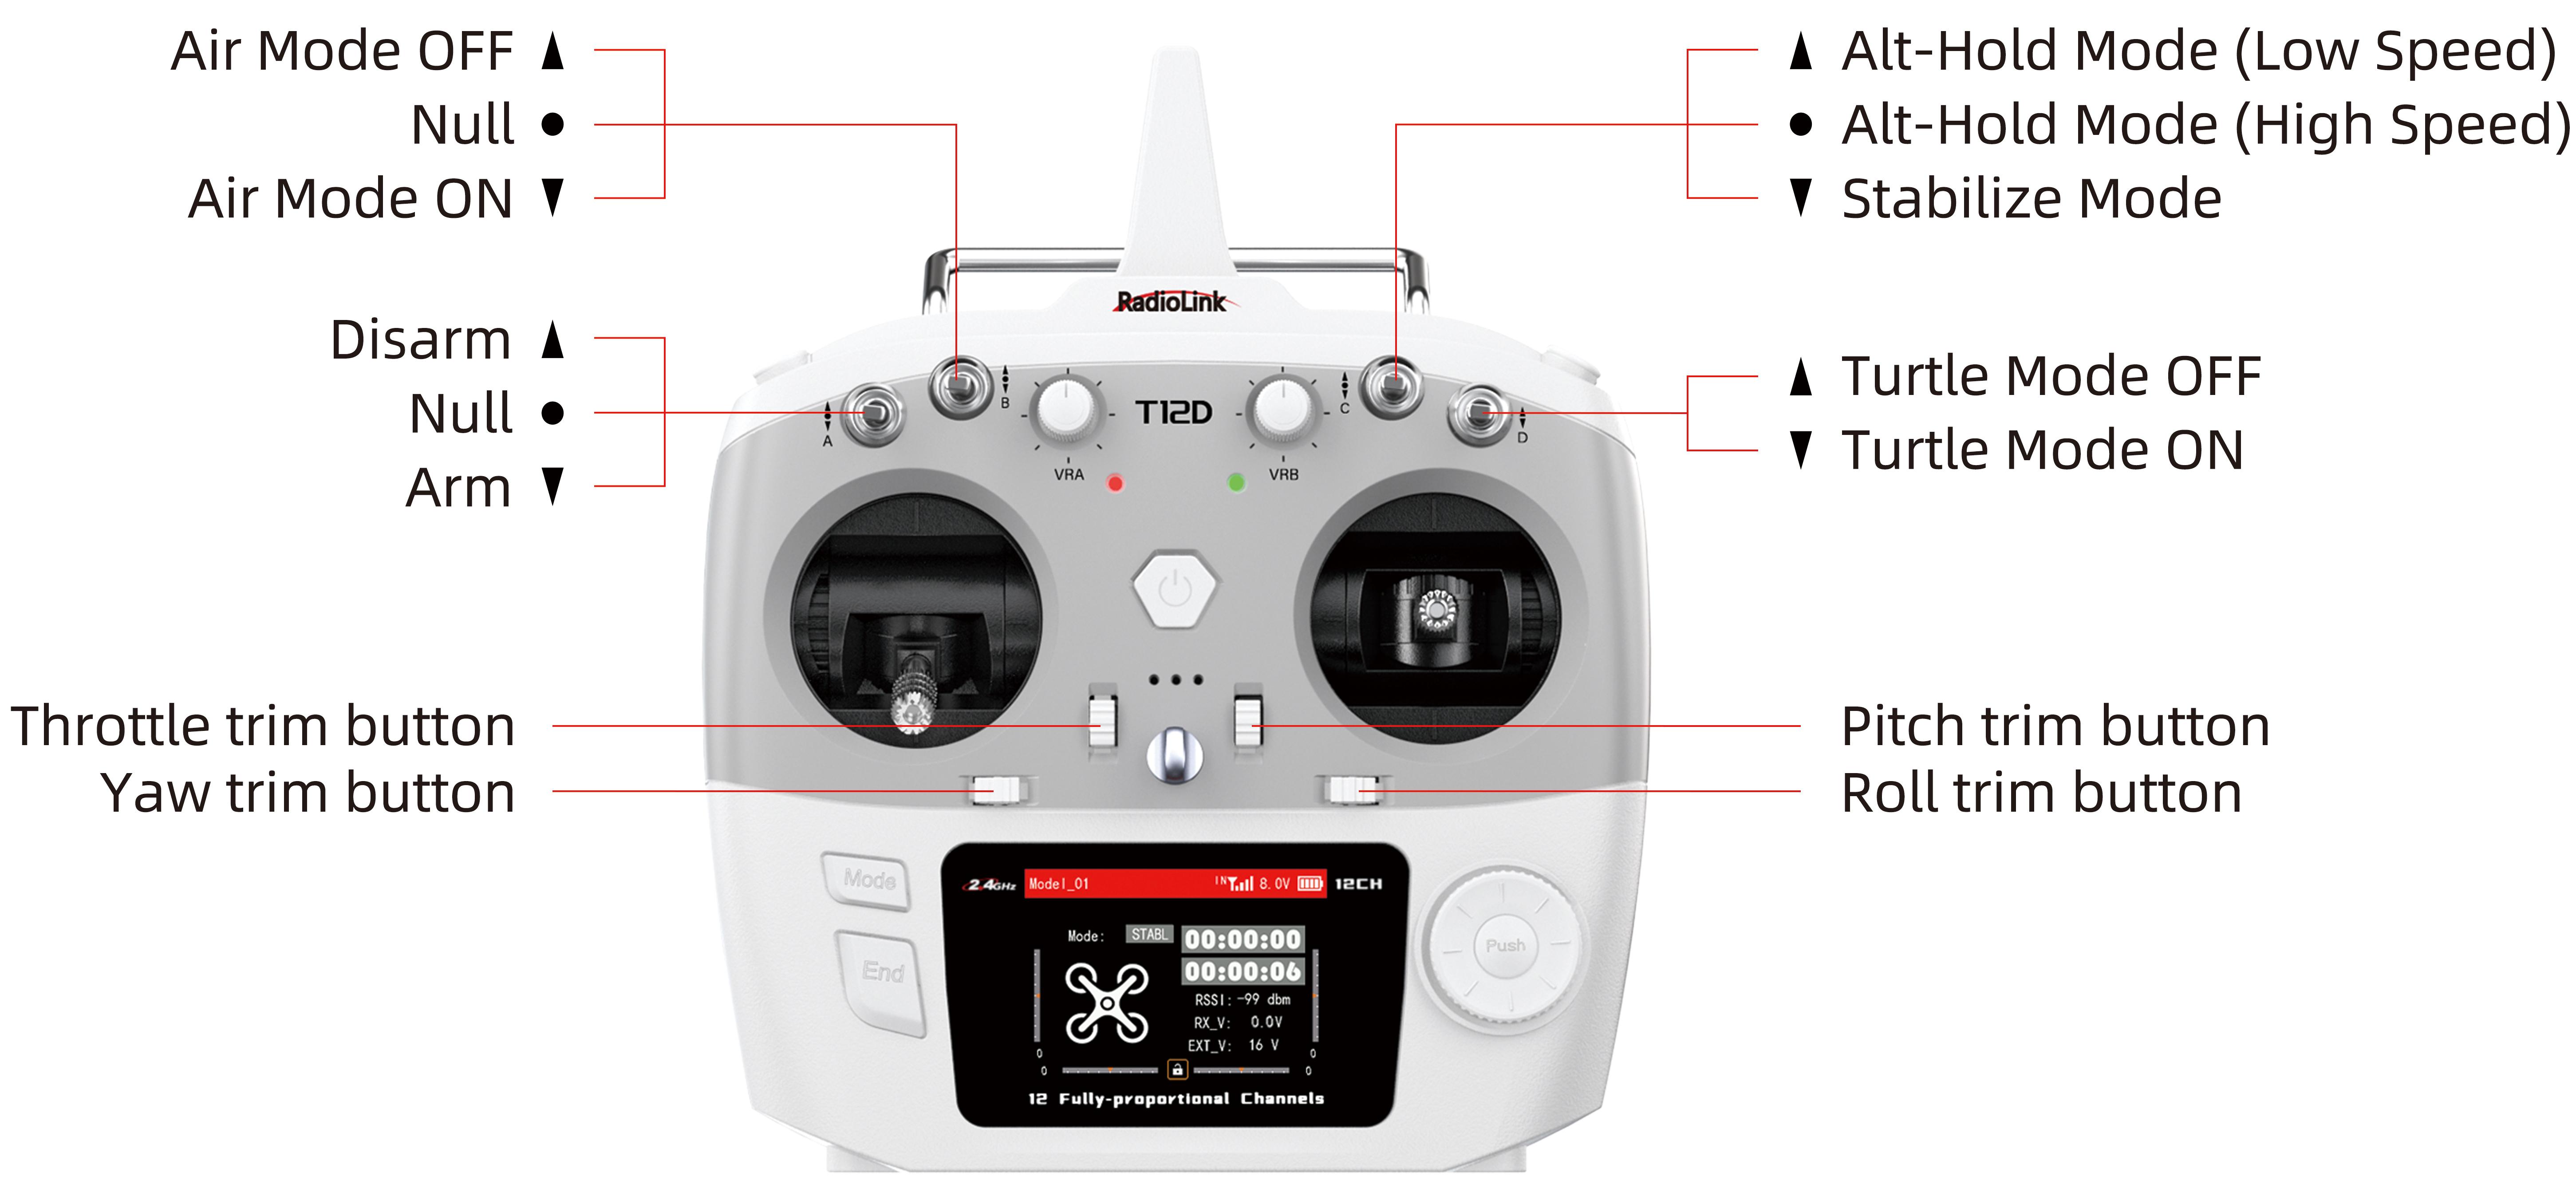
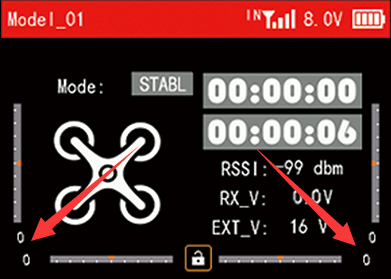
When the trim values on the screen of T12D are not 0, please adjust the trim values to 0 by using the four trim buttons (as shown above). For more details, please refer to the detailed manual of T12D: https://www.radiolink.com.cn/t12d_manual
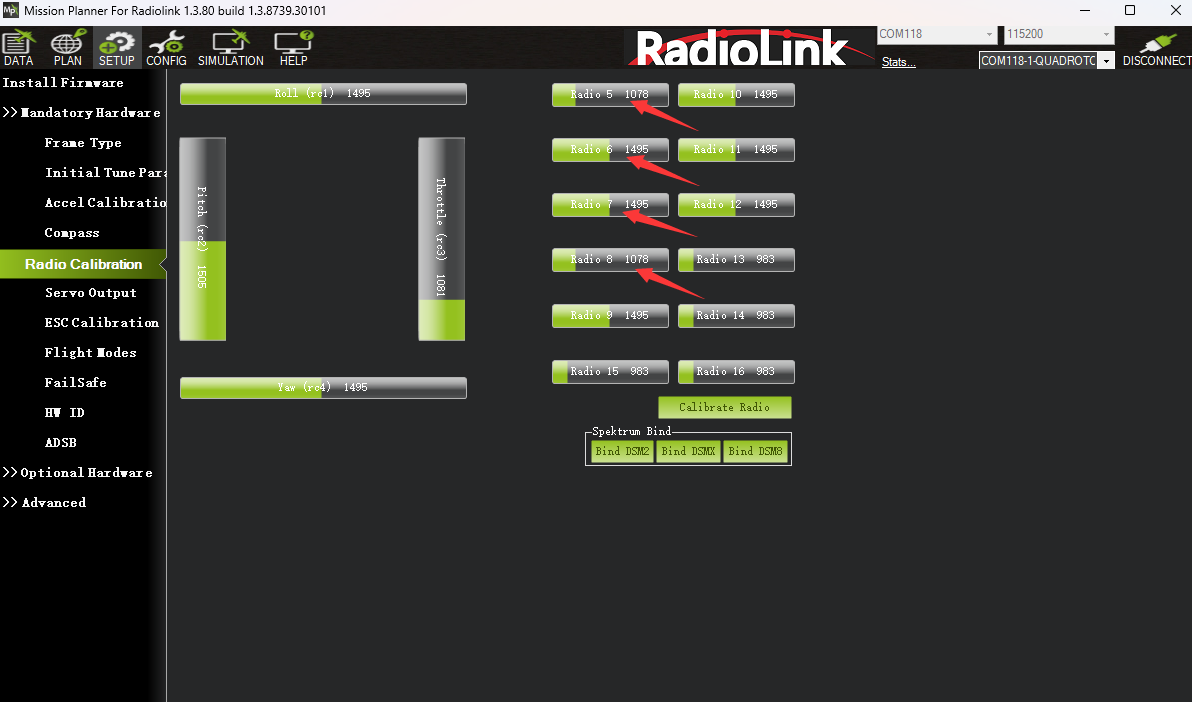
Note: LD-B20 PNP version does not come with transmitter or transmitter. Users need to set the transmitter switch of channel 5 to channel 8 according to the below channel values and servo output of the transmitter:
CH5 | CH6 | CH7 | CH8 | |
Arm | (servo output +100% or 100%) | |||
Alt-Hold mode (low speed) | (servo output -100% or 0%) | |||
Alt-Hold mode (high speed) | (servo output 0% or 50%) | |||
Stabilize mode | (servo output +100% or 100%) | |||
Turtle mode | (servo output +100% or 100%) | |||
Air mode | (servo output +100% or 100%) |
Users can view the channel value in Mission Planner-- Radio Calibration interface (as shown above). Toggle the corresponding transmitter switch. If the corresponding channel value is within the range in the table above, you can switch to the corresponding mode/arm the drone.
Arm and Disarm LD-B20
Arm LD-B20
Power on LD-B20 with the 4S battery. After powering it up, place LD-B20 on the ground for self-checking. LD-B20 needs to remain stationary during the self-checking process. The motor will emit a piece of music during the self-checking. When you hear two short music sounds, the self-checking is complete.
Make sure the throttle is at the lowest position. Push SWA down to the lowest position, and the propellers start to rotate at idle speed indicates arm successful. For security reasons, LD-B20 will be disarmed automatically if there is not any operation of the throttle for 5 seconds. Please arm LD-B20 again when the flight is ready.
Note: The maximum arming angle of LD-B20 is 90 degrees. When the drone tilts more than 90 degrees, please return the body to the normal position by using the turtle mode or make the drone tilt angle less than 90 degrees before arming. And the throttle stick must be in the lowest position when arming.
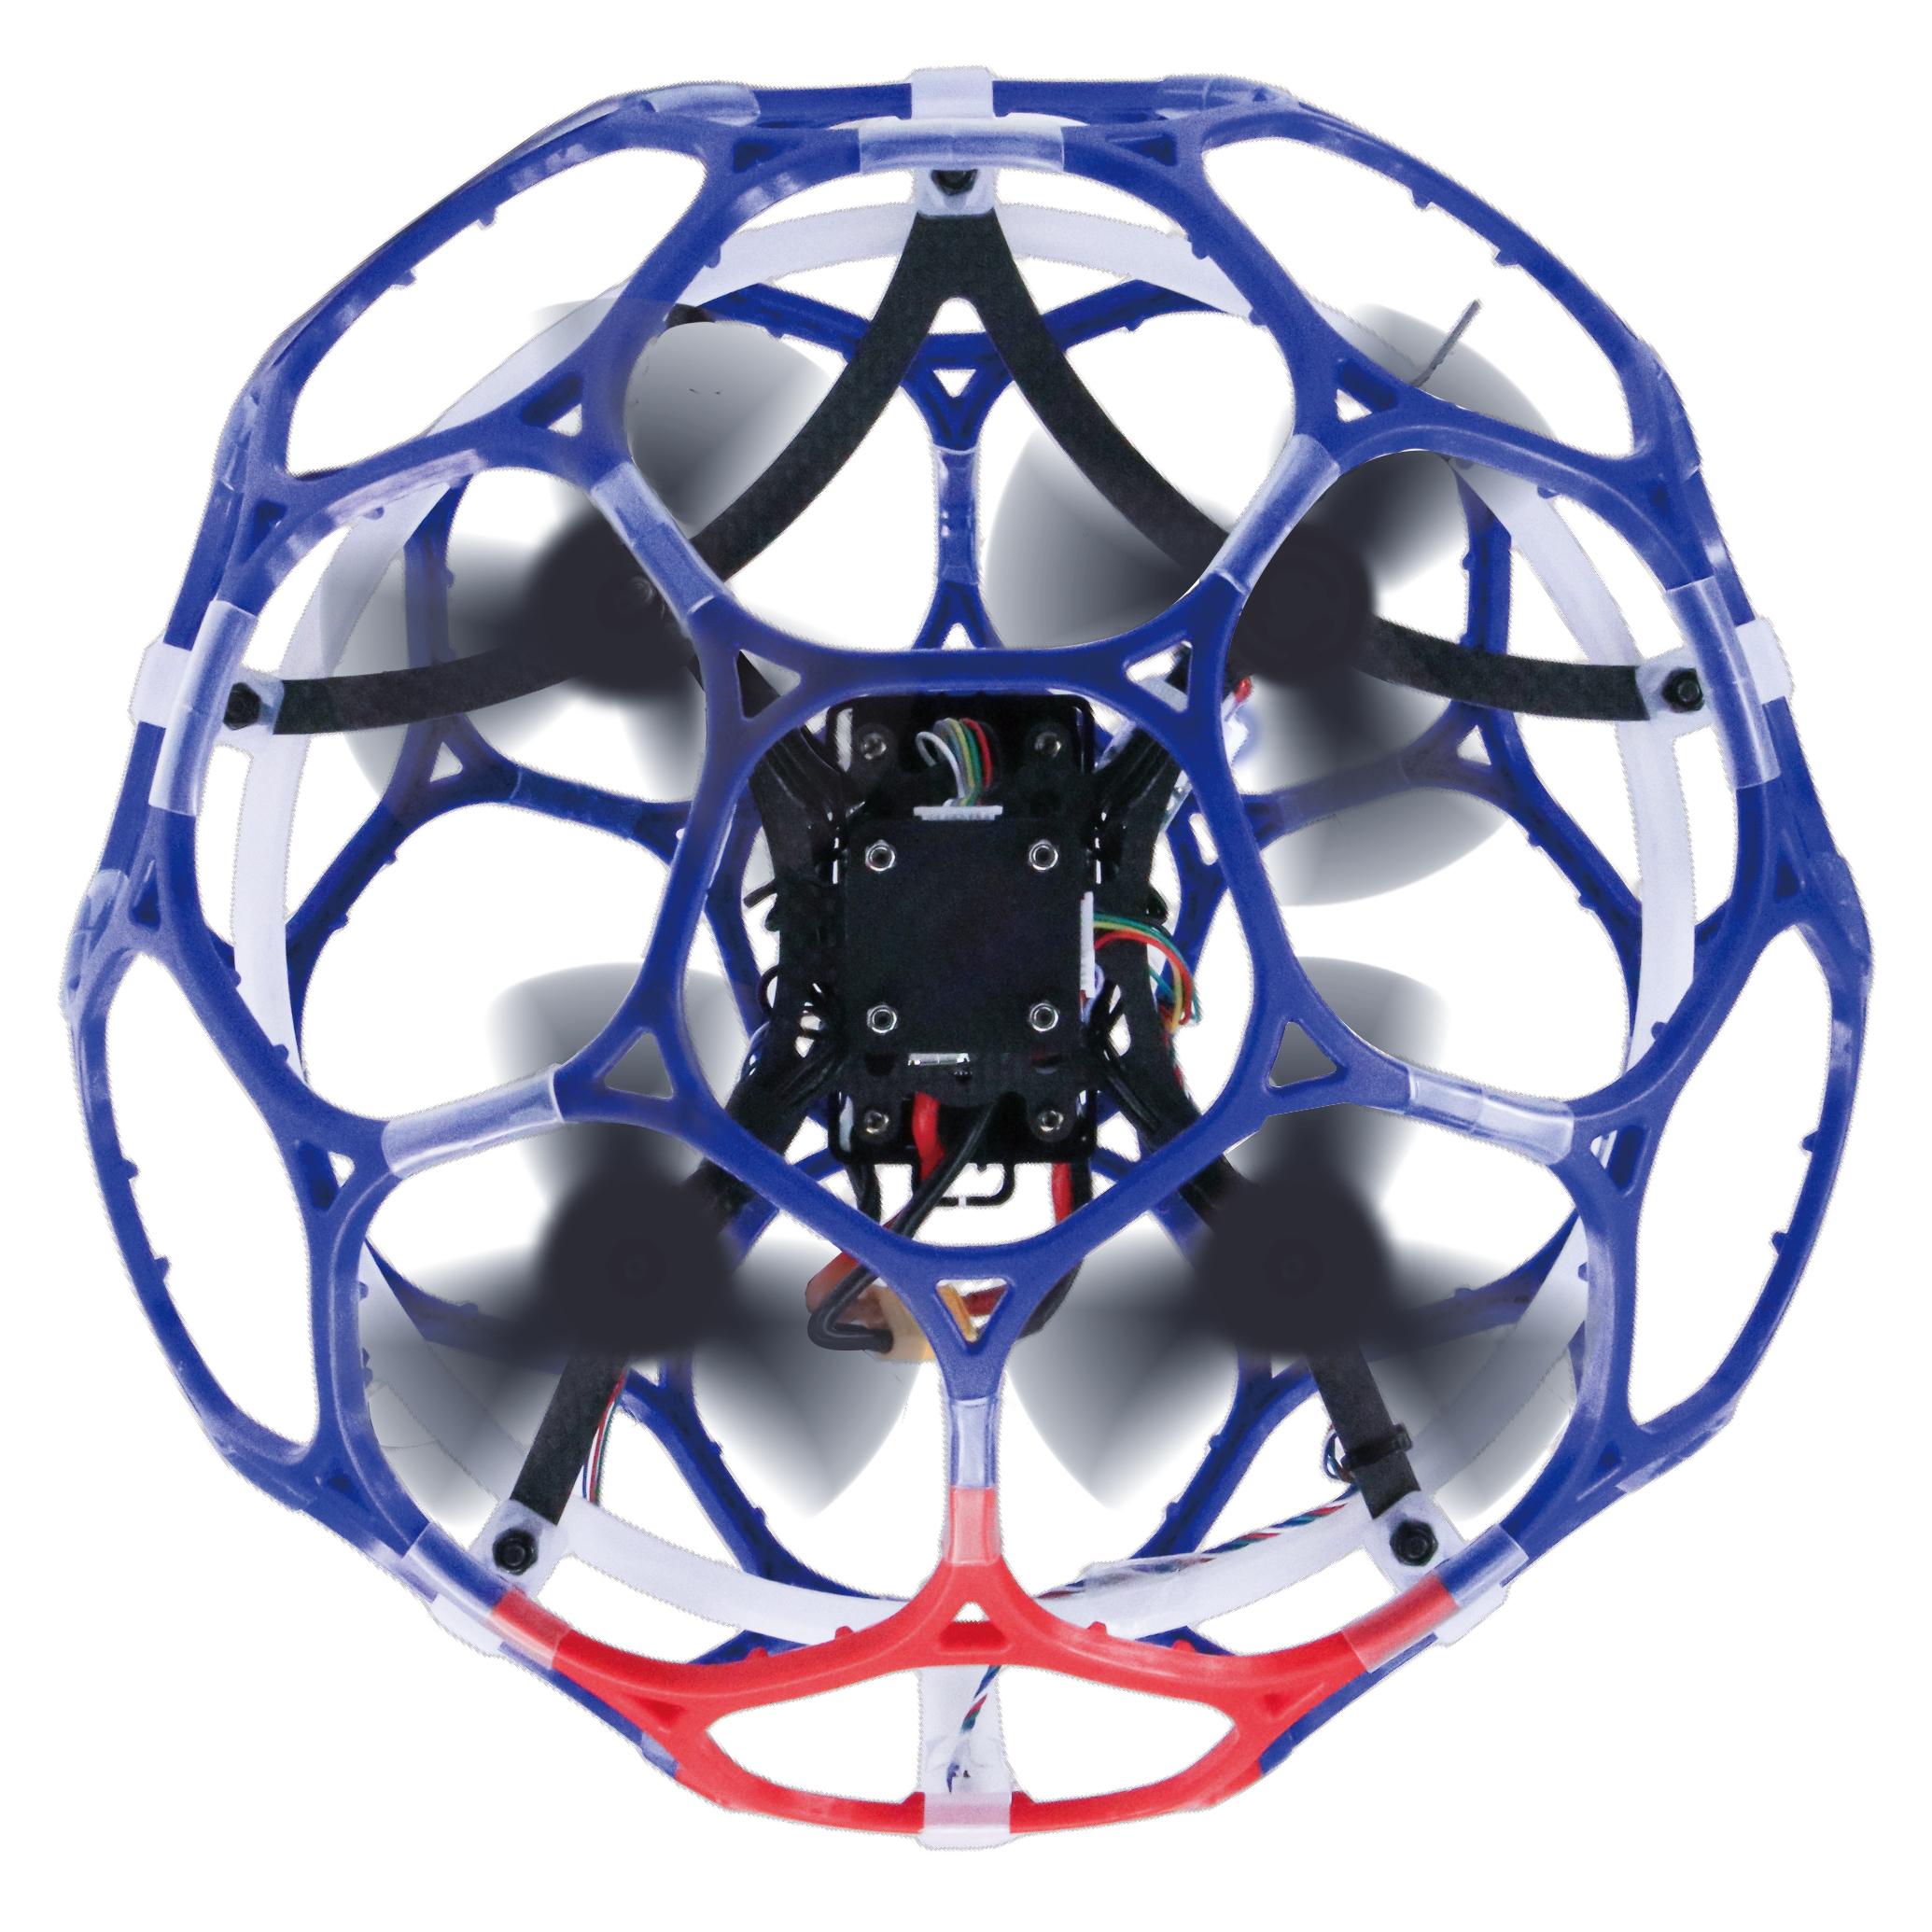
LD-B20 propellers start to rotate at idle speed indicates arm successful
Disarm LD-B20
When the flight is finished, push up SWA to disarm LD-B20. LD-B20 propellers stop rotating indicates disarm successful.
Note: During the flight, the motors/propellers will stop immediately if SWA is pushed up. Please pay attention to avoid hitting people and damaging valuables.
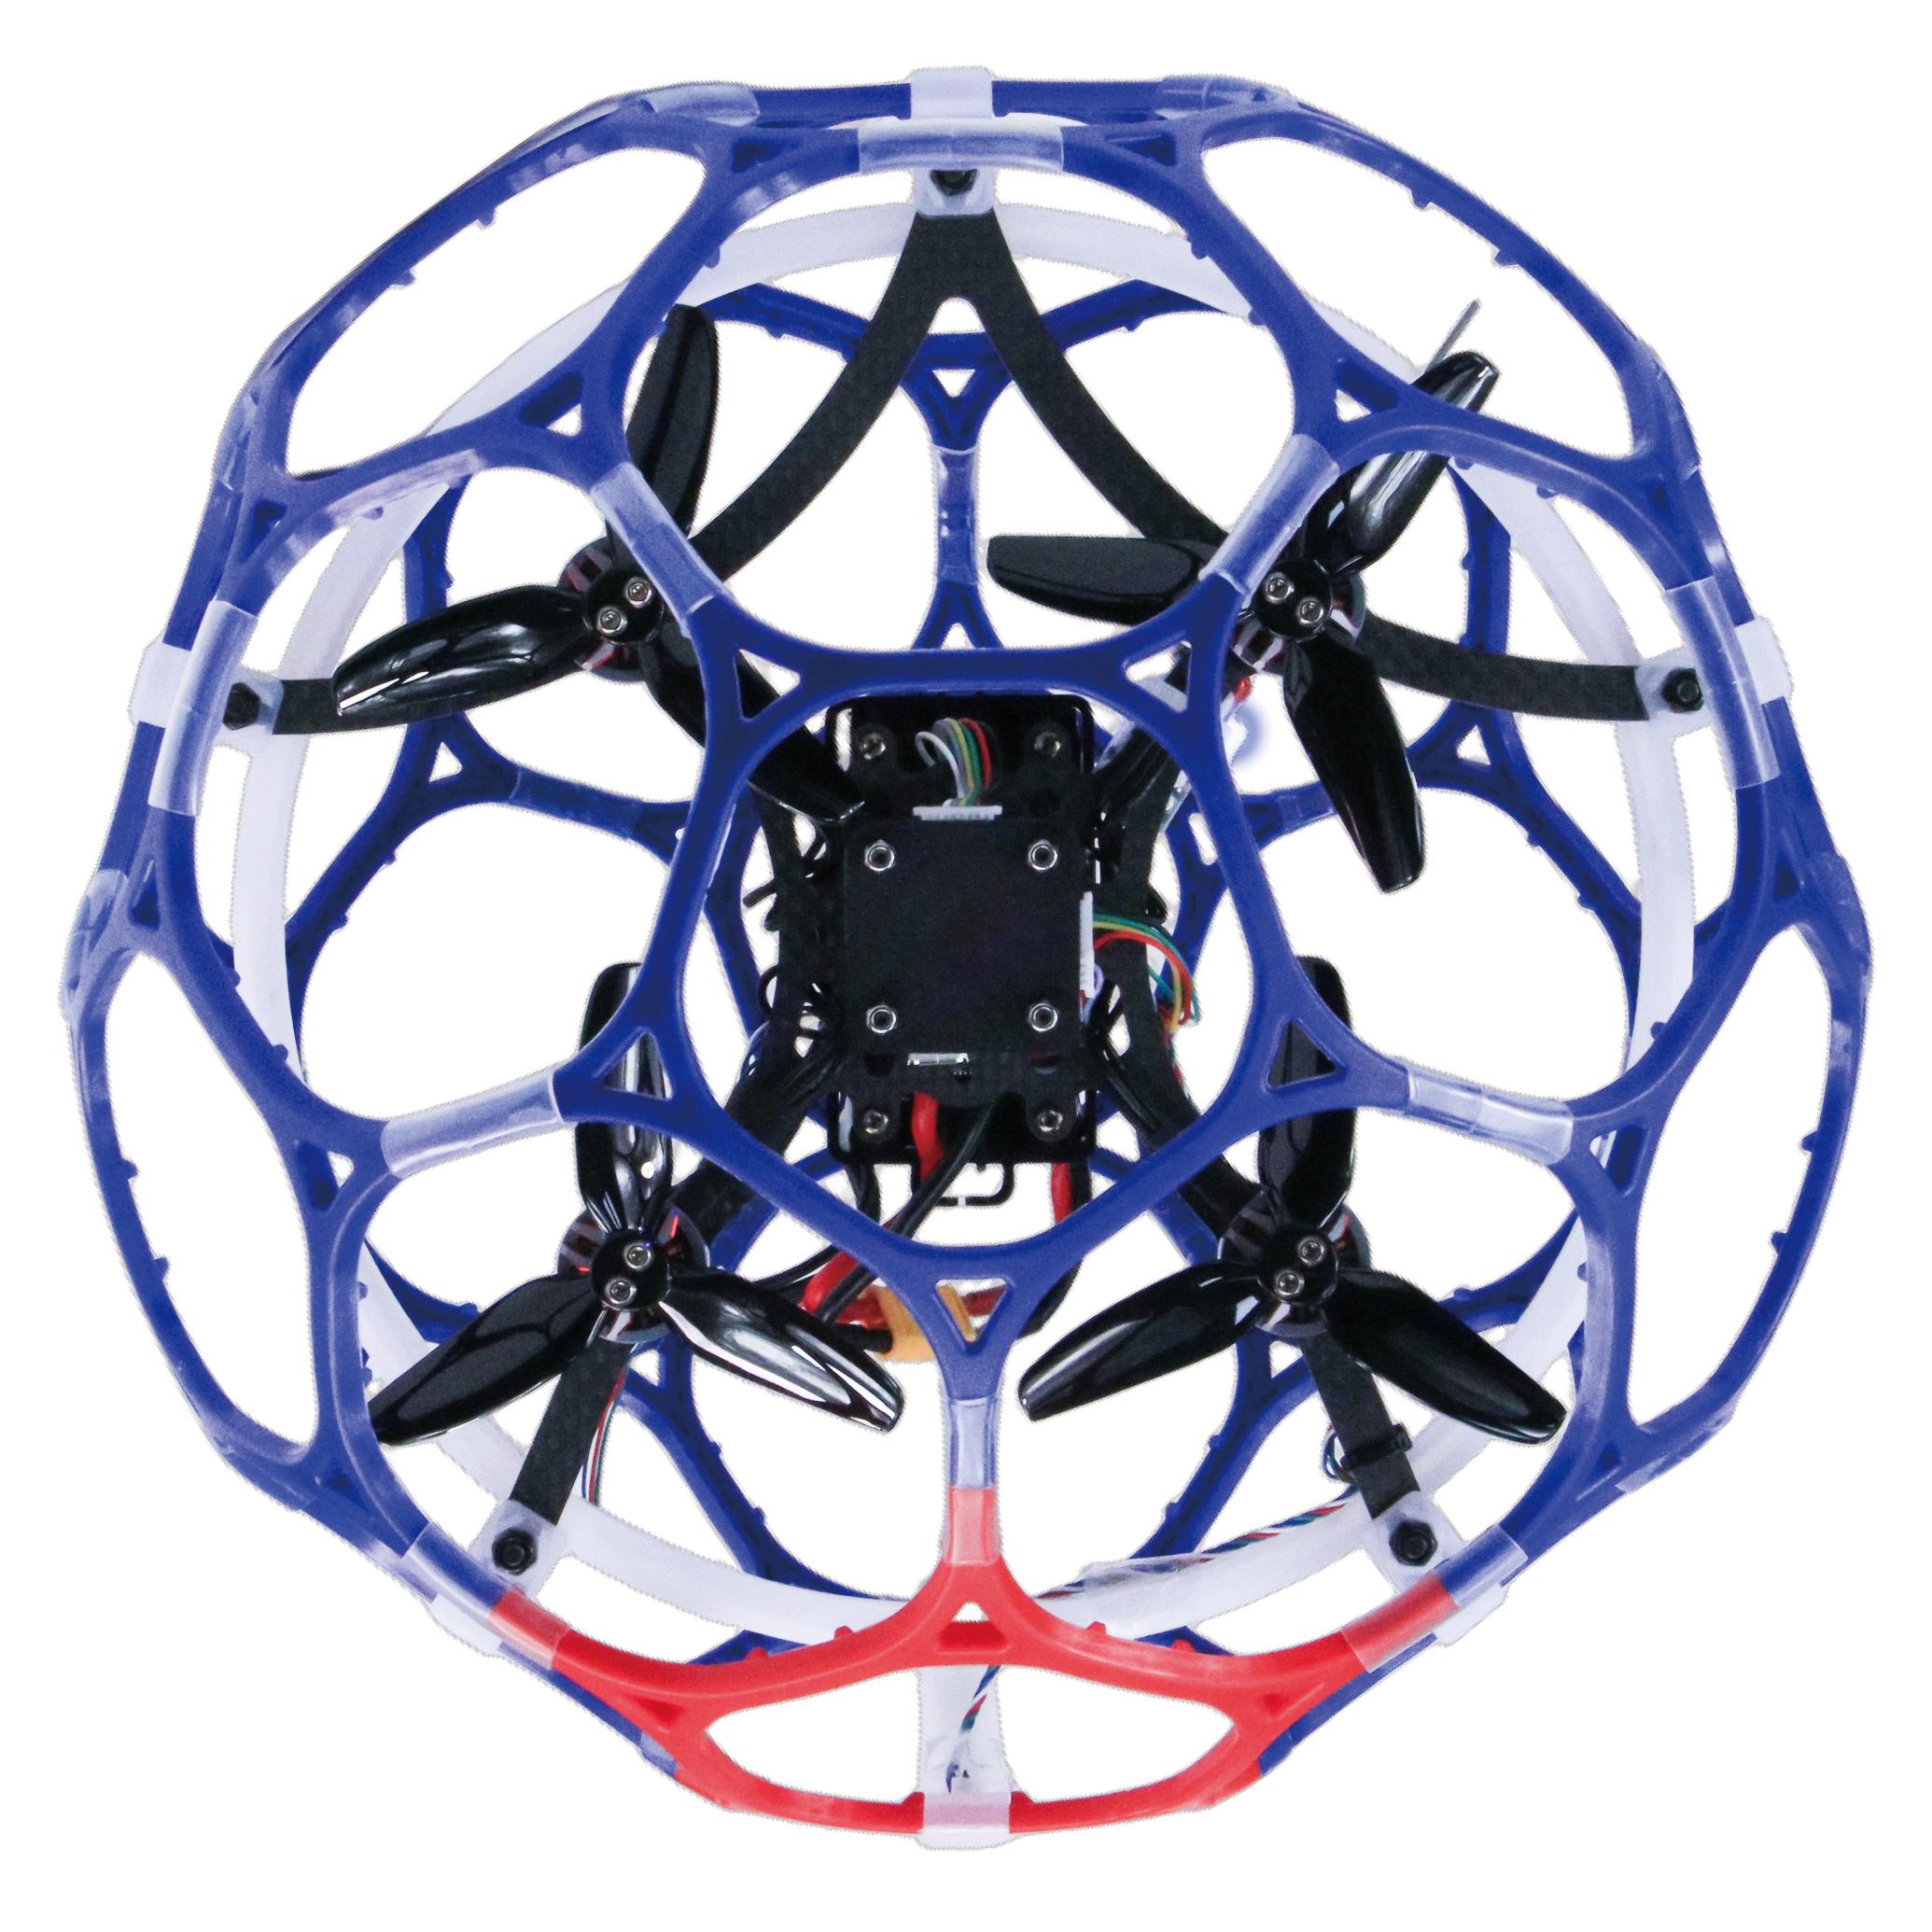
LD-B20 propellers stop rotating indicates disarm successful
Five Flight Modes
Alt-Hold Mode (Low Speed)
After arming LD-B20, push throttle lightly to start the motor. If the throttle is pushed above the midpoint, the drone will climb steadily upwards. If it is pushed below the midpoint, it will descend. To take off from the ground, push the throttle stick above the midpoint. When the drone climbs or descends to a suitable height, push the throttle stick to the midpoint, and the drone will maintain its current position and altitude. In Alt-Hold mode (low speed), the flight angle is smaller and the speed is slower, which is suitable for novices.
Alt-Hold Mode (HighSpeed)
The operation method is the same as Alt-Hold mode (low speed), but compared with Alt-Hold mode (low speed), the flight angle is larger and the flight speed is faster for Alt-Hold mode (high speed).
Stabilize mode
The basic operation such as Rise/Descend/Forward/Backward/left/right of Stabilize mode is the same as Alt-Hold mode. In Stabilize mode, the throttle corresponds to the drone power. The more the throttle stick is pushed up, the greater the climbing power. The flight control no longer assists in altitude setting. If you want the drone to maintain the same altitude, the pilot needs to practice for a period of time to achieve it through flight operations.
Turtle mode
When the drone is hit or flips over at any angle due to operation error, you can enable the turtle mode to rotate one side of the motor to flip the fuselage back to normal.
Put throttle to the lowest position. Then push SWD down to the lowest position to turn on the turtle mode. After turtle mode is turned on, push up the throttle stick a little bit. Move the roll or pitch stick to flip the drone. After the drone flips back to the level,put down the throttle stick to the lowest position. Push SWD up to turn off the turtle mode. Then arm LD-B20 and take off.
Note: When turning on/off the turtle mode, the throttle stick must be at the lowest point.Otherwise you cannot turn on/off the turtle mode.
Air mode
Air mode can help the drone maintain its attitude when the throttle is zero in the stabilize mode, and avoid the aircraft rolling over after the pitch or roll stick is operated when the throttle is zero. After turning on the air mode, the aircraft will bounce when landing. If you want a smoother landing, please turn off the air mode in advance when preparing to land.
Note: The air mode only takes effect in the stabilize mode. The air mode switch does not work in other modes.
LED Light Switch
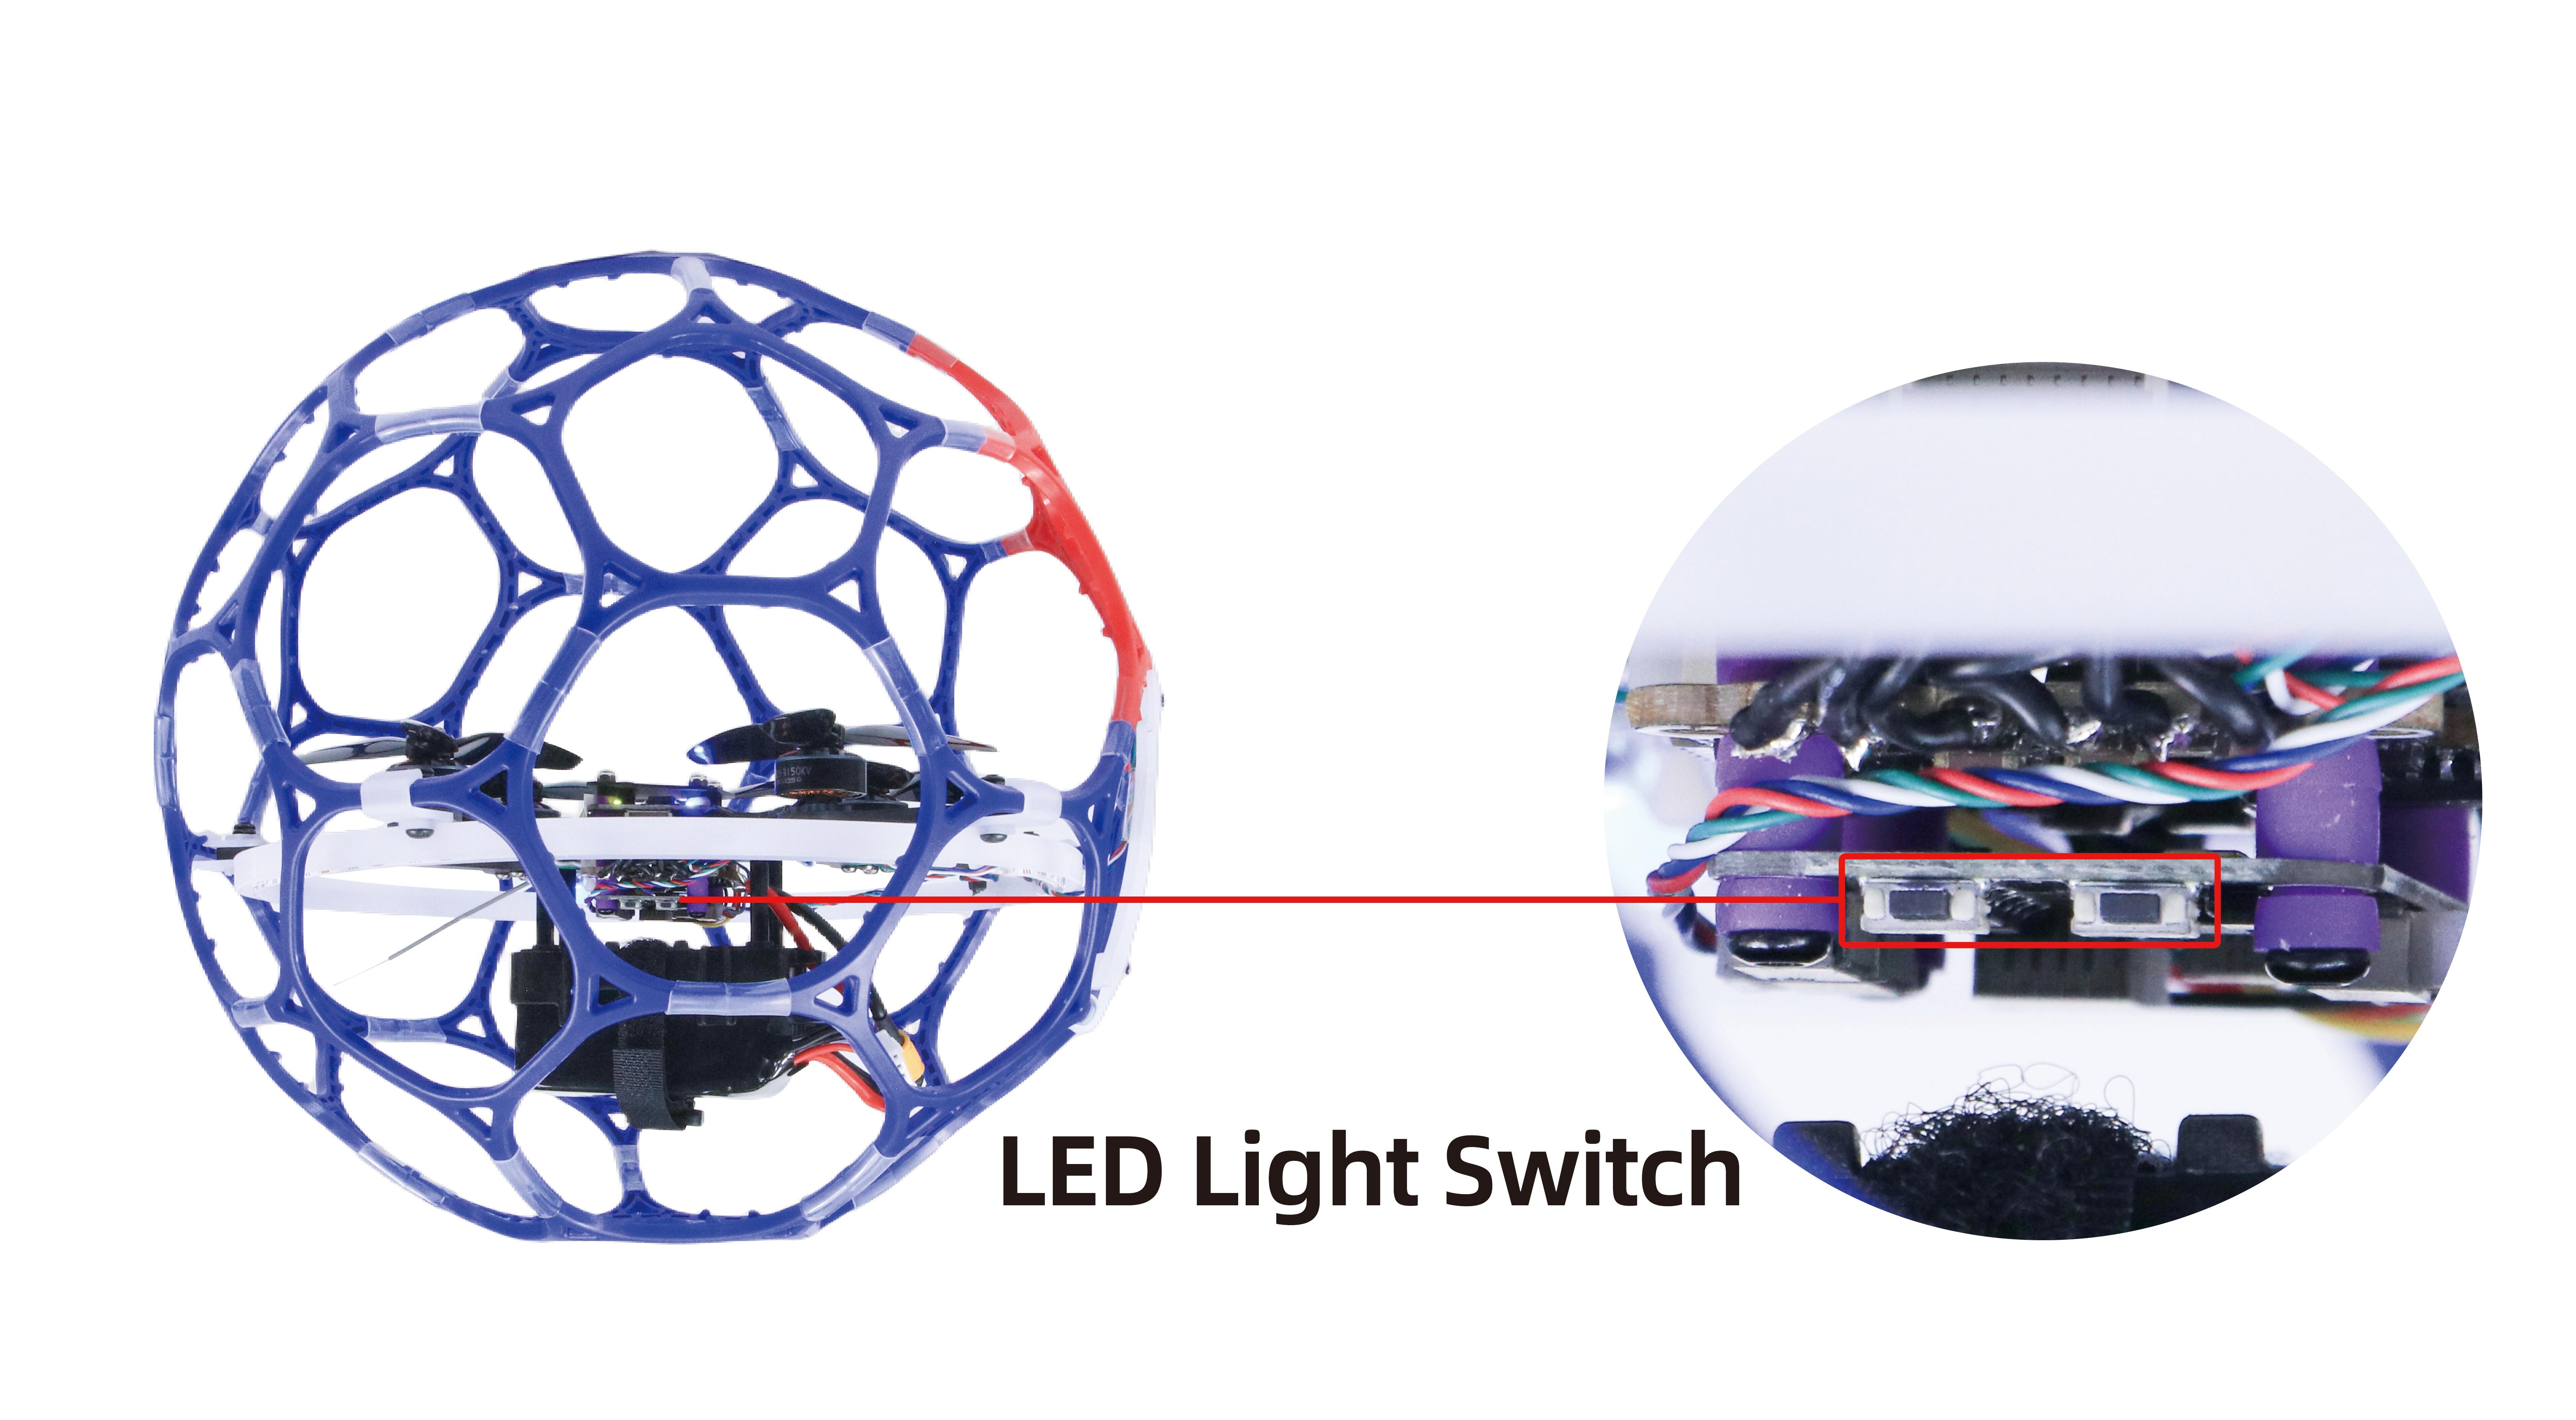
LD-B20 has a tail LED light and a ring light strip. They have 7 colors that can be switched, namely red, green, blue, yellow, purple, cyan and white. Short press the button on the light board to switch their light color or turn off the light.
The light board socketsof LD-B20 are as follows:
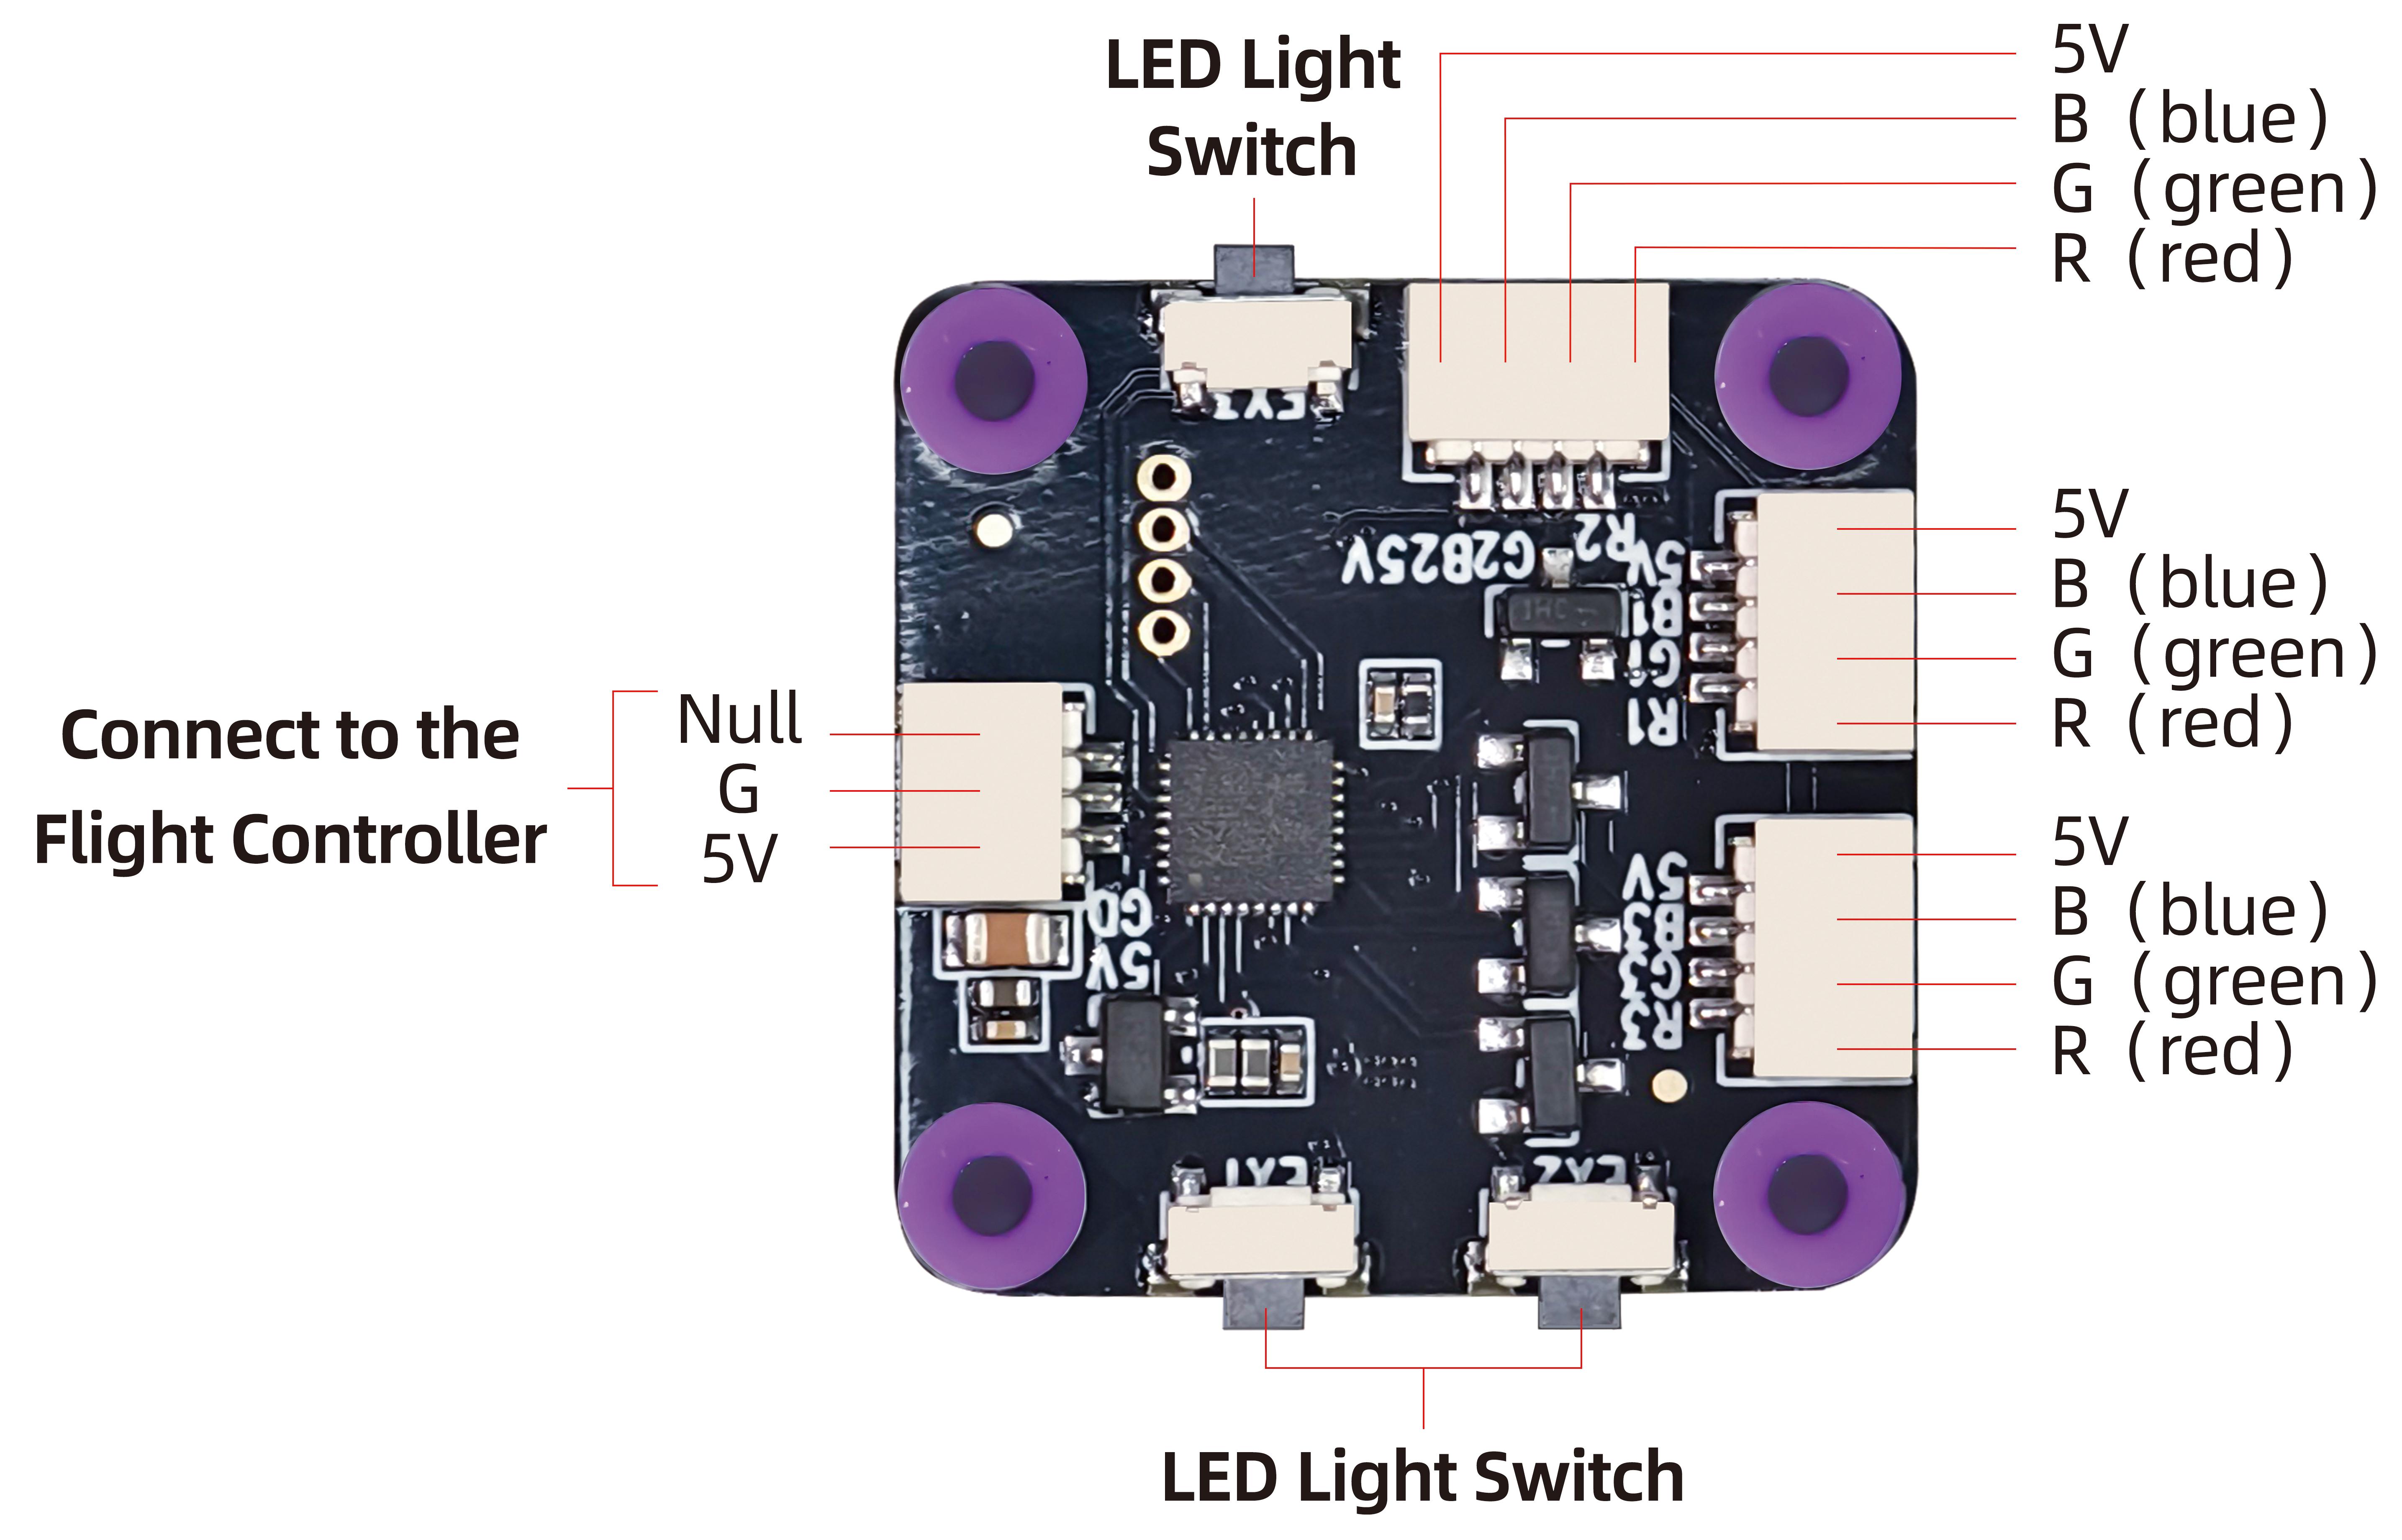
Note: There are 3 light switch buttons on the light board, 2 of which work (including the tail LED light switch button and the ring light strip switch button), and the remaining one does not work. You can press the 3 light switch buttons to confirm which two buttons work.
Low Battery Alarm
LD-B20RTF version comes with a RadioLink R16SM receiver. R16SM supports model battery telemetry function. During the flight, the battery voltage of the drone can be viewed on the screen of T12D transmitter. The alarm voltage is 14.7V by default. When the battery voltage is lower than 14.7V, T12D will make a beeping alarm prompt. Please land the drone in time to replace the battery. If you continue to fly, the drone will automatically land when the voltage reaches 14V. During the landing process, the yaw, pitch and roll can be controlled, and it can also be disarmed directly. After landing, please disconnect the power and replace the battery in time to avoid over-discharge of the battery.
Note: You want to modify the alarm voltage on T12D. For more details, please refer to the detailed manual of T12D: https://www.radiolink.com.cn/t12d_manual
Motor and Propeller Installation
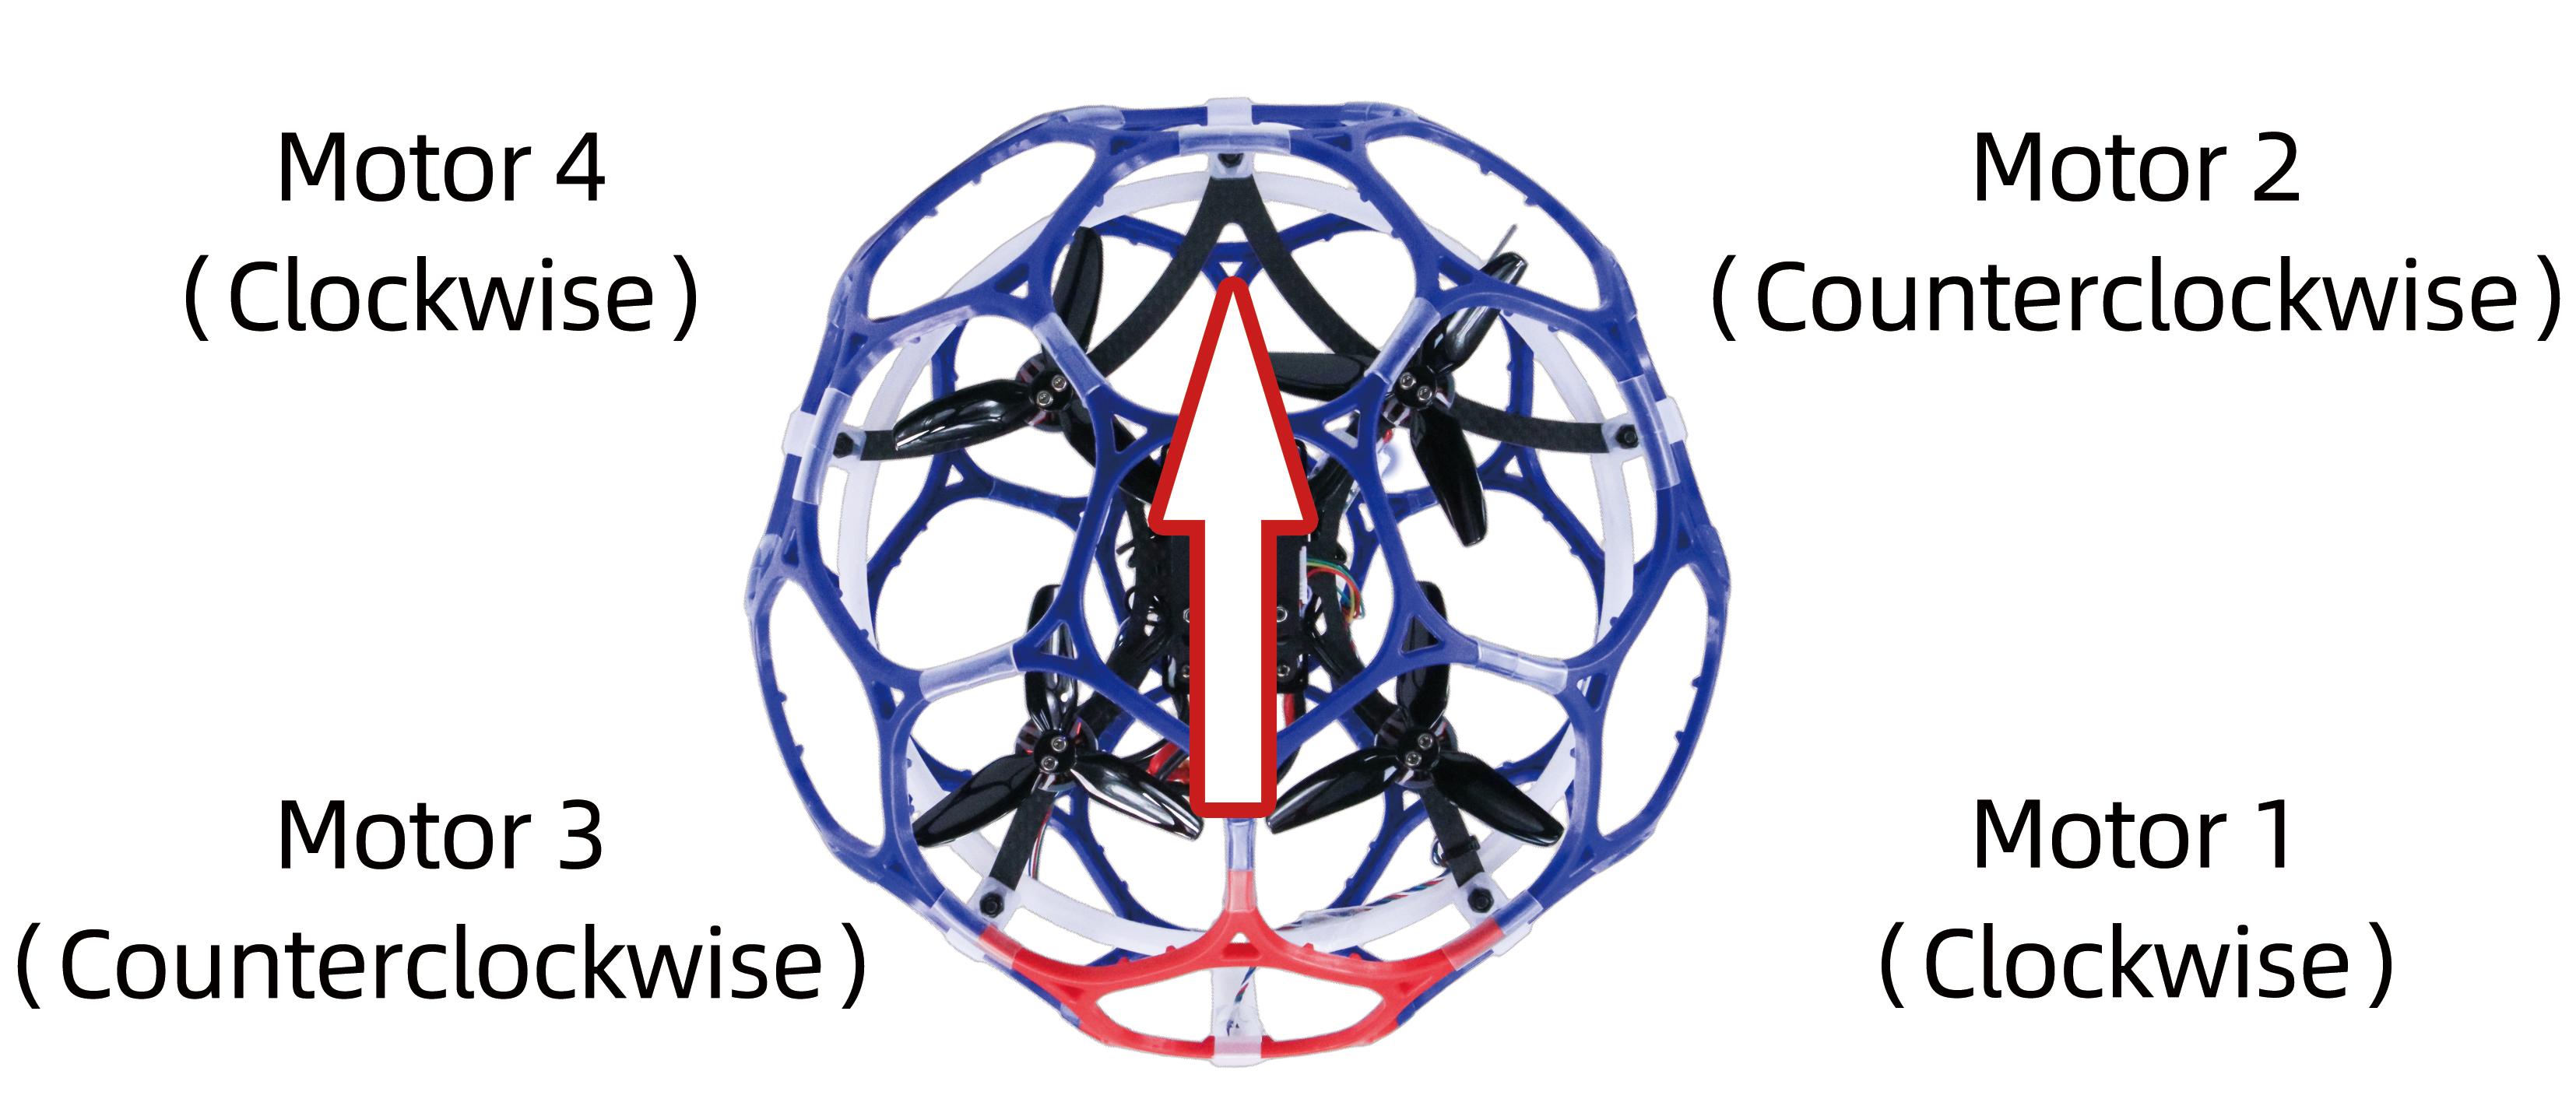
To make the drone fly, motors usually rotate clockwise (CW)/counterclockwise (CCW) with the propellers.It is very important to make sure about the rotation direction as below when installing motors. Otherwise, the drone would fail to take off.
Motor and propeller installation can be skipped as LD-B20 is already assembled by factory default. If any of the motors is worn out and needs to be replaced, it is essential to identify the correct motor/propeller rotation. Please follow the below picture to install the motor and propeller.
Binding (R16SM)
RTF version comes with T12D transmitter and R16SM receiver (As shown below).
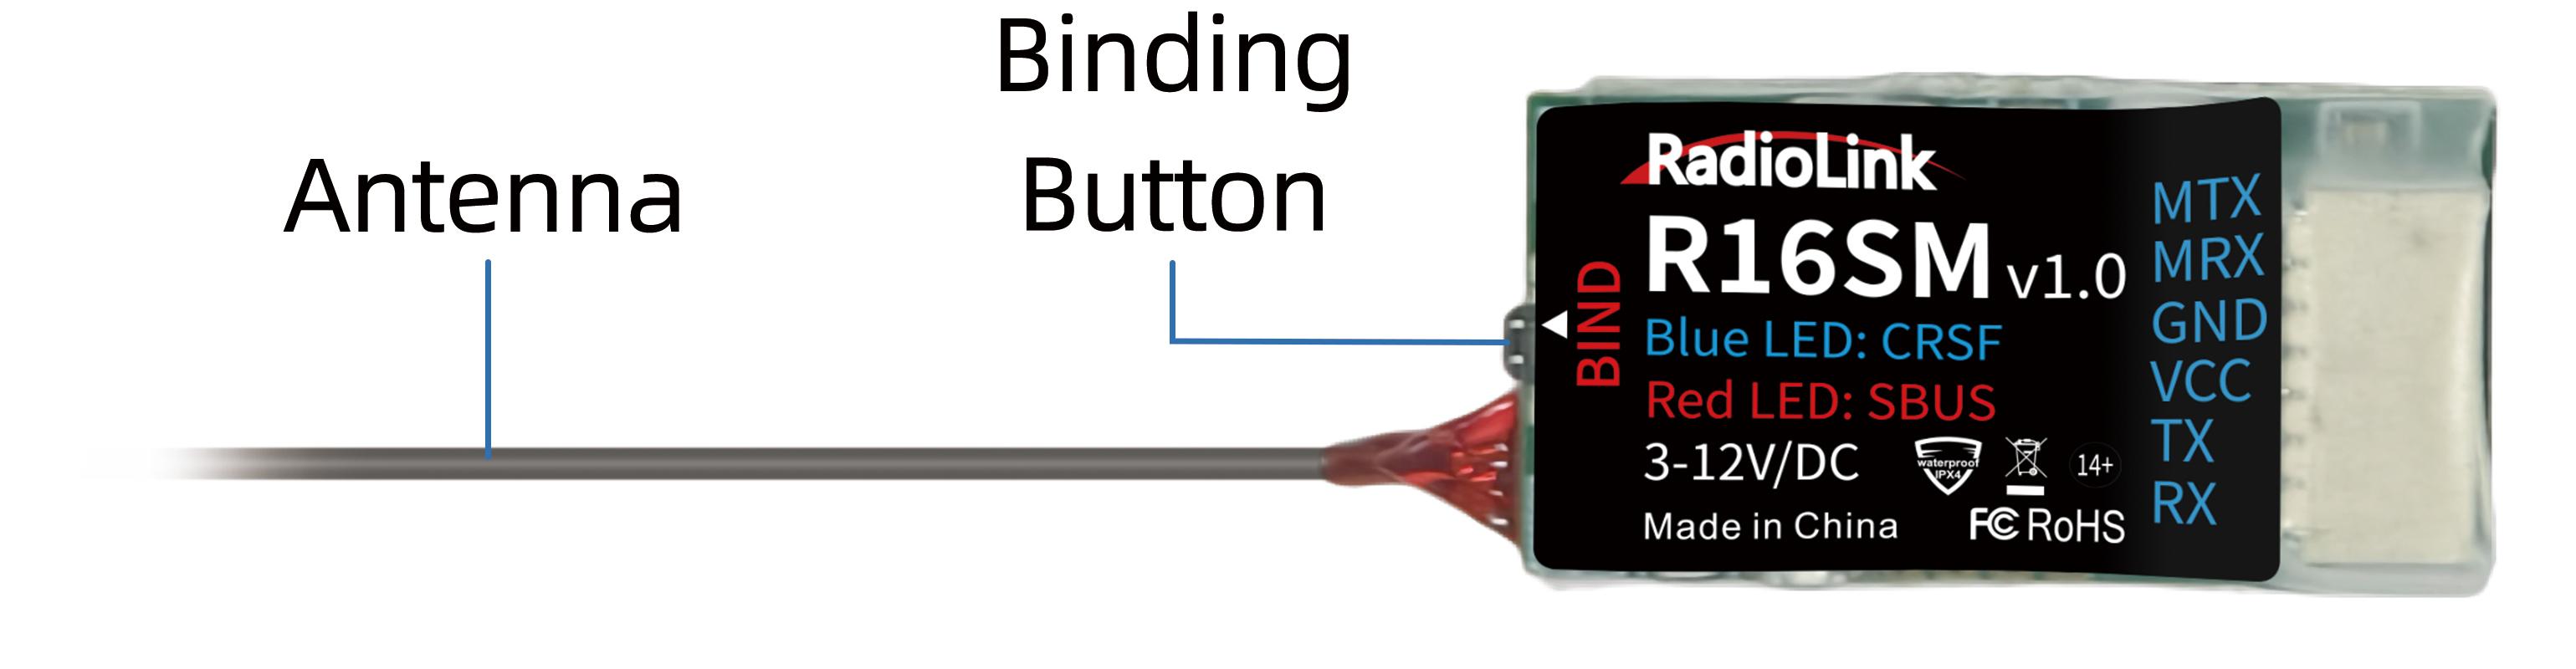
If it is the RTF version purchased, there is no need to bind because the binding between the transmitter and R16SM receiver is complete by factory default.However, if you want to change the transmitter or receiver, binding between the transmitter and receiver needs to done first.
Here are the binding steps for RadioLink transmitter and receiver:
① Place the transmitter and receiver(installed on LD-B20) close to each other within 50 centimeters.
② Power on the transmitter and the receiver.
③ There is a black binding button on the side of the receiver. Press it for more than 1 second. When the LED starts flashing, meaning binding process has started.
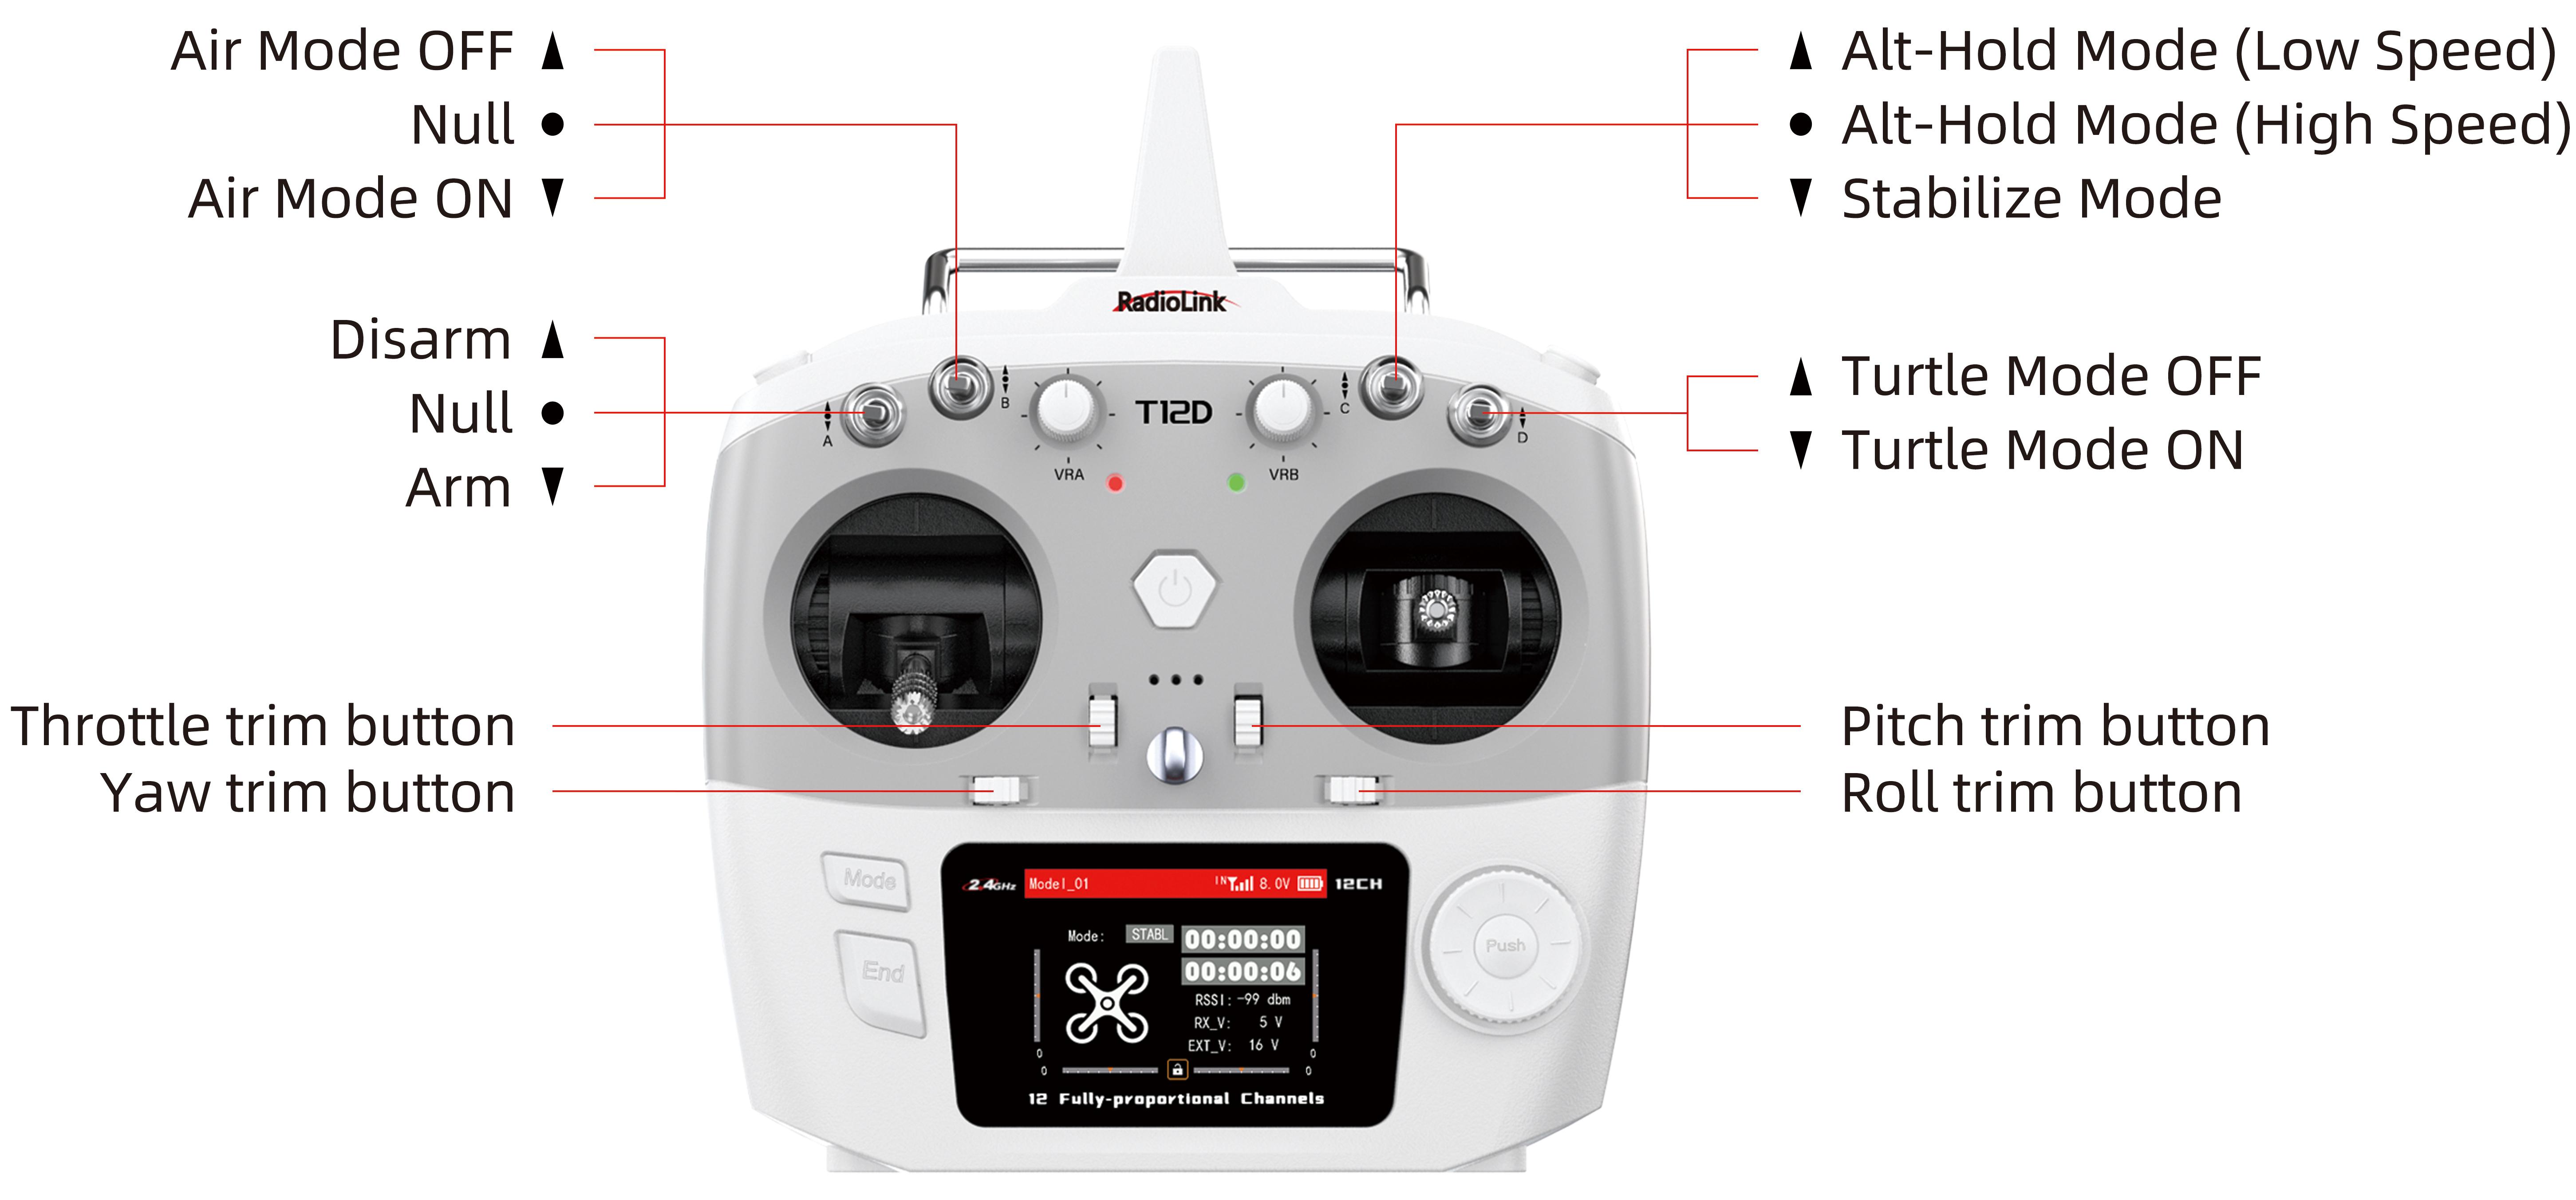
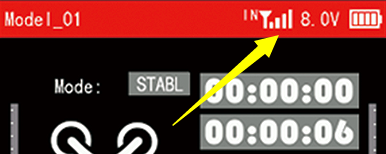
④ The binding is complete when the LED is always on. And there will be a signal tower on the screen of T12D (As shown on the right).
For transmitter and receiver from other brands, please refer to its detailed manual for binding steps.
Note: Please always make sure the LED of R16SM is blue, meaning CRSFprotocol. If the LED is red (SBUS working mode), please press the binding button once to change it to blue.
Level Calibration
Level calibration has been donebu factory default. You can flyit directly without calibration. If you dismantle the drone and then reinstall it, you need to calibrate level. The installation direction of the flight controller must be the same as the factory installation direction, otherwise it will be out of control after arming. The drone must be powered off during level calibration. Here are the steps of level calibration:
Connects the flight controller to Mission Planner via the TYPE_C data cable (The baud rate is 115200). Ensure that the receiver is bound to the transmitter successfully, and then power on the transmitter.
Open Mission Planner (LD-B20 supports RadioLink Mission Planner, ArduPilot Mission Planner and QGC Mission Planner). Select the baud rate and port, and click "Connect" to connect to the flight controller.
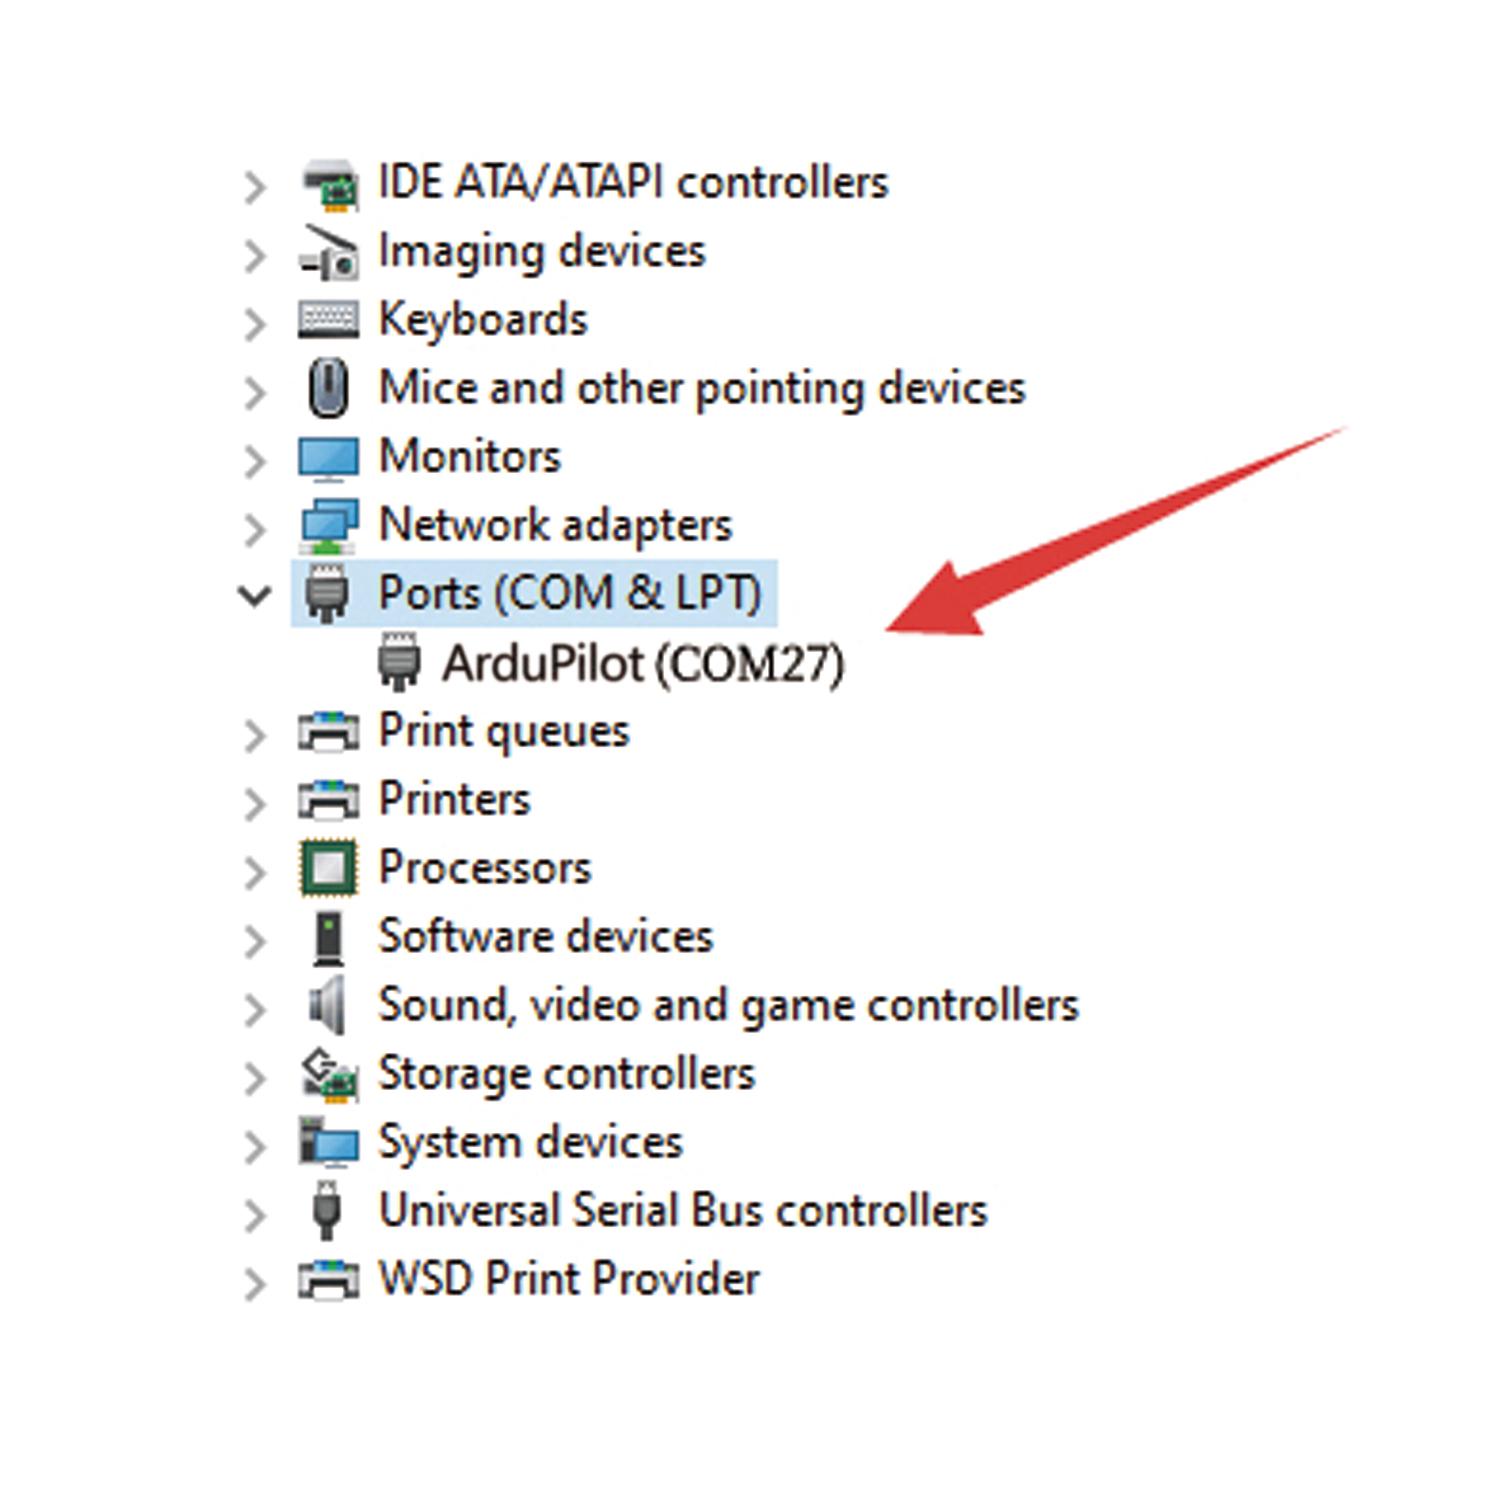
Note: Ports varies from different computers. Please select the correct port to connect. Connection may fail with several ports in use. Please remove the other connections, or enter Device Manager to view the port of the flight controller of LD-B20, just as below:
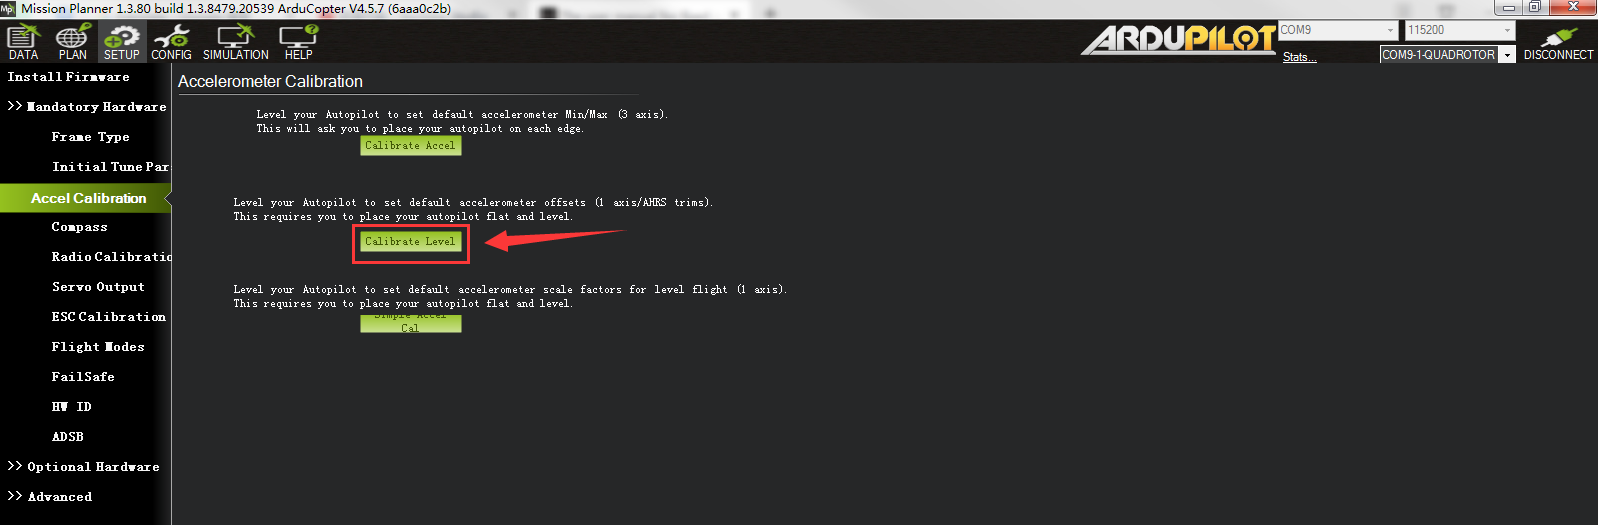
Click Setup-- Mandatory Hardware-- Accel Calibration. Put LD-B20 on a level surface. Then click Calibrate Level to start the calibration, and wait for about two seconds until the word "Complete" appears, indicating that the level calibration is complete.
The Receiver Connection for LD-B20 PNP
For LD-B20 PNP version, uses need to prepare the transmitter and receiver. The receiver needs to connect to the flight controller. Here is the socket introduction of the flight controller of LD-B20:
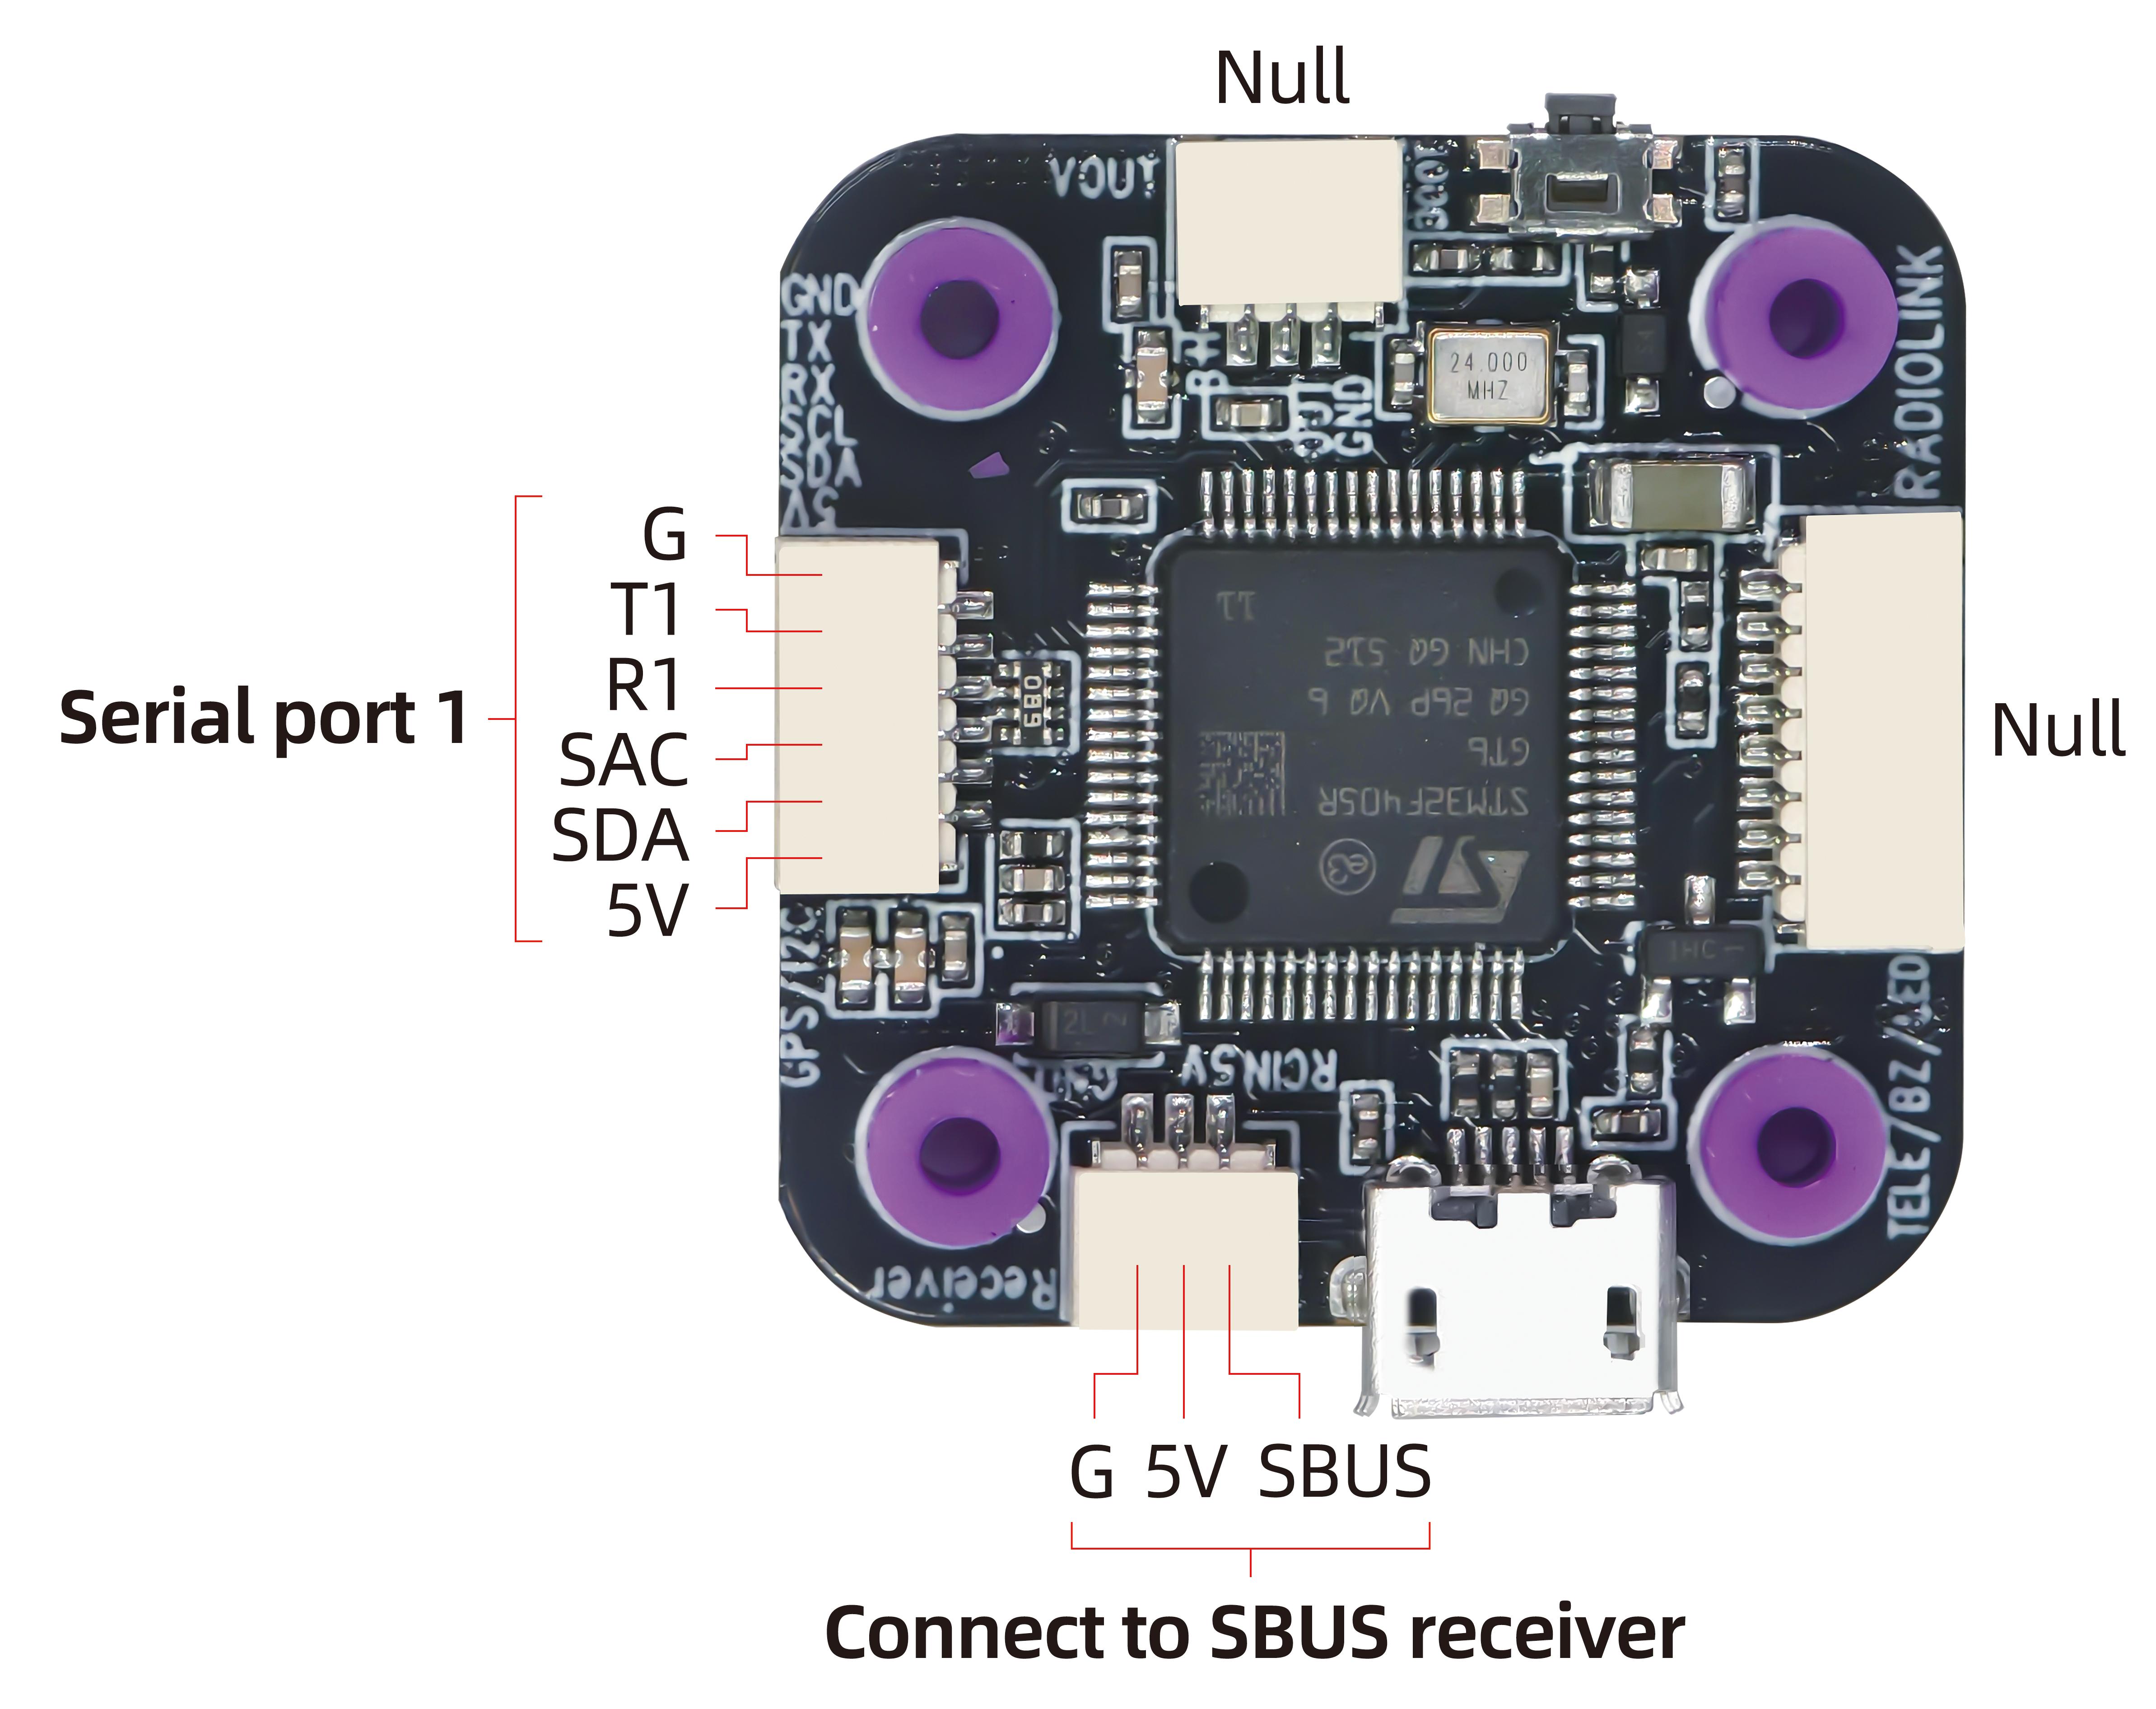
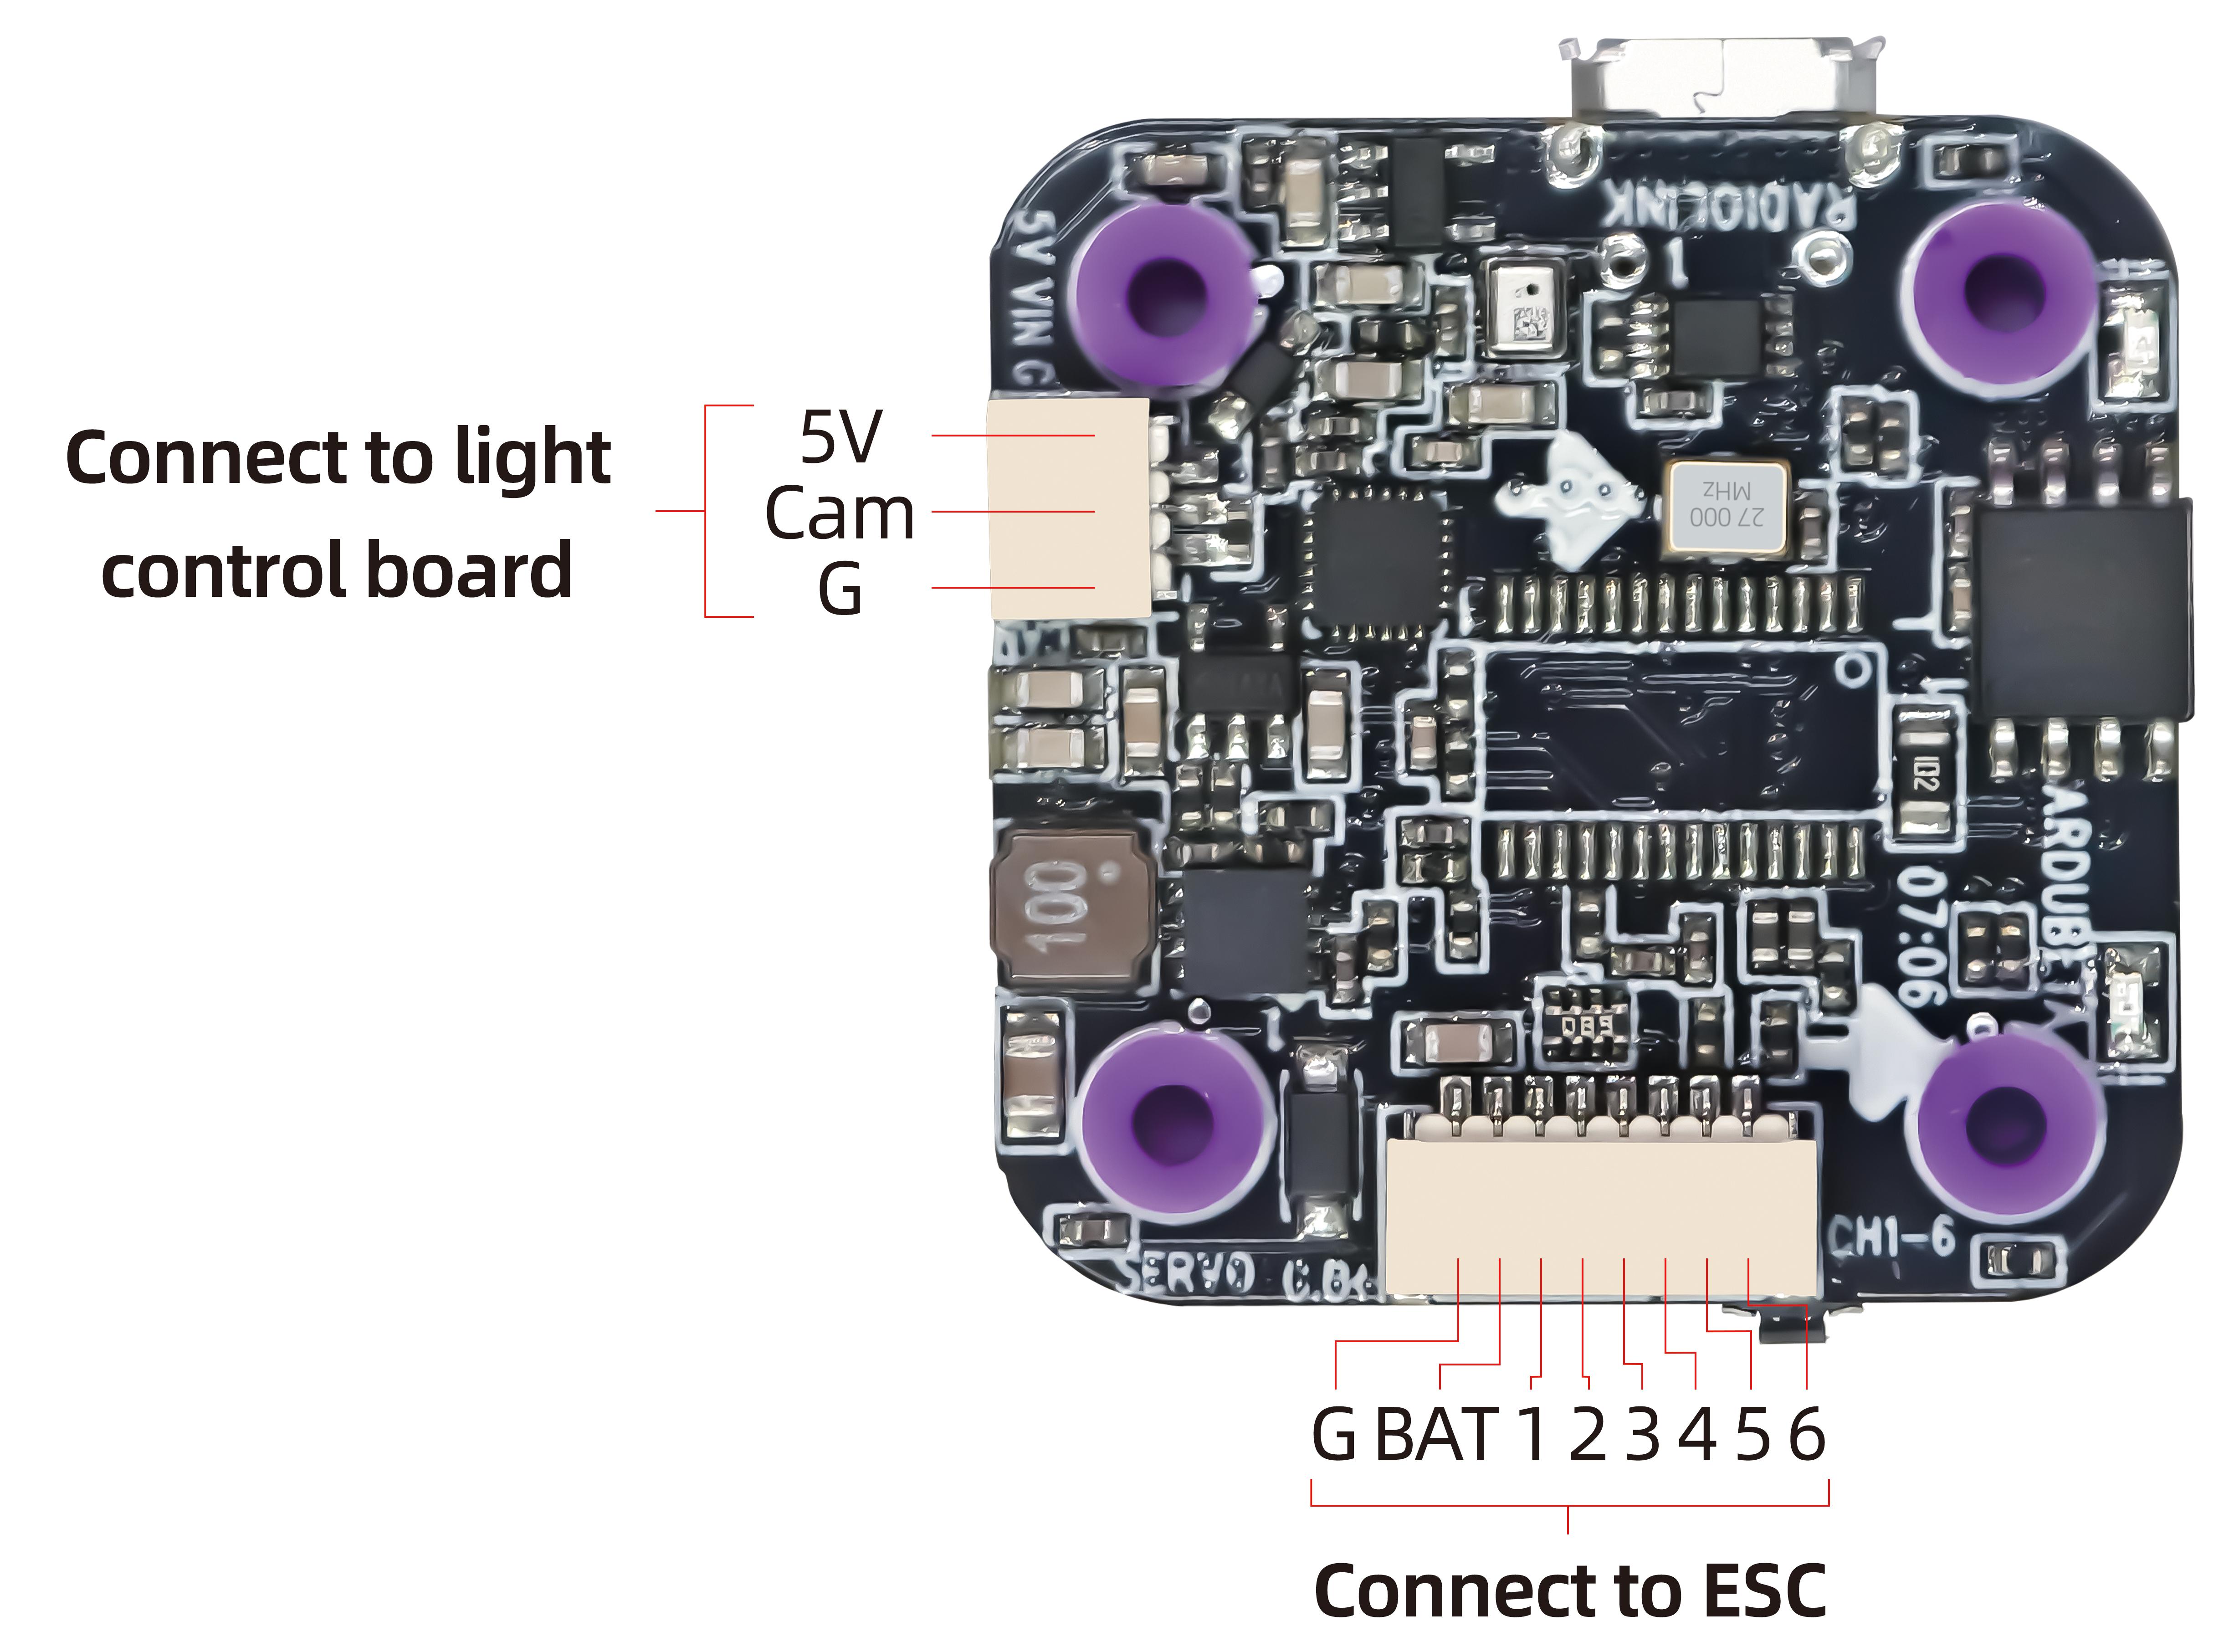
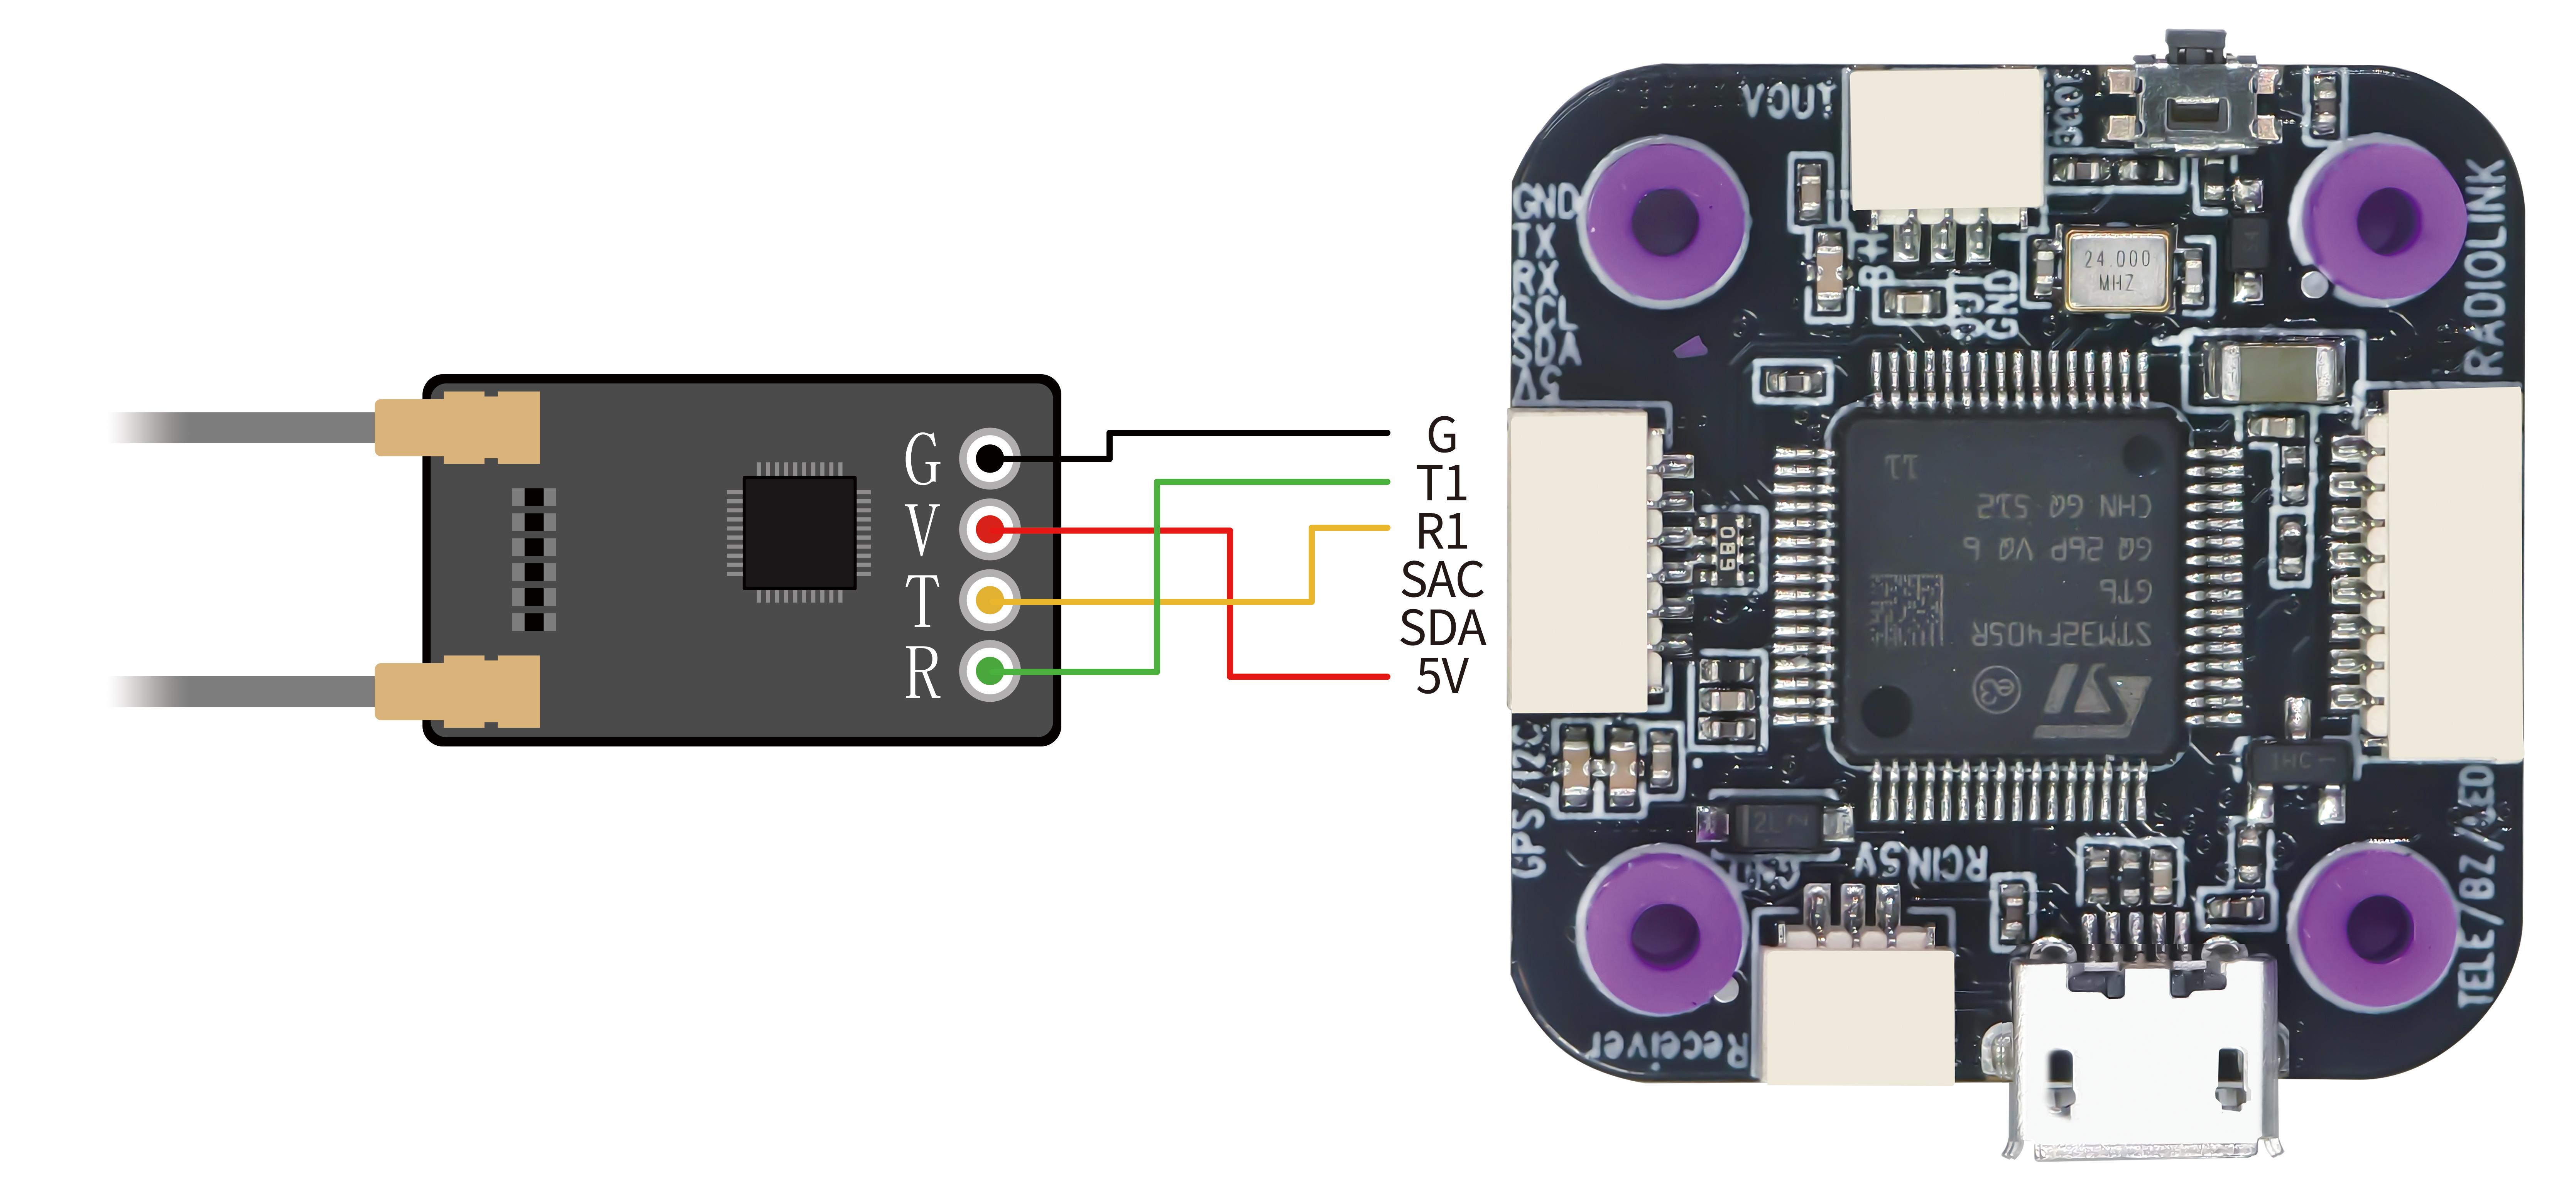
If ELRS receiver is used with LD-B20, please connect ELRS receiver to the flight controller by using the ELRS receiver connect cable that comes with LD-B20 PNP version. Connect the 6-pin connector to the flight controller, solder the other end of the four cables to ELRS receiver by following the below connection diagram:
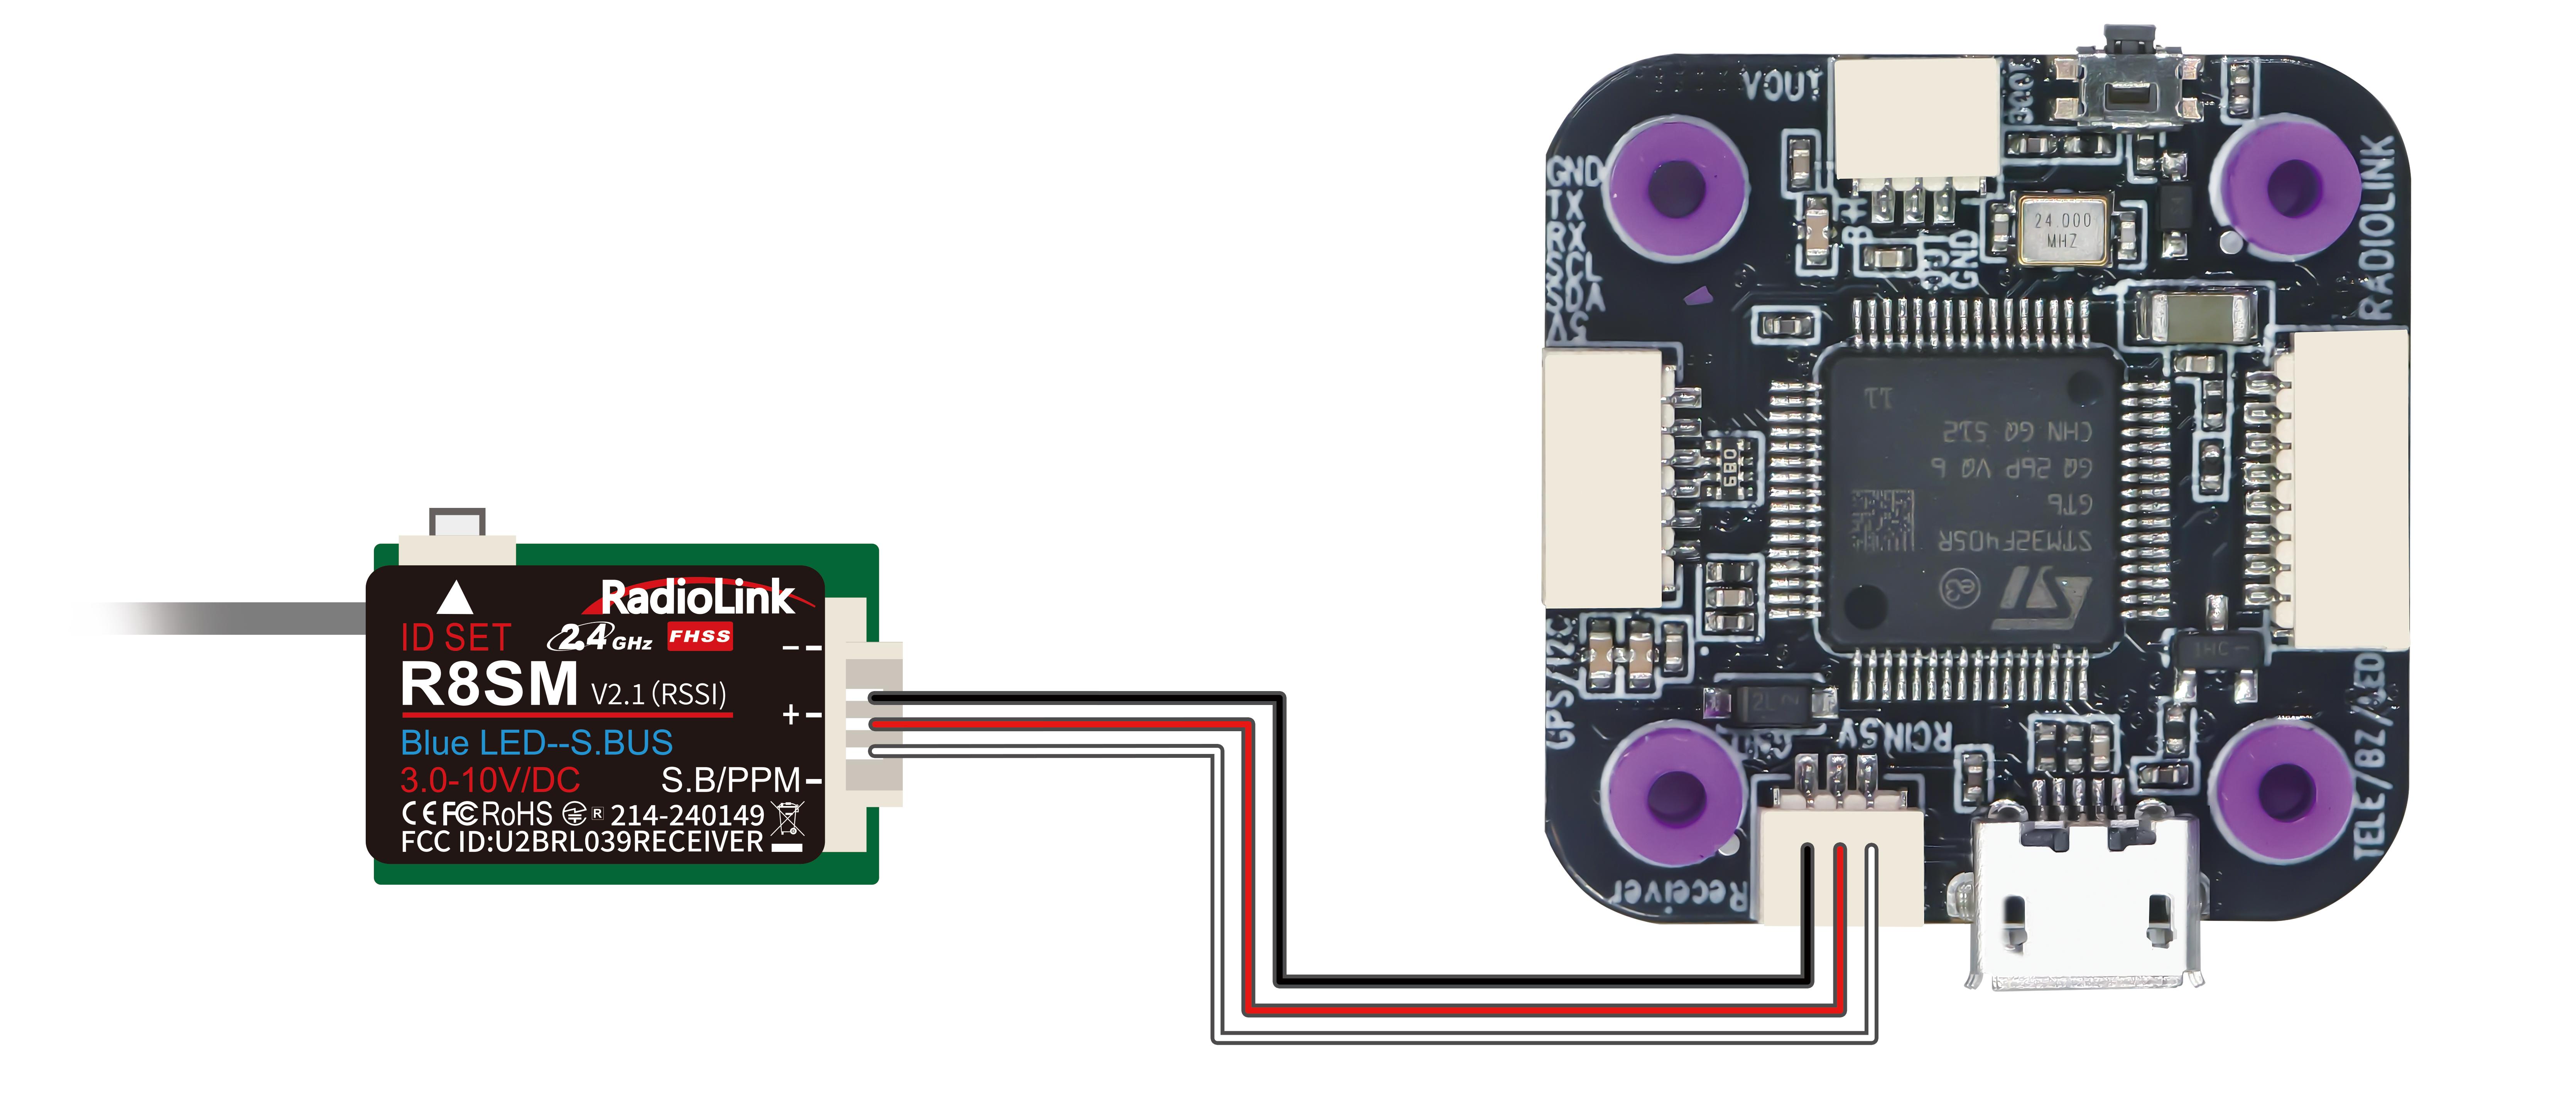
If SBUS receiver is used with LD-B20, please connect SBUS receiver to the SBUS receiver connect port of the flight controller (As shown below. RadioLink R8SM receiver is used as an example). Since the factory configured receiver serial port is serial port 1 (for ELRS receiver), you need to modify the settings when using the SBUS receiver, otherwise there will be conflict between the SBUS serial port and the ELRS receiver serial port, resulting in the failure of the communication between the transmitter and receiver.
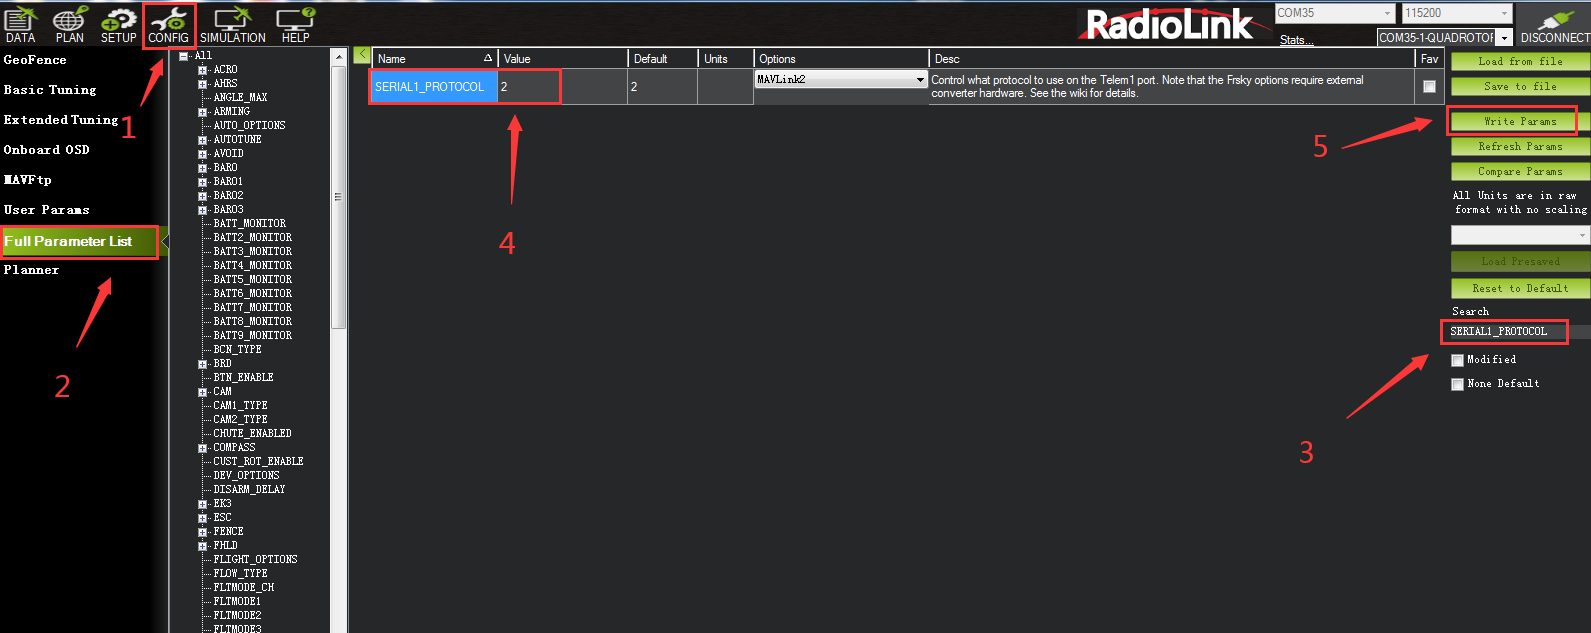
Please connect the flight controller to Mission Planner. Click CONFIG--Full Parameter List. Search for SERIAL1_PROTOCOL, and change the value from 23 to 2, and then click Write Params. The steps are shown below:
(In addition, when using an SBUS receiver, you also need to reverse channel 2 on the transmitter. For details, please refer to the manual of your transmitter.)
Firmware Update
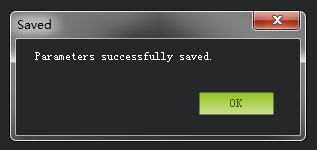
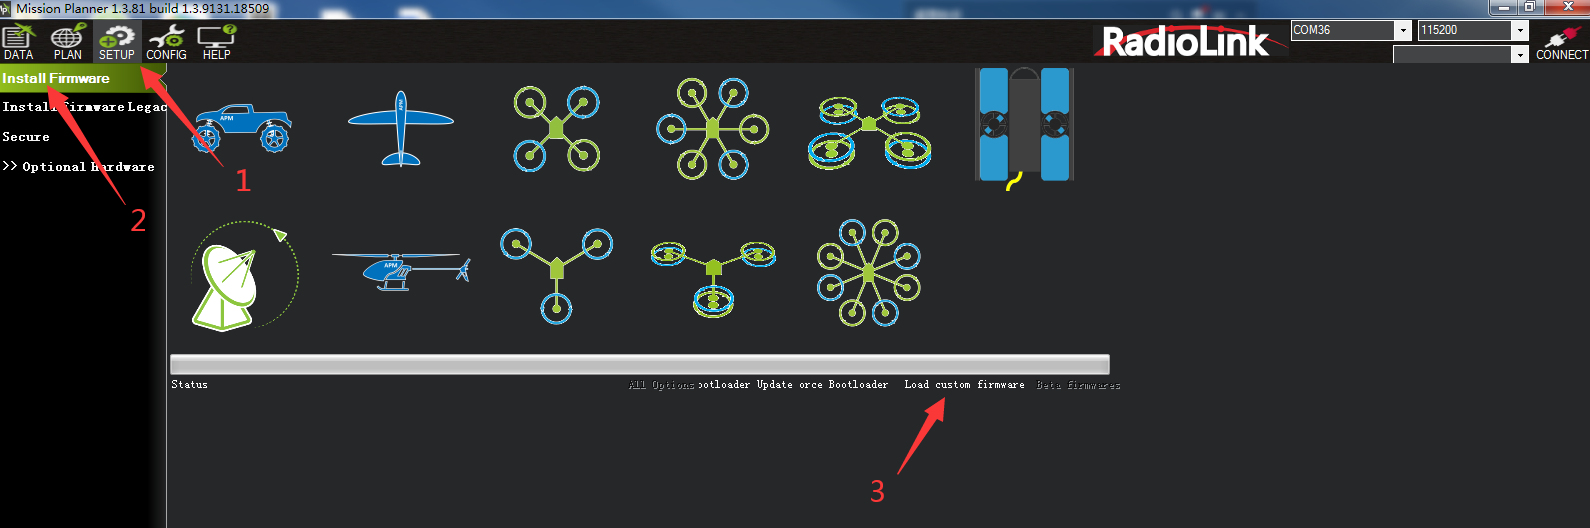
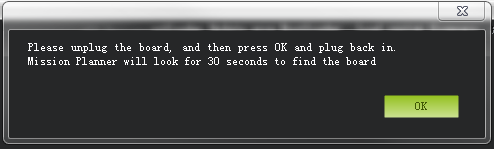
Connects the flight controller to Mission Planner via the TYPE_C data cable. Select the COM port. Click SETUP--Install Firmware--Load custom firmware. Please select the apj firmware. After there is a prompt below, unplug the flight controller, click OK, and then plug back in. Then wait for the firmware update. The steps are shown below.
Troubleshooting
Problems | Solutions |
Unable to arm the drone. | The battery voltage is low. Please charge the battery and try again. |
The aircraft rolls after taking off. | The propellers may be installed in wrong direction. Please adjust them and try again. |
There is an abnormal sound after the aircraft is armed. | Arm the drone and turn the propeller by hand to check whether there are any objects or parts interfering with the propeller. Remove the objects. |
The aircraft shakes after it is armed. | Check whether the propeller is intact. If not, please replace the propeller. |
The aircraft sways after takeoff. | Connect the flight controller to Mission Planner and operate level calibration. |
After taking off, the aircraft deflects in one direction. | Turn the trim button to set the trim value to 0. For more details, please refer to the manual of the transmitter. |
Charger
LD-B20is packed with Gensace B6 and RadioLink CM210 charger to charge the battery.
Gensace B6
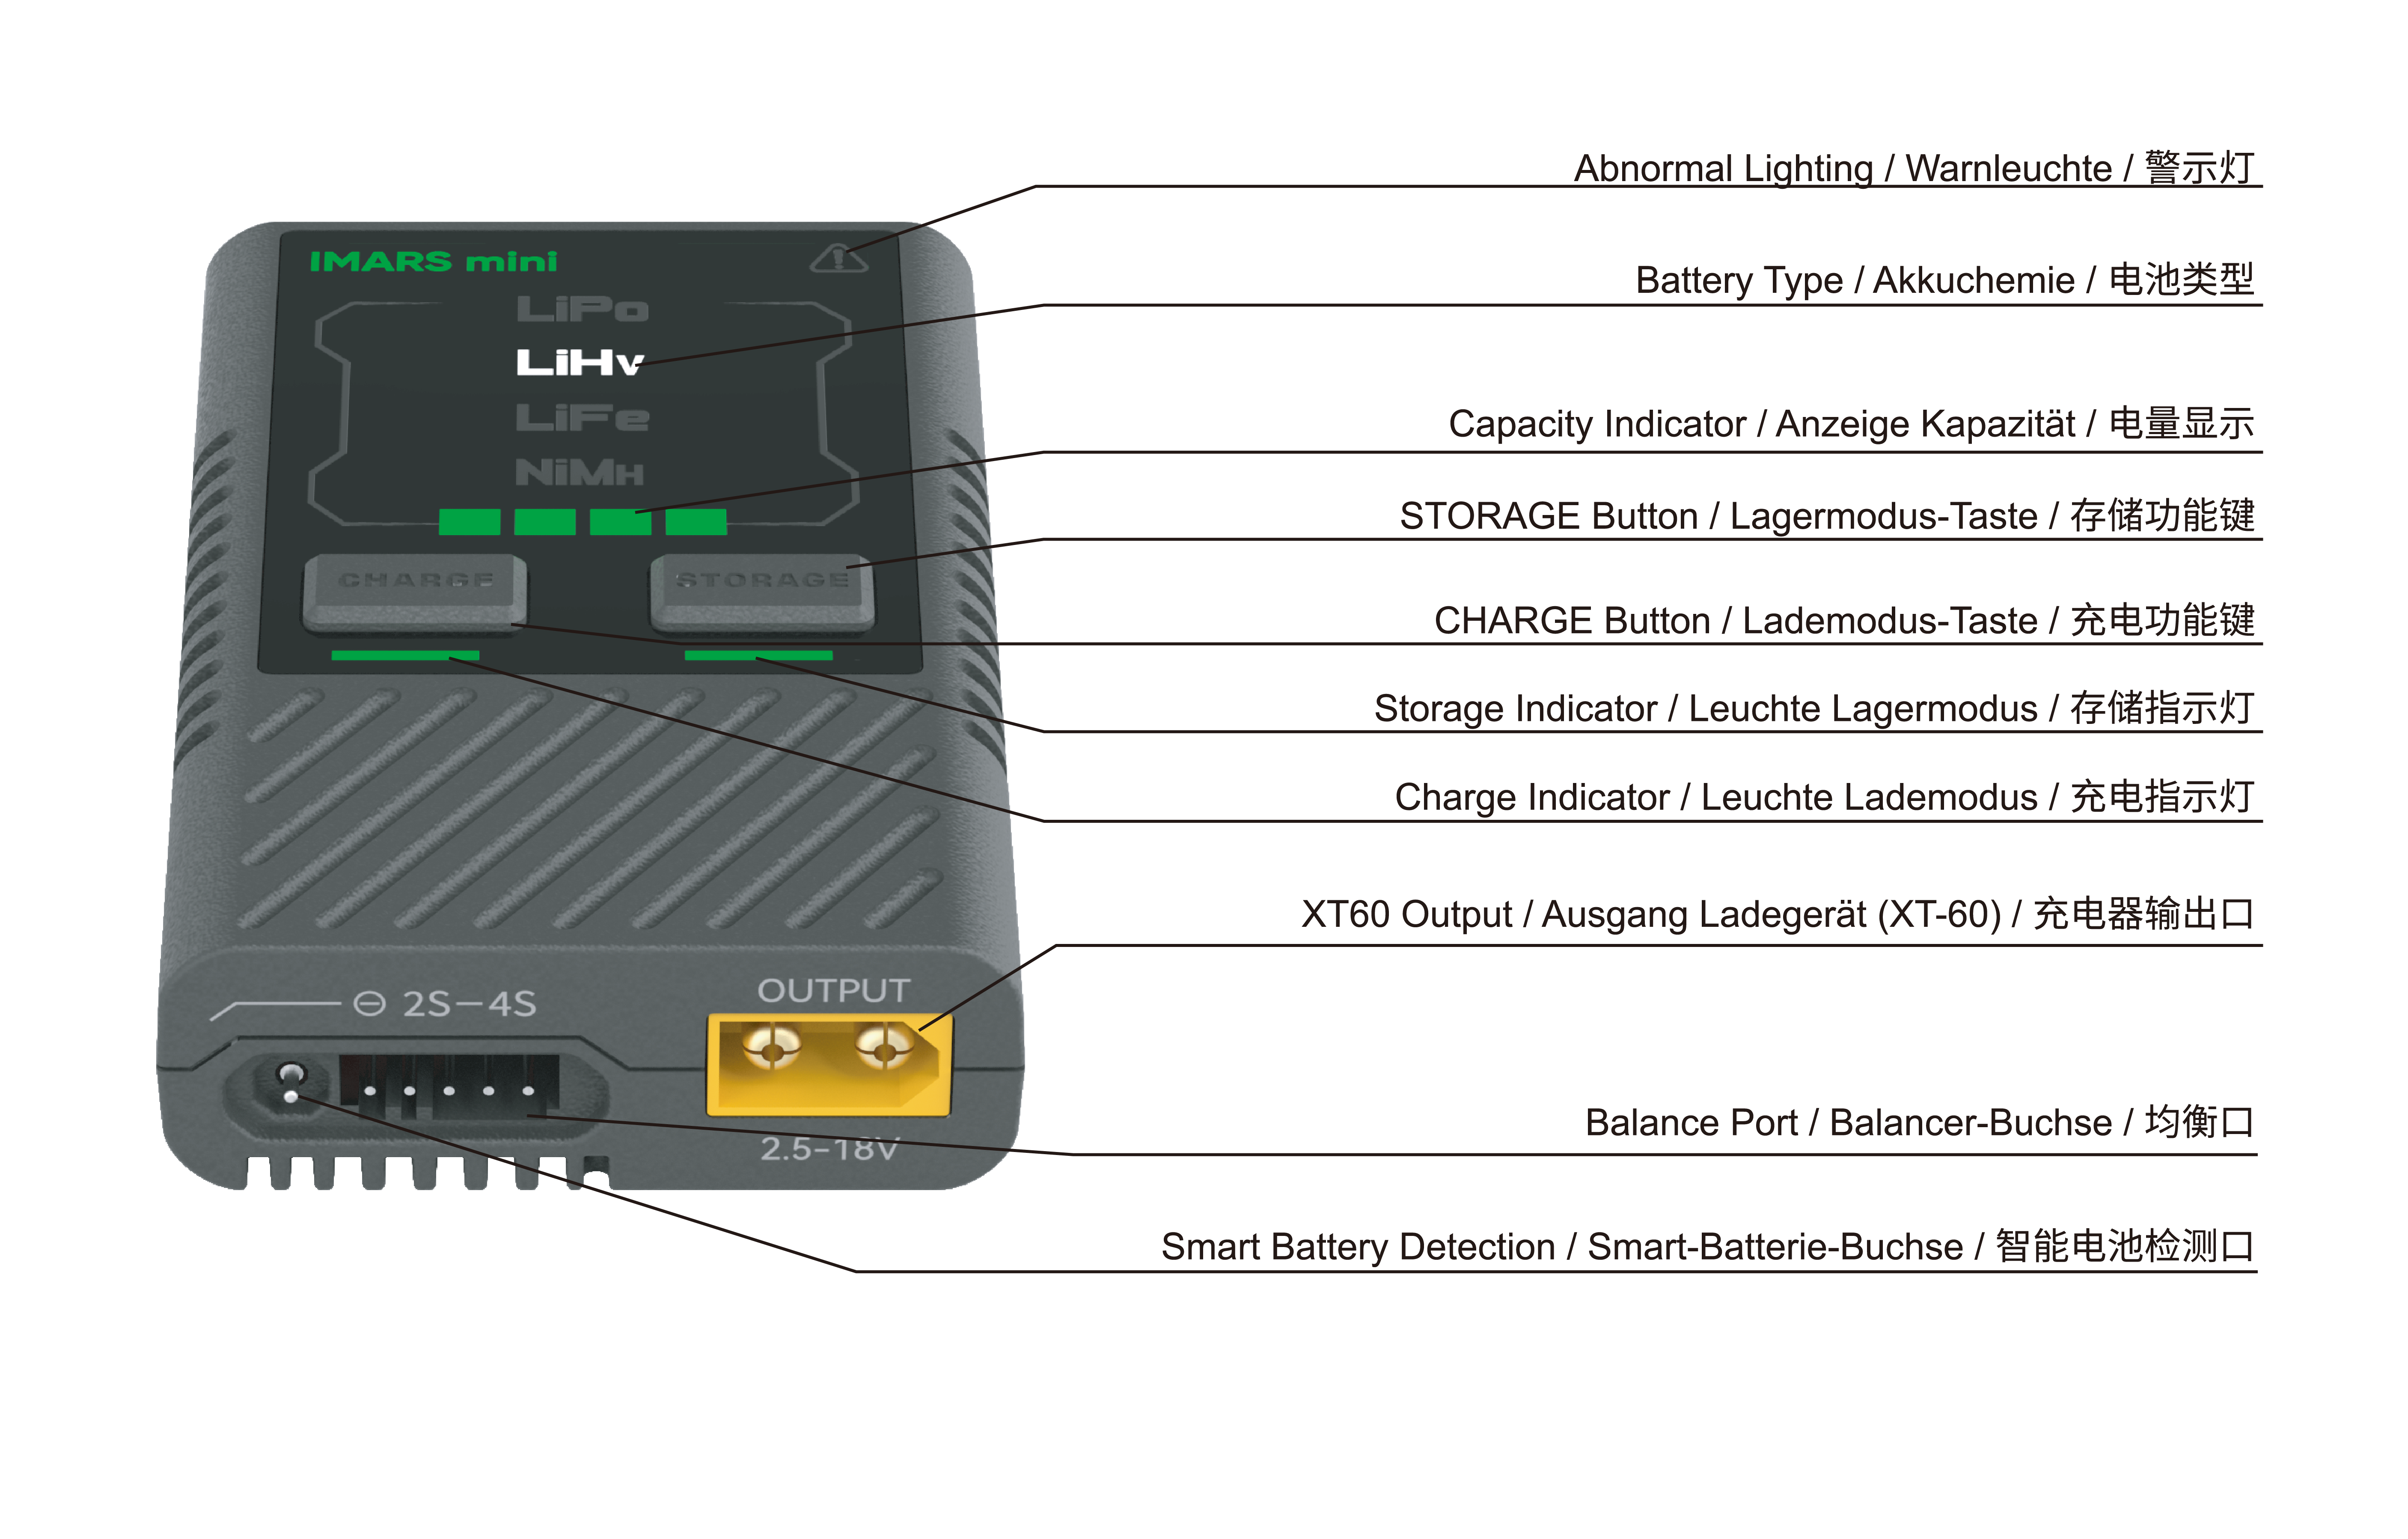
Product Overview:
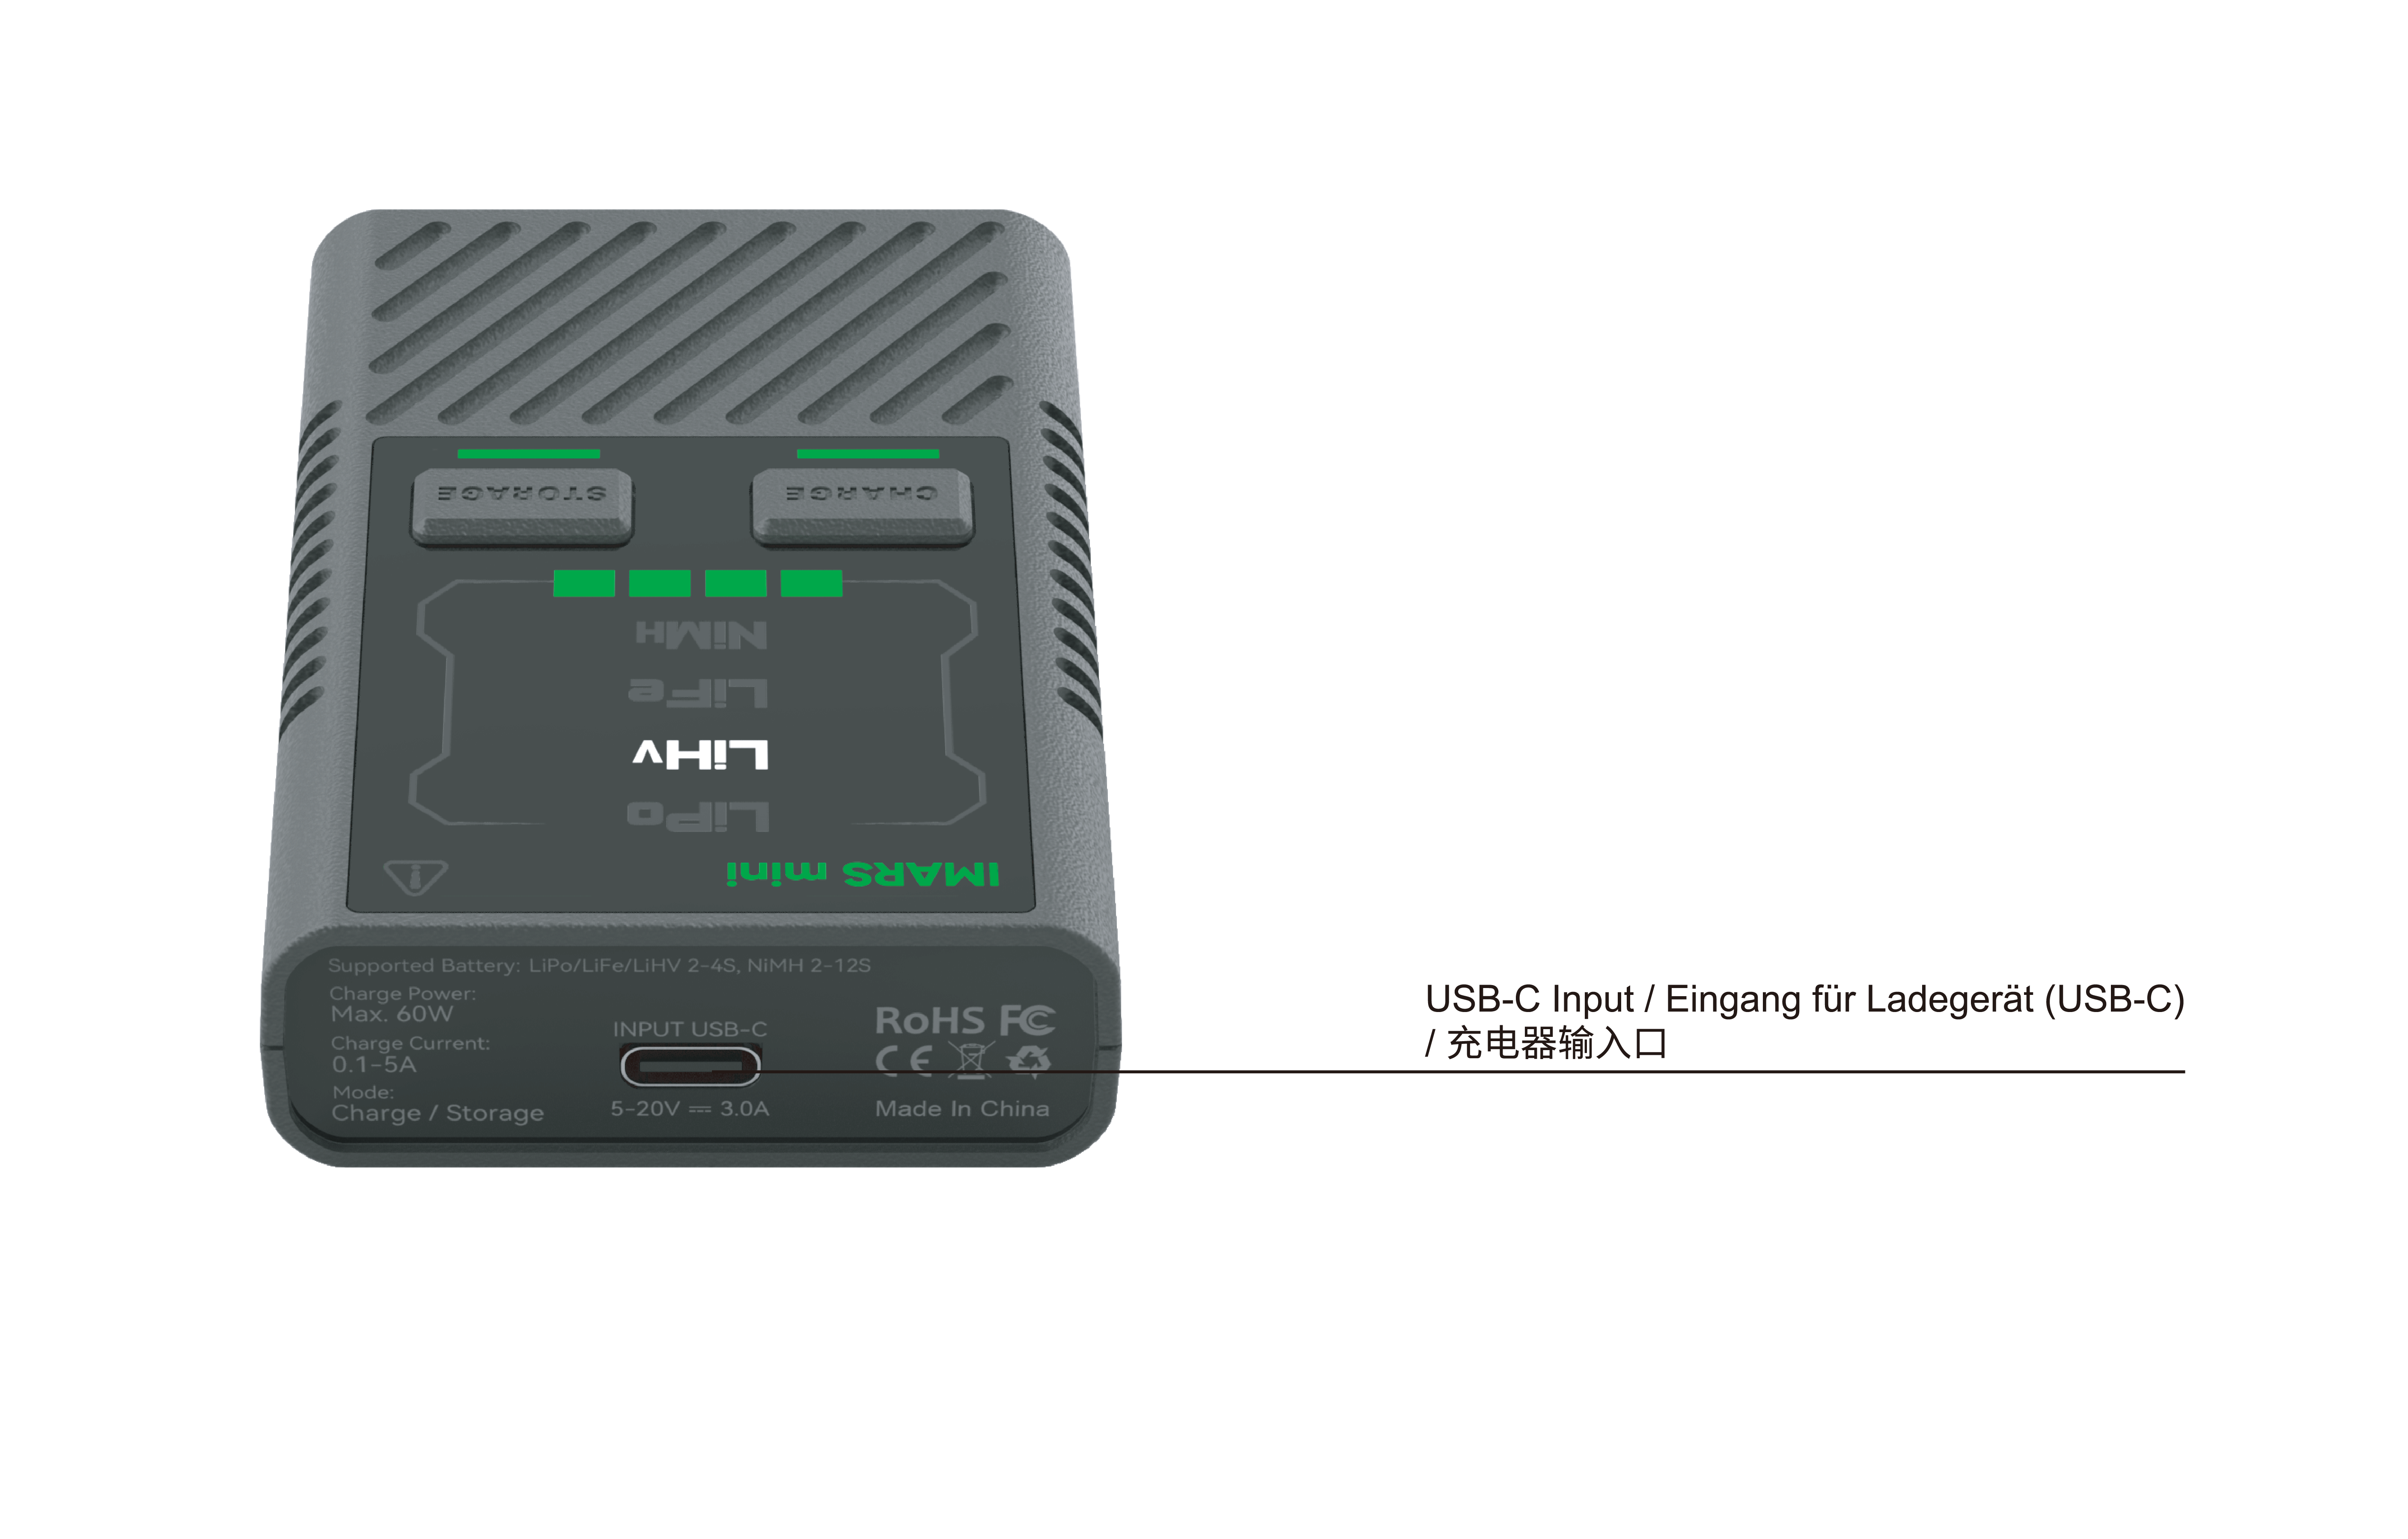
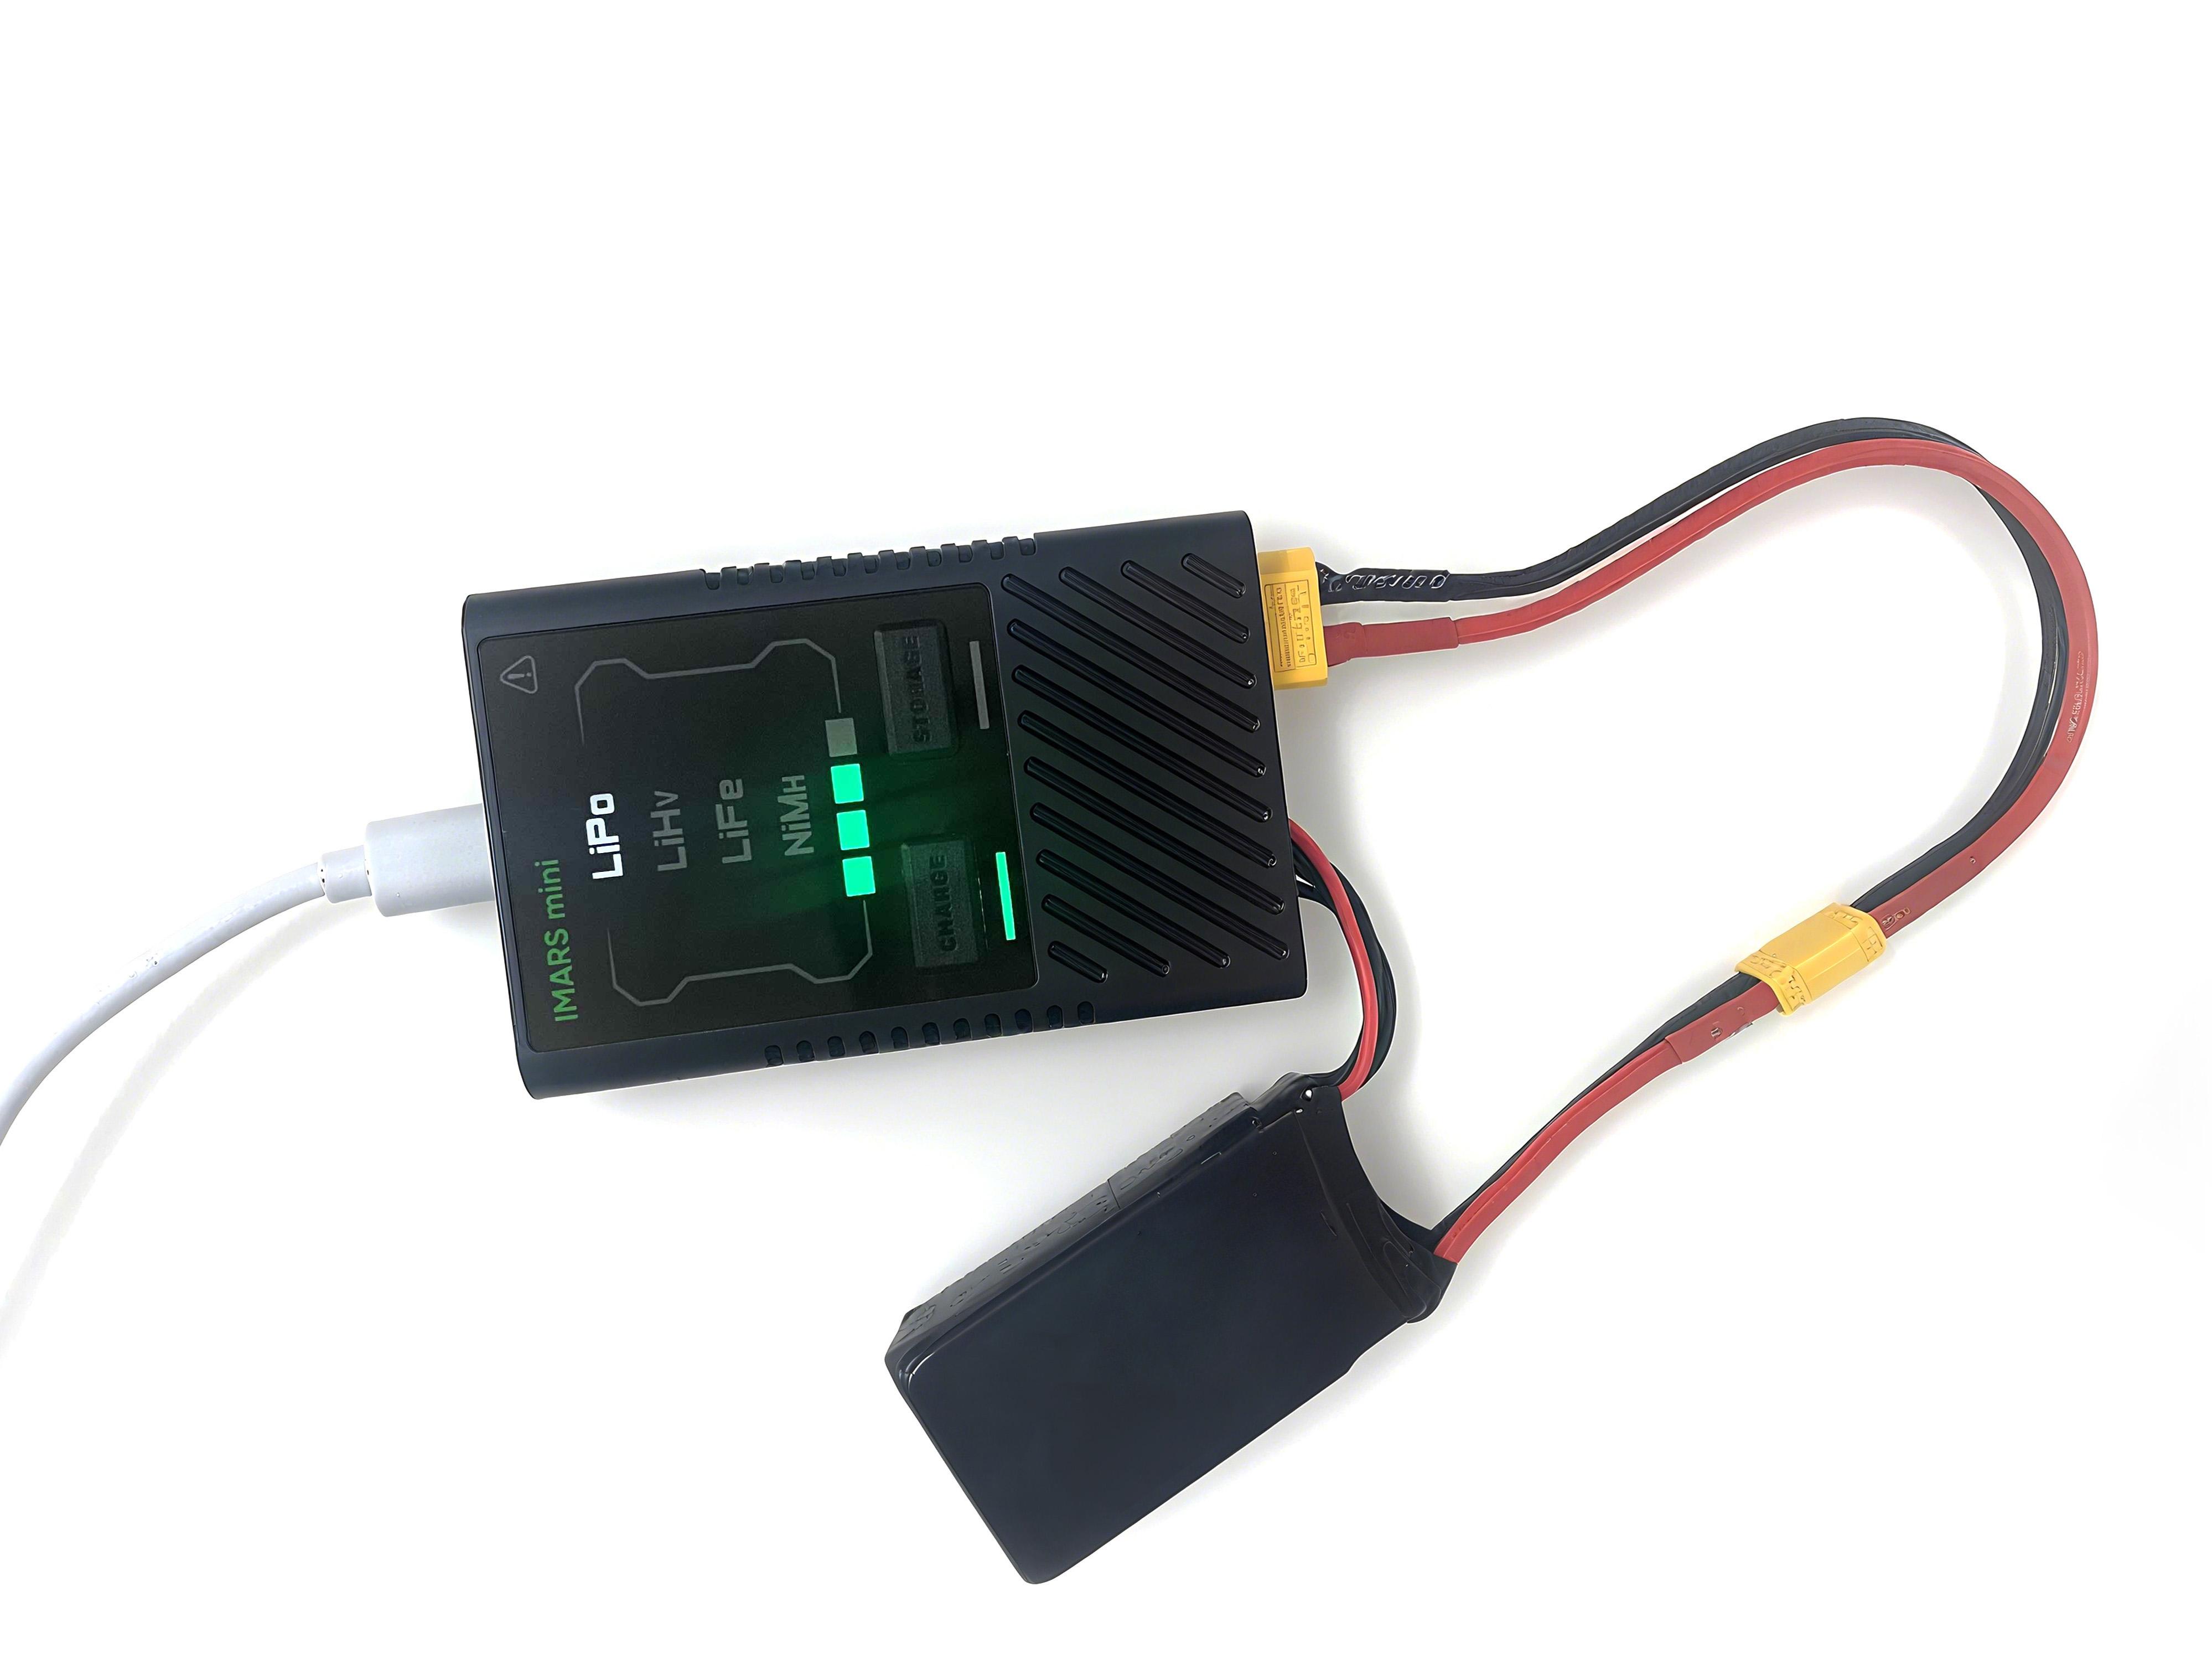
The connection between the B6 charger and the battery:
Specifications:
Max. Charge Power: 60W
Charge Current: 1-5A, Max. 5A (Auto adjustment)
Max. Storage Power: 3W Discharge, 60W Charge
Input Voltage: 5~20V
Output Voltage: DC 2.5~18V
Max. Input Current: DC 3A
Balance Current: 0.4A/Cell×2
Input port: QC/PD/BC1.2/TYPE-C V1.4/SDP/CDP/DCP/Apple 5V/2.4A
(does not support 5V/1A adapter input)
Abnormal battery voltage alarm: Yes
Output reverse connection protection and alarm: Yes
Balance port reverse connection protection and alarm: Yes
Supported Battery Types: LiPo/LiHv/LiFe(2~4S), NiMH(2~12S)
Working Temperature: 0~40C
Storage Temperature: -20C~60℃
Dimension:85×55×21mm
Net Weight: Apporx. 64g
Instructions:
When the charger is connected to the power supply, there is a power-on prompt tone, all the LED lights will light up in sequence. The lighting time of each LED light is about 0.5 seconds. LiPo's battery-type light will be on after it. The default battery type after the charger is turned on is LiPo.
In the idle state, short-press the CHARGE or STORAGE button to select the battery type. If a G-Tech Smart Battery is connected, the operation of button pressing will not change the battery type.
When the G-Tech battery is connected, the charger will automatically recognize the battery information and automatically enter the smart charging mode after 5 seconds under the condition that both the discharge connector and the G-Tech balance connector are successfully connected. If you short-press any button within 5 seconds, it will cancel the charging mode. If you still want to enter the charging or storage mode after canceling the smart charging mode, you must press and hold the corresponding function button for 2 seconds.
When connecting a non-smart battery, under the condition that the discharge connector and the balance connector are successfully connected, if you need to enter the charging mode, firstly short press any key to select the battery type, for lithium batteries, then you need to press and hold the CHARGE button for 2 seconds, but for NiMH batteries, you need to simultaneously press and hold the CHARGE and STORAGE buttons for 2 seconds to start the charging mode. After successfully entering the charging mode, the charger will beep, and the charging indicator light will lash at a frequency of 1Hz. The charger does not need to set the charging current. The charger will intelligently adjust the charging current to a suitable charging current according to the battery voltage fluctuation. During the charging process, the battery capacity indicator light will display the current real-time battery status. The charger will beep when the battery is fully charged, and the charging indicator light will remain on.
When connecting a non-smart battery, under the condition that the discharge connector and the balance connector are successfully connected. Suppose you need to enter the storage mode, firstly short press any key to select the battery type, then press and hold the STORAGE button for 2 seconds to start the storage mode. After successfully entering the storage mode, the charger will beep, and the storage indicator light will flash at a frequency of 1Hz. The battery capacity indicator light will show the current real-time battery status during the storage process. When the battery storage is completed, the charger will beep, and the storage indicator light will remain on.
When the charger is in any working mode. Suppose you need to cancel the corresponding working mode. You need to press and hold the CHARGE or STORAGE button for 2 seconds. After the cancellation is successful, the charger will beep, the charger will return to the idle state, and the battery capacity indicator light charging indicator light, and the storage indicator light will turn off.
If any question when using the charger, please feel free to contact Grepow Inc.
Tel: 9253647166
Fax: +1-925-364-7177
Email: info@genstattu.com
290 Lindbergh Ave Livermore,CA94551 United State
CM210 charger
Specifications:
Size: 40.5*21*15 mmWeight: 9g
Input Voltage: 5VSupporting Battery: 2S LiPo battery
Charging Precision: 0.02VCharging Voltage: Max. 4.2V for each battery cell
Charging Current: 1.5ABalance Current: 0.8A
Max. Output Power: 20WPower Supply Input Port: USB Type-C Input
Charging Port Interface: 3P XH2.54 port
Working Modes: Charging Mode, Balance Mode, Repair Mode (Self-adaptive, with no need to set it)
The connection of CM210, battery, cable is as shown below:
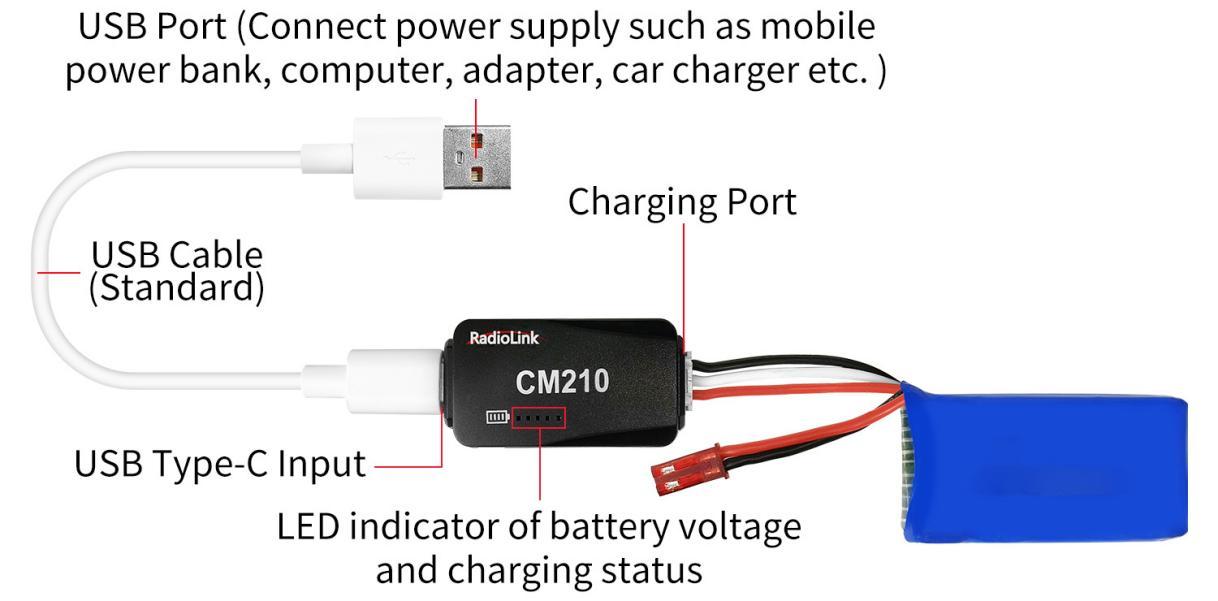
Instructions for using CM210 charger:
Insert one end of the standard USB cable into the Type-C input port of the CM210 charger (as shown in the picture above), and then connect the other end of the USB cable to power supply equipment such as power bank, computer, mobile phone adapter, etc.. After the right connection, the red LED indicator will be always on.
Insert the balance port of the standard 2S lithium battery of D460 into the charging port of CM210 (as shown in the picture above). Then the green LED indicator starts flashing, which means it starts to charge the battery. (Note: The green LED indicator flashes during the charging to indicate normal charging; If the red LED indicator flashes during the chargingto indicate abnormal charging. Please reconnect battery and cable to troubleshoot the abnormality.)
When all four LED indicators turn solid green, the battery is fully charged, and the charger will automatically stop charging.
Remove the battery and then disconnect the power supply.
CM210 LED indicator status:
LED color | Status | Meaning |
Red | Flash | The charger detects abnormality. |
Always on | No battery is connected. | |
Green | All four green LEDs flash once. | The charger is powered on. |
The first green LED flashes, and the other LEDs are off. | The battery voltage is lower than 7.4V. | |
The first green LED is always on, and the second green LED is flashing. The other LEDs are off. | The battery voltage is lower than 7.8V. | |
The front two green LEDs are always on, and the third green LED is flashing. The other LEDs are off. | The battery voltage is lower than 8.2V. | |
The front three green LEDs are always on, and the fourth green LED is flashing. The other LED is off. | The battery voltage is lower than 8.4V. | |
All four green LEDs are always on. | The battery is fully charged. |
Troubleshooting for CM210 charger:
1. After the charger is powered on, the red light flashes just after inserting the battery or within one minute.
The current detection resistor is burned out, and the MCU detects that the current is too large.
The switch tube is damaged, so it is unable to switch normally. There is no current output, or the output current of the power supply is too small.
2. After the charger is powered on, insert the battery and charging works normally for a period of time, and then the red light flashes.
The output current of the power supply is too small, or the battery is damaged.
Solution: Replace the power supply or battery to charge it again, if the abnormal phenomenon still occurs, the charger is damaged.